Installing the dk roll, 3 installing the dk roll – Brother QL-650TD User Manual
Page 23
23
STEP
1
STEP
2
STEP
3
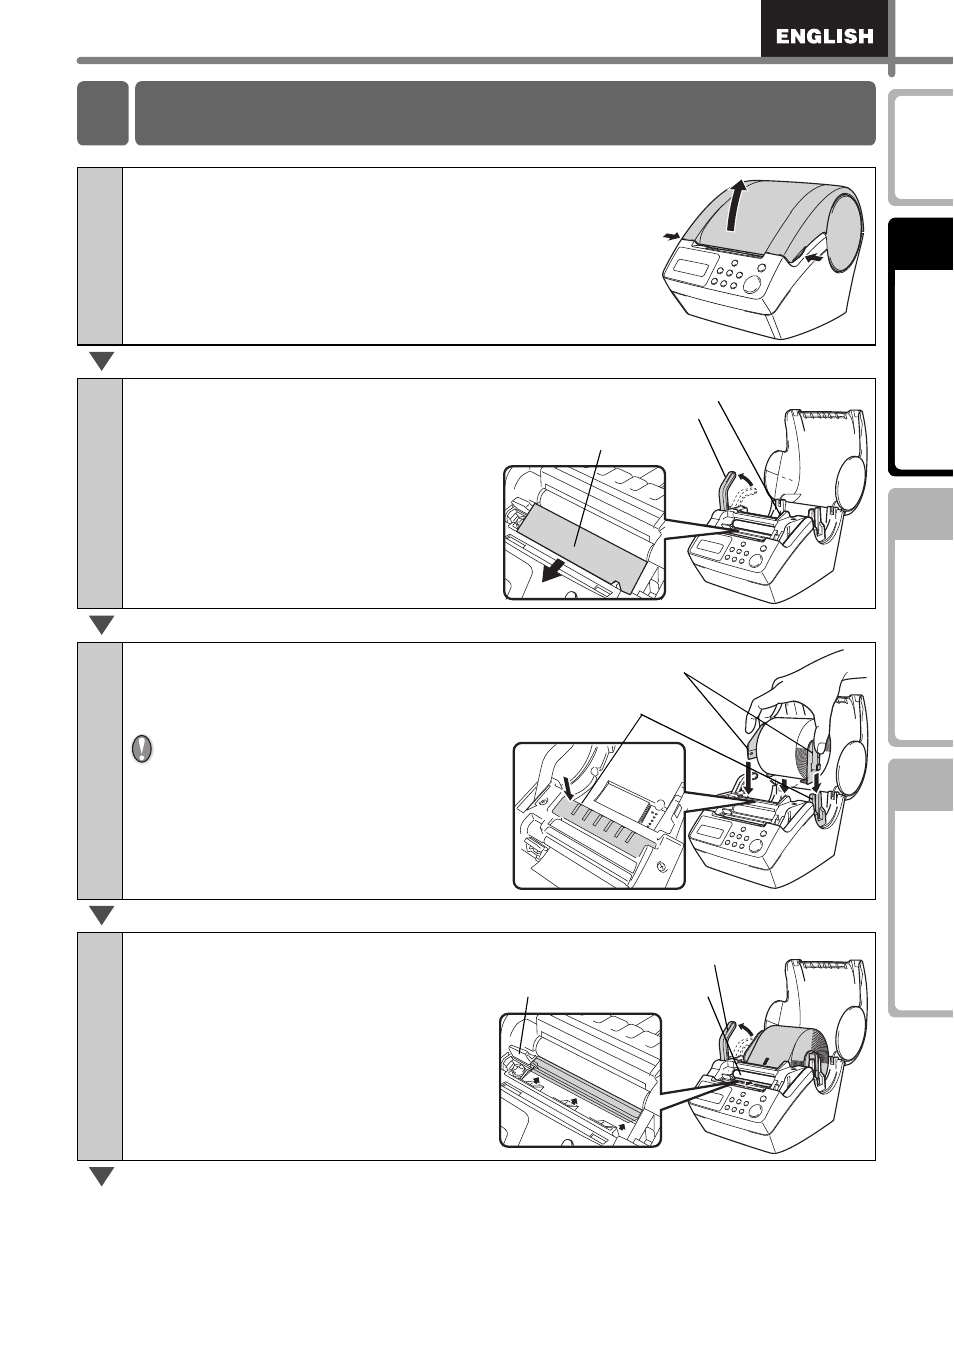
1
Check that the power is turned OFF (check
LCD and LED lamp).
Lift up the DK Roll cover by the tabs at the
sides of the cover.
2
Pull up the roll release lever and
remove the protective sheet of
printing unit.
Then, remove the protective
battery sheet.
3
Insert the spool of the DK Roll
along the spool guide of the
printer.
Check the both sides of spool of DK
Roll are correctly inserted into
spool guide of the printer.
4
Check that the roll release lever
is in the up position.
Insert the edge of DK Roll into
the slot until it is just in front of
the cutter.
3 Installing the DK Roll
Roll release lever
Printing unit protective sheet
Protective battery sheet
Spool
Spool guide
Roll release lever
Printing unit
Cutter
See also other documents in the category Brother Tools:
- REPLACING POWER SUPPLY BOARD BES-1216 (3 pages)
- P-TOUCH PT-65 (4 pages)
- P-TOUCH PT-7100 (1 page)
- QL-500 (2 pages)
- P-TOUCH PT-80 (1 page)
- P-TOUCH PT-1880 (1 page)
- 2430PC (4 pages)
- P-TOUCH PRO DX PT-9200DX (80 pages)
- P-touch PT-1290 (2 pages)
- P-TOUCH 1830 (1 page)
- PT-1230PC (2 pages)
- DIE-KUT DK1240 (1 page)
- LX-900 (50 pages)
- P-touch LN7629001 (2 pages)
- P-touch LN7808001 (2 pages)
- P-TOUCH QL-500A (4 pages)
- LN9953001 (1 page)
- QL-500 (65 pages)
- QL-500 (48 pages)
- QL-650TD (4 pages)
- P-Touch LA3776001 (2 pages)
- Label Printer QL-700 (8 pages)
- P-TOUCH PT-1700 (82 pages)
- LN7424001 (2 pages)
- QL-1050 (41 pages)
- QL-1050 (2 pages)
- QL-1050 (2 pages)
- QL-1050 (4 pages)
- QL-1050 (2 pages)
- P-TOUCH PT-97OOPC (118 pages)
- P-TOUCH PT-1500PC (55 pages)
- PT-2730 (88 pages)
- PT-2730 (1 page)
- P-TOUCH PT-1600 (2 pages)
- QL-710W (23 pages)
- QL-710W (93 pages)
- QL-710W (23 pages)
- QL-710W (48 pages)
- P-TOUCH LN6645001 (1 page)
- P-touch PT-55 (2 pages)
- PT-2430PC (2 pages)
- PT-2430PC (32 pages)
- PT-2430PC (1 page)
- QL-570 (100 pages)