Dwyer ULTM User Manual
Page 7
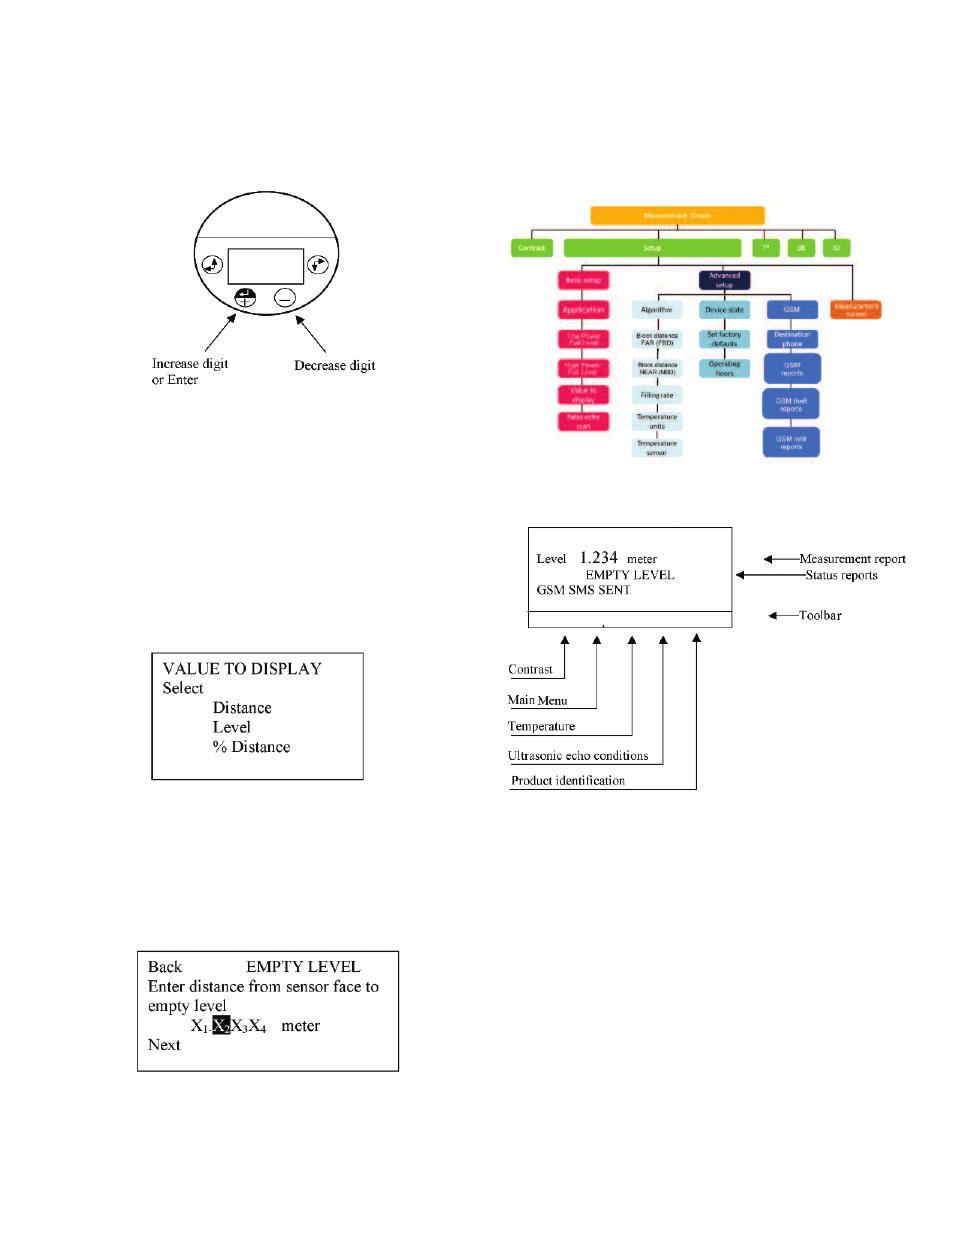
1.2 Execution Keys
Use the execution keys to change a digit or to execute a command (Back, Next or
Sub-menu).
To change a digit: navigate to the digit and press the plus (+) key or the minus (-)
key.
To execute a command: navigate to the command and press the enter (+) key.
Remember–some changes are saved only after returning to the measurement
screen. If you shut down Series ULTM before you return to the measurement
screen, your changes may be lost.
2. Navigation Through Menus
Series ULTM supports two menu styles that are used throughout the setup
operations and are described below. False echo scan employs a third menu style
and is described in the relevant section below.
2.1 Sub-Menu Style
The Sub-Menu style presents a list of vertical choices. An arrow may appear on the
right hand side of the screen if additional items can be reached when scrolling
down. The scrolling is cyclic, meaning that when you reach the last (first) item, the
next step will lead you to the first (last) item. Scroll up or down, using the navigation
keys, to your selected choice and press Enter (+). This action will lead you to the
next sub-menu.
The last item in the list of choices is **back**. Select **back** to return to the
previous menu. The previous menu will be displayed such that your last selection
will appear first on the menu. For example:
2.2 Numeric Menu Style
The numeric menu style presents you with a multi-digit number which may be
modified. Navigate to each digit and modify the digit as required by using the plus
(+) or minus (-) keys.
When you are done with all digits, select Next to move on. Select Back to ignore
the changes and return to the previous sub-menu. Modifications will become
permanent (survive a reset) when you navigate back to the measurement screen.
For example:
By repeatedly pressing the Right-Down navigation key, you will follow this route:
X1 → X2 → X3 → X4 → Next → Back → X1→ X2 →…
Conversely, by repeatedly pressing the Left-Up navigation key, you will follow the
opposite route.
After pressing Next, ULTM will check the validity of your numerical entry. If your
entry is outside the acceptable boundaries, an ILLEGAL VALUE screen will be
presented. You need to press any key to return to the previous screen. A default
value will replace your wrong entry. If so needed, modify the numerical entry and
press Next again.
The top line presents the current measurement information.
2.3. Menu and Sub-Menu Organization
ULTM menus and submenus are organized in a tree-like format. The organization
is described in the following figure:
3 Measurement Screen
3.1 Status Reports
Status reports appear beneath the measurement result. On the first line, reports
related to ultrasonic monitoring issues are presented. On the next line, cellular
communication related reports are displayed. Ultrasonic reports include messages
such as: FULL LEVEL, EMPTY LEVEL, ECHO SEARCH, THEFT, START FILL,
END FILL and others. Cellular related reports include messages such as SMS
SENT, SMS ACTIVE, REGISTRATION FAILED and more.
The bottom line on the screen presents a toolbar with choices. Navigate through
the toolbar and select an action or report. ULTM halts any operations (including
measurements) during navigation. ULTM will automatically resume operations 30
seconds after last key has been pressed.
3.2 Contrast
Press the plus (+) or minus (-) keys to change visual contrast of the display.
3.3 Main Menu / Setup
Navigate to setup and press Enter (+) to configure ULTM. The actual configuration
process is explained in a following chapter.
Page 6
Figure 11: Execution Keys.
Figure 12: Sub Menu Screens.
Figure 13: Numeric Menu.
Figure 14: Menu and Sub-Menu Organization.
Figure 15: Measurement Screen.
±XX
setup
T°
dB
ID