Sdd i – Triton 9100 Installation Manual User Manual
Page 23
23
I
NSTALLATION
P
ROCEDURES
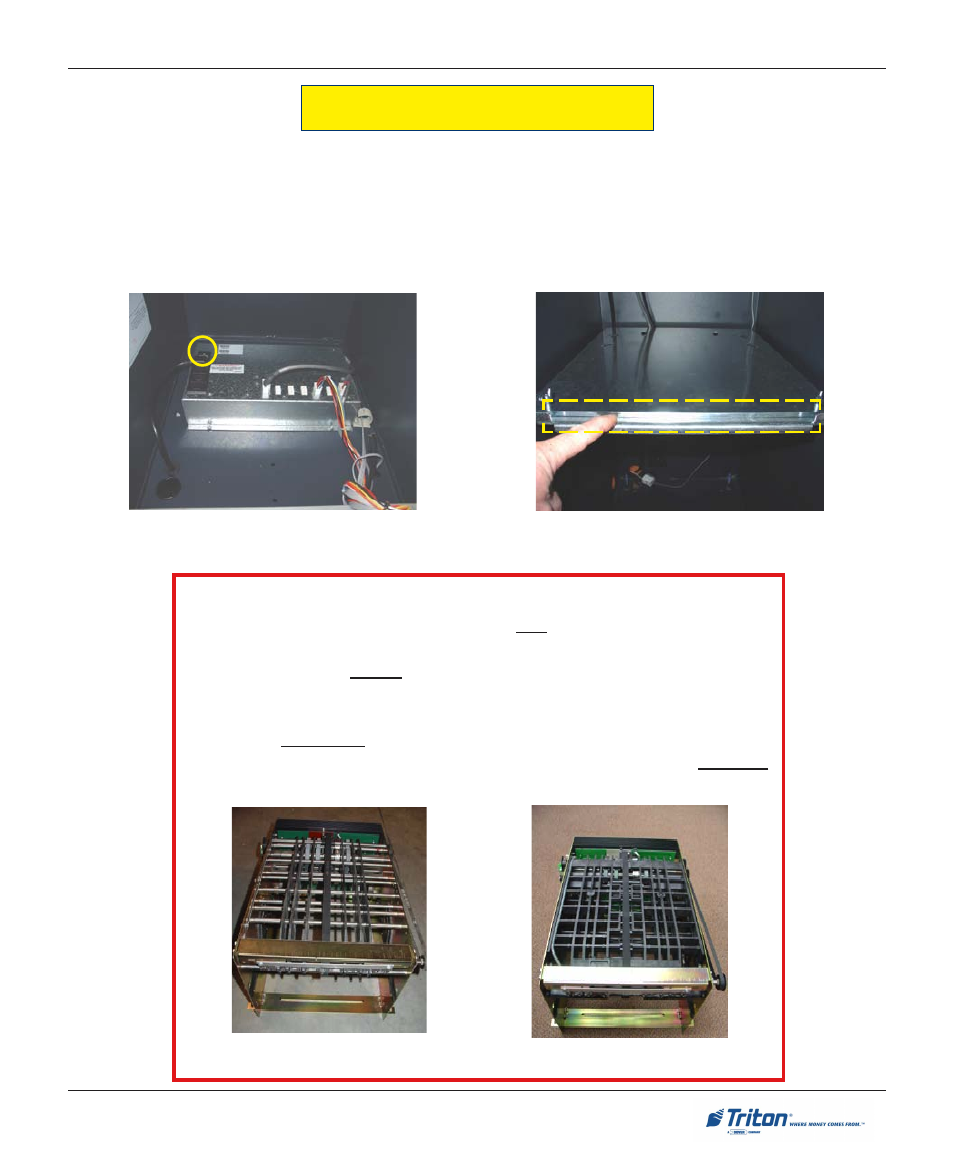
1.
Unlock and open the control panel. Verify that the power switch is in the OFF (0) position. Close the
control panel.
Power switch on left side of
power module.
2.
The dispenser tray is fixed (No slide rails). Also, there is a spacer bar located under the two (2) wing
nuts that will secure the dispenser. Before installing an SDD dispenser, refer to the *NOTE* on the
next page.
Spacer bar location.
* Note *
Before you install an SDD mechanism, you may have to remove the spacer bar
depending on which version of SDD dispenser you have. Units shipped with
an SDD mechanism WILL retain the spacer. If you bought a unit without a
dispenser, you will need to determine which version of SDD mechanism you
will be installing. If your dispenser looks like the one shown in Figure 1, you
will need to REMOVE the spacer bar prior to installing. If your dispenser looks
like the one shown in Figure 2 (same as shipped mechanism), you will RETAIN
the spacer.
Figure 1. “Older” SDD.
Figure 2. “Current” SDD.
SDD I
NSTALLATION
- X-SCALE/X2 Configuration Manual (419 pages)
- ARGO Installation Manual (35 pages)
- ARGO User Manual (97 pages)
- ARGO G60 Installation Manual (31 pages)
- ARGO Quick Reference Guide (10 pages)
- RL331X TRAVERSE User Manual (74 pages)
- FT5000 X2 User Manual (105 pages)
- FT5000 X2 Quick Reference Guide (10 pages)
- 81XX/91XX (including X2)/97XX/RL16XX (5 pages)
- RL1600 Installation Manual (41 pages)
- RL1600 Quick Reference Guide (7 pages)
- RL1600 User Manual (72 pages)
- RL2000 POWER CORD Installation Manual (1 page)
- RL2000 User Manual (124 pages)
- RL2000 Installation Manual (45 pages)
- RL2000 Quick Reference Guide (10 pages)
- RL5000 X2 Series User Manual (122 pages)
- RL5000 X2 Series Installation Manual (55 pages)
- RL5000 X2 Series Quick Reference Guide (12 pages)
- 8100/9100/97XX/RL5000 (X-SCALE/XP) (10 pages)
- 8100 Quick Reference Guide (6 pages)
- 8100 User/Installation Manual (150 pages)
- 9100 Quick Reference Guide (8 pages)
- 9100 User Manual (172 pages)
- 9100 Electronic Lock Installation Manual (8 pages)
- 96XX CASH DISPENSER CABINET Installation Manual (6 pages)
- 9650 Operation Manual (264 pages)
- 9600 Series Quick Reference Guide (2 pages)
- 9640 Operation Manual (265 pages)
- 9600 Operation Manual (209 pages)
- 9610 Series Quick Reference Guide (2 pages)
- 9610 Operation Manual (210 pages)
- 97XX Series Operation Manual (265 pages)
- 9710 Series Quick Reference Guide (2 pages)
- 9700 Series Quick Reference Guide (2 pages)
- 9705 Series Quick Reference Guide (2 pages)
- 9200 Installation Manual (26 pages)
- 9200 Operation Manual (179 pages)
- MAKO 2000 Operation Manual (217 pages)
- MAKO PEDESTAL Installation Manual (8 pages)
- MAKO EXTENDED CABINET Installation Manual (7 pages)
- RT2000 X2 User Manual (109 pages)
- RT2000 X2 Installation Manual (36 pages)
- RT2000 X2 Quick Reference Guide (8 pages)