Triton 9100 Installation Manual User Manual
Page 17
17
I
NSTALLATION
P
ROCEDURES
6.
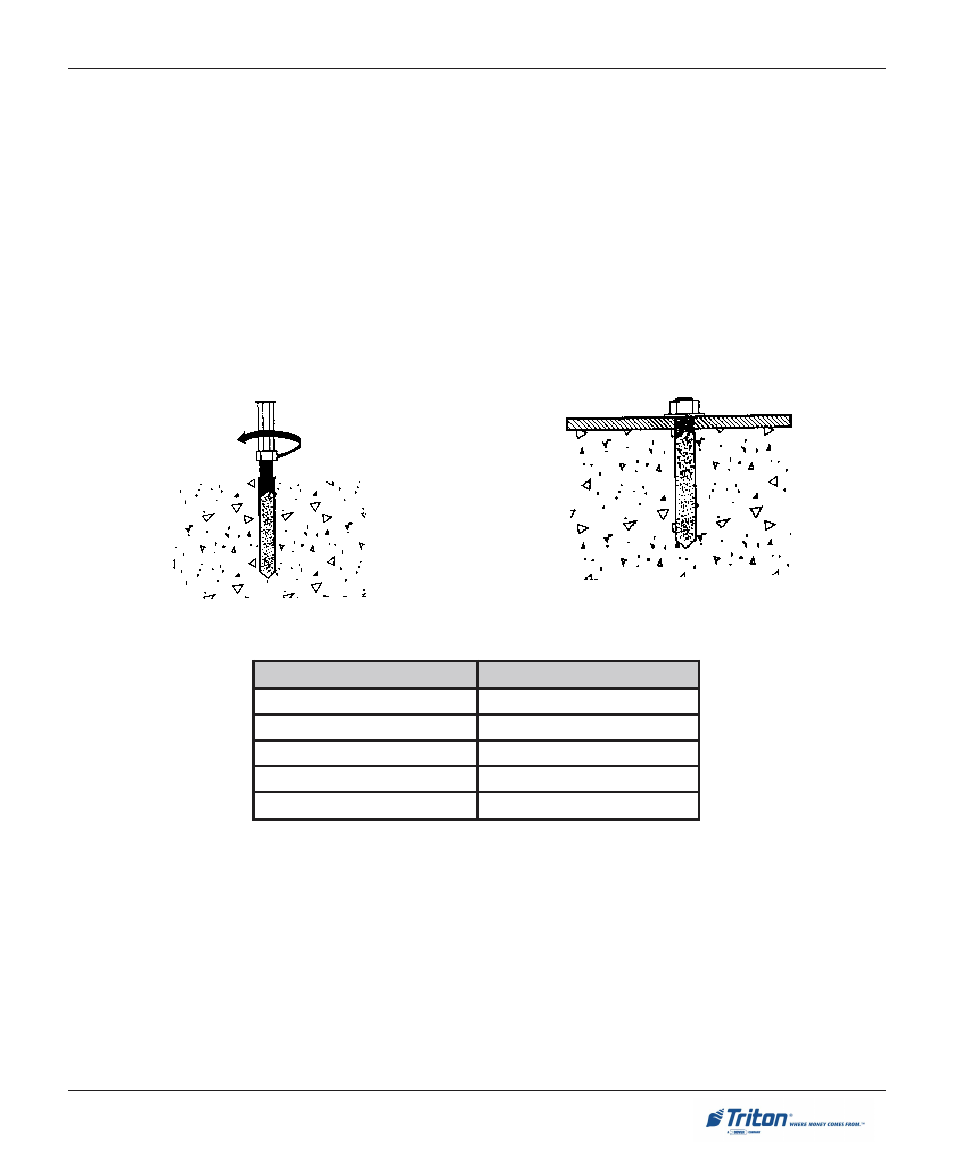
Insert the chisel point of the rod into the hole to break the glass capsule. Change to rotary and spin it
into the capsule at a speed of 250 to 500 RPM, until it is fully embedded. IMPORTANT! Turn the
rotary hammer drill OFF IMMEDIATELY when the rod is fully embedded!
Drive anchor rod into capsule using hammer drill.
7.
Pull the driver out of the coupling while holding the rod. Hold the hex nut with a wrench to unthread the
coupler.
8.
Repeat steps 1-7 for each of the remaining mounting holes.
9.
Allow the adhesive to cure for the specified time (see chart and important not, which follow) prior to
applying any load to the anchors. During the winter, the hole temperature may be different than the
room temperature! The hole temperature should be measured to determine the curing time required. DO
NOT disturb or load the anchors until they are fully cured!
Allow seated anchor to cure.
*
e
r
u
t
a
r
e
p
m
e
T
l
a
i
r
e
t
a
M
e
s
a
B
e
m
i
T
g
n
i
t
t
e
S
r
e
v
o
d
n
a
C
º
0
2
/
F
º
8
6
s
e
t
u
n
i
m
0
2
C
º
0
2
/
F
º
8
6
o
t
C
º
0
1
/
F
º
0
5
s
e
t
u
n
i
m
0
3
C
º
0
1
/
F
º
0
5
o
t
C
º
0
/
F
º
2
3
r
u
o
h
1
C
º
0
/
F
º
2
3
o
t
C
º
5
-
/
F
º
3
2
s
r
u
o
h
5
C
º
5
-
/
F
º
3
2
o
t
C
º
0
1
-
/
F
º
4
1
s
r
u
o
h
0
1
12. Once the ATM is square (level), install a second nut on each bolt and tighten down firmly.
10. Ensure the ATM is as level as possible given the floor conditions. Use a bubble level to verify this. If
a bubble-level is not available, the cabinet can be “rocked” gently from front-to-back and side-to-side
to check the need for leveling.
11. Use an adjustable wrench or a ratchet wrench with 18 mm (3/4-inch) socket to tighten the nuts down.
No minimum torque setting for the nuts is required. Simply ensure the nuts are tightened down firmly
enough to secure the plinth to the anchors. Tightening the nuts just beyond hand tight should prove
adequate.