Kasco Marine Pond Aerator & Water Circulator User Manual
Page 6
6
this time, go to Light kit instructions.
8400AF, 2.3AF, 3.1AF, 3.3AF, 5.1AF, 5.3AF
Parts
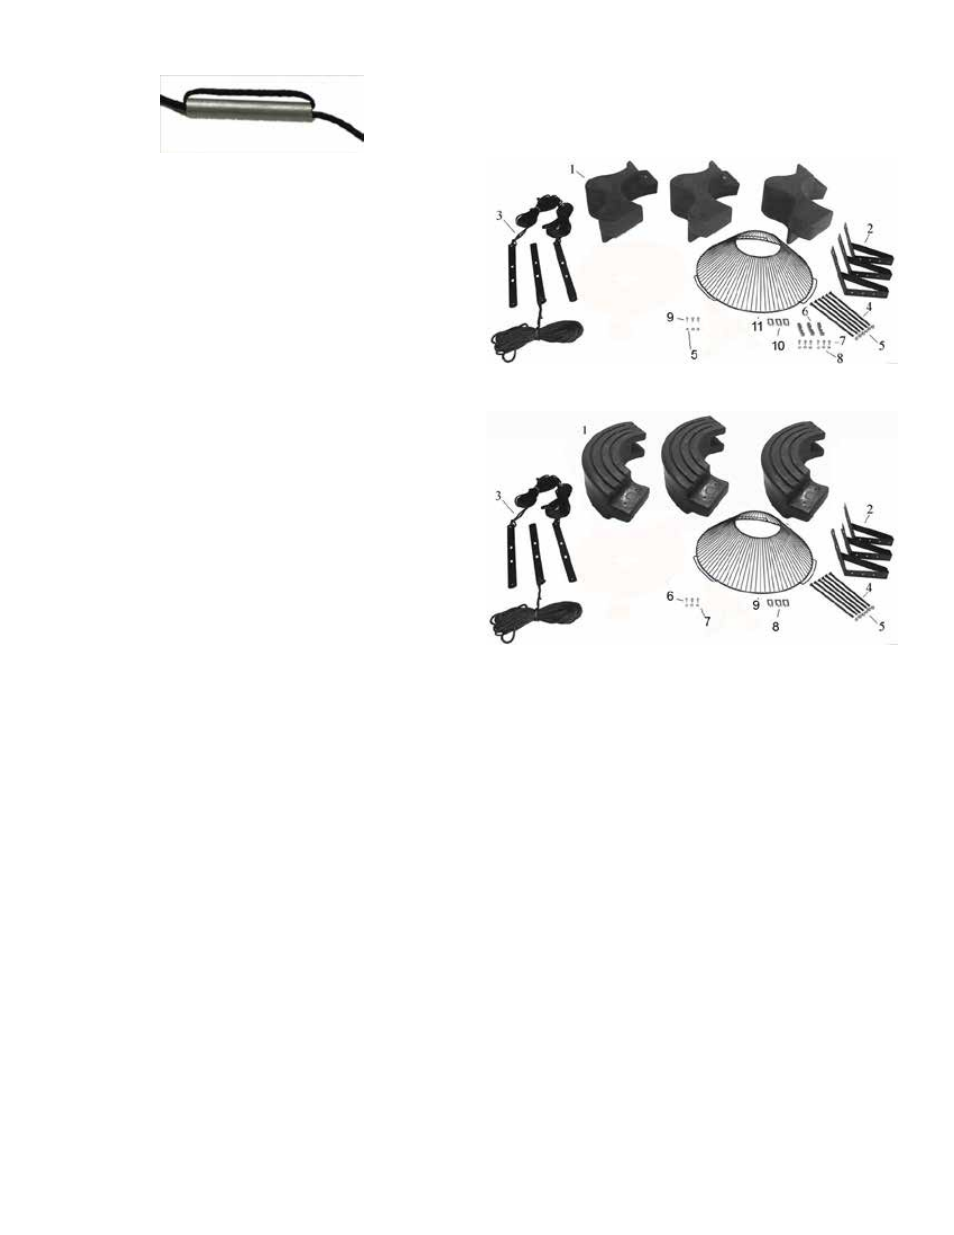
POND AERATOR PARTS INCLUDED
Aerator Unit with cord (Cord may be shipped separately) (1)
B. Large Float Ring (8400AF, 2.3AF)
1. Float Sections (3)
2. Top Float Bracket (3)
3. Bottom Float Bracket w/Rope (3)
4. 9” x 3/8” Bolt (6)
5. 3/8” Lock Nut (6)
6. Unit Mounting Bracket (3)
7. 1/4” x 3/4” Bolt (6)
8. 1/4” Lock Washer (6)
9. 1/4” x 3/4” Bolt with lock washers and nuts (3)
Optional: (parts 10-13) May be sold separately
10. Bottom Screen Clip (3)
11. Bottom Screen (1)
12. Mesh screen (1)
13. Cable ties for mesh (10)
B. Large Float Ring (3.1AF, 3.3AF, 5.1AF, 5.3AF)
1. Float Sections (3)
2. Top Float Bracket (3)
3. Bottom Float Bracket w/Rope (3)
4. 9” x 3/8” Bolt (6)
5. 3/8” Lock Nut (6)
6. 3/8” x 1” Bolt (3)
7. 3/8” Lock Washer (3)
Optional: (parts 8-11) May be sold separately
8. Bottom Screen Clip (3)
9. Bottom Screen (1)
10. Mesh screen (1)
11. Cable ties for mesh (10)
Optional Equipment
C. Control Box (1 - optional)
NOTE: Extra hardware may be included.
POND AERATOR TOOLS & SUPPLIES NEEDED
• Anchors or stakes for installing unit (3)
• Philips head screw driver for mounting optional control
panel
• 120V or 240V Electrical Supply near pond on a post
• Three 12” pieces of 1” galvanized pipe for weighting
ropes (optional)
• #10 x 1” long or longer screw(s) for mounting the op-
tional C-25 (3) or C-85/95 (4)
• 9/16” & 7/16” Nut Driver
• 9/16” & 7/16” Socket
• Adjustable crescent wrench
• Nylon Tie for cord
8400AF, 2.3AF
3.1AF, 3.3AF, 5.1AF, 5.3AF
Tools & Supplies Needed:
A. Anchors or stakes for installing unit (2 or 3 de-
pending on unit)
B. 208-240V Electrical Supply near pond on a post
C. Two (or 3 depending on model) 30cm pieces of
2.54cm galvanized pipe for weighting ropes (optional)
D. 9/16”(14mm) & 7/16” (11mm) Nut Driver
E. 9/16” (14mm) & 7/16” (11mm) Socket
Adjustable crescent wrench
8400AF, 2.3AF, 3.1AF, 3.3AF, 5.1AF, 5.3AF
Assembly
STEP ONE
Remove all contents from package and place on a
clean, flat surface. Inspect the shipment for any dam-
ages. If damages are found, immediately notify your
carrier and your Kasco Marine, Inc. representative.
Next, cross reference the parts included in the ship-
ment with the Parts Included sheet in this manual.
Make sure you have all the parts needed. If any
shortages are found, contact your Kasco representative