Kasco Marine Universal Dock or Piling Mount User Manual
Kasco Marine Water equipment
1
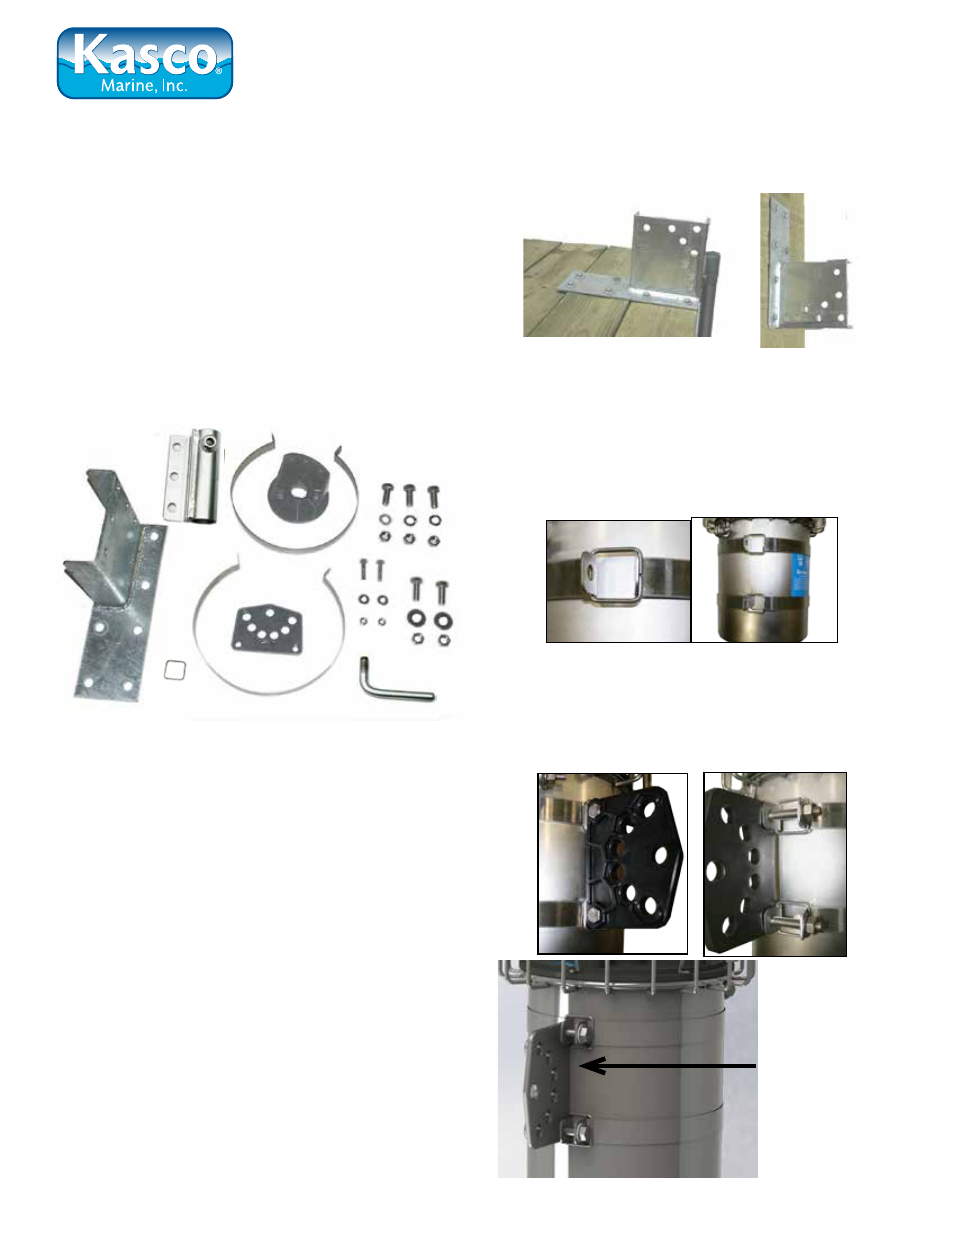
PARTS INCLUDED
1. Dock Mount Base (1)
2. Pipe Clamp (1)
3. 1/2”-13 x 1 1/4” Hex Head Bolt (5)
4. 1/2”-13 Nut (5)
5. 1/2” Flat Washer (2)
6. 9 Hole Plate (1)
7. 4 Hole Angle Bracket (1)
8. Dock Mount Strap (2)
9. Strap Retaining square ring (2)
10. 5/16” Flat Washer (2)
11. 5/16” Lock Nut (2)
12. 5/16”-18 x 2” Hex Head Bolt (2)
13. 1/2” Lock Washer (3)
14. Lock Handle (1)
1
2
3
4
5
6
7
8
10
11
13
12
14
9
TOOLS & SUPPLIES NEEDED
• 1” NPT or BSPT (European) Threaded Galvanized or
Stainless Steel Pipe up to 10’ long (1)
• Lag Screws or Bolts for Mounting to Dock (8)
• 3/4” Wrench
• 1/2” Wrench or 1/2” Socket with Ratchet
• 3/4” Socket with Ratchet
• 1” galvanized or S.S. pipe cap (optional)
ASSEMBLY INSTRUCTIONS
Note: Customer must provide the 1” galvanized or stainless
steel threaded pipe extension not more than 10 feet in
length. Since applications may vary, the user will supply
the appropriate lag screws or bolts to secure the dock or
piling base. Kasco urges that the base be mounted as
securely as possible. For salt water use, Kasco suggests
that you use 1” stainless steel pipe.
STEP ONE:
Determine the most suitable application for your situation.
Install the Dock Mount Base to your dock or piling using
8 mounting lag screws or bolts supplied by user. For
mounting on dock surface or the horizontal surface make
one end of the Dock Mount Base flush with the dock edge
as shown. For piling or other vertical surface mount large
end down as shown.
STEP TWO:
Wrap the Dock Mount Straps around the Deicer can. Use
the retaining square rings to hold the draw straps together.
Position the first band as close to the De-Icer cage as
possible. Note: If you have difficulty wrapping the strap
around the can, insert the retaining ring around the strap
before it is around the can and then slide it onto the can and
into position.
STEP THREE:
Insert one 5/16 – 18 x 2” Hex Head Bolt through the 9 Hole
Plate and then through the two holes in the strap. Use a
5/16” Washer and 5/16” Lock Nut to hold the strap onto
the can. Repeat with the 2nd strap and tighten both straps
using the 1/2” Wrench or Socket. Do not over tighten
.
Warning! Be sure
flat surface of plate
is facing to the
right of the unit as
shown. Failure to
do so could result
in the loosening or
unthreading of the
pipe fittings while
in operation.
Universal Dock or Piling Mount
Assembly & Installation Instructions