Experiment 1: introduction to interferometry, Introduction, Procedure – PASCO OS-9257A PRECISION INTERFEROMETER User Manual
Page 15: Part i: wavelength
11
012-07137A
Precision Interferometer
OS-9255A
PRECISION
INTERFEROMETER
-5
0
5
10
15
25
30
ADJUSTABLE MIRROR
MICHELSON, TWYMAN-GREEN
BEAM SPLITTER
MICHELSON
COMPENSA
TO
R
MICHELSON
18 mm FL
LENS
VIEWING SCREEN
MICHELSON, TWYMAN-GREEN
1 div = 1 MICRON
Experiment 1: Introduction to Interferometry
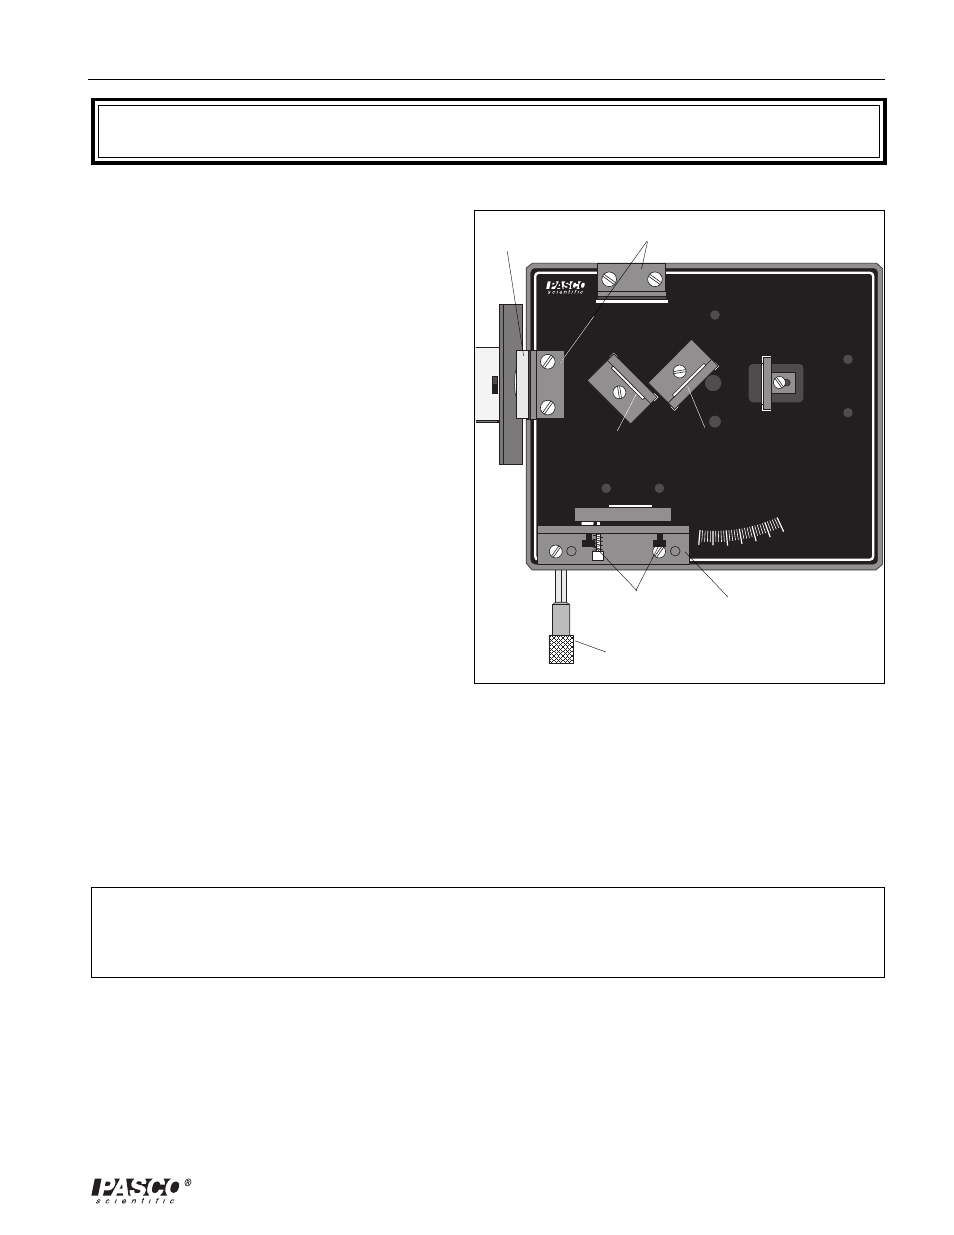
Figure 1.1. Michelson Mode Setup
Component holder
Compensator
(optional)
Movable
mirror
Beam
splitter
Viewing screen
Adjustable
mirror
Micrometer
knob
Adjustment
Thumbscrews
Lens
18mm FL
EQUIPMENT NEEDED:
Basic Interferometer (OS-9255A)
Laser (OS-9171)
Laser Alignment Bench (OS-9172)
Interferometer Accessories (OS-9256A)
Component Holder , (2) Calibrated Polarizers
Introduction
In general, an interferometer can be used in
two ways. If the characteristics of the light
source are accurately known (wavelength,
polarization, intensity), changes in the beam
path can be introduced and the effects on the
interference pattern can be analyzed. Experi-
ments 2 and 3 are examples of this procedure. On
the other hand, by introducing specific changes in
the beam path, information can be obtained
about the light source that is being used.
In this experiment, you'll use the interferometer to
measure the wavelength of your light source. If
you have a pair of polarizers, you can also
investigate the polarization of your source.
Procedure
Part I: Wavelength
1.
Align the laser and interferometer in the Michelson mode, so an interference pattern is clearly visible on your
viewing screen. See Setup and Operation for instructions.
2.
Adjust the micrometer knob to a medium reading (approximately 50 µm). In this position, the relationship be-
tween the micrometer reading and the mirror movement is most nearly linear.
3.
Turn the micrometer knob one full turn counterclockwise. Continue turning counterclockwise until the zero on the
knob is aligned with the index mark. Record the micrometer reading.
➤
NOTE: When you reverse the direction in which you turn the micrometer knob, there is a small amount of
give before the mirror begins to move. This is called mechanical backlash, and is present in all mechanical
systems involving reversals in direction of movement. By beginning with a full counterclockwise turn, and then
turning only counterclockwise when counting fringes, you can eliminate errors due to backlash.
4.
Adjust the position of the viewing screen so that one of the marks on the millimeter scale is aligned with one of the
fringes in your interference pattern. You will find it easier to count the fringes if the reference mark is one or two
fringes out from the center of the pattern.
5.
Rotate the micrometer knob slowly counterclockwise. Count the fringes as they pass your reference mark.
Continue until some predetermined number of fringes have passed your mark (count at least 20 fringes). As you
finish your count, the fringes should be in the same position with respect to your reference mark as they were
when you started to count. Record the final reading of the micrometer dial.