User settings, Dip switch designations – GE Industrial Solutions ZNET901 User Manual
Page 8
DIP Switch Designations
(cont’d)
User Settings
(cont’d)
0
SW8
OFF
SW7
OFF
SW6
OFF
1
ON
OFF
OFF
2
OFF
ON
OFF
4
OFF
OFF
ON
5
ON
OFF
ON
6
OFF
ON
ON
7
ON
ON
ON
SW5
OFF
OFF
OFF
OFF
OFF
OFF
OFF
SW4
OFF
OFF
OFF
3
ON
ON
OFF
OFF
OFF
OFF
OFF
OFF
OFF
8
OFF
OFF
OFF
ON
OFF
9
ON
OFF
OFF
ON
OFF
10
OFF
ON
OFF
ON
OFF
11
ON
ON
OFF
ON
OFF
12
OFF
OFF
ON
ON
OFF
13
ON
OFF
ON
ON
OFF
14
OFF
ON
ON
ON
OFF
15
ON
ON
ON
ON
OFF
16
OFF
OFF
OFF
OFF
ON
17
ON
OFF
OFF
OFF
ON
18
OFF
ON
OFF
OFF
ON
19
ON
ON
OFF
OFF
ON
20
OFF
OFF
ON
OFF
ON
21
ON
OFF
ON
OFF
ON
22
OFF
ON
ON
OFF
ON
23
ON
ON
ON
OFF
ON
24
OFF
OFF
OFF
ON
ON
25
ON
OFF
OFF
ON
ON
26
OFF
ON
OFF
ON
ON
27
ON
ON
OFF
ON
ON
28
OFF
OFF
ON
ON
ON
29
ON
OFF
ON
ON
ON
30
OFF
ON
ON
ON
ON
31
ON
ON
ON
ON
ON
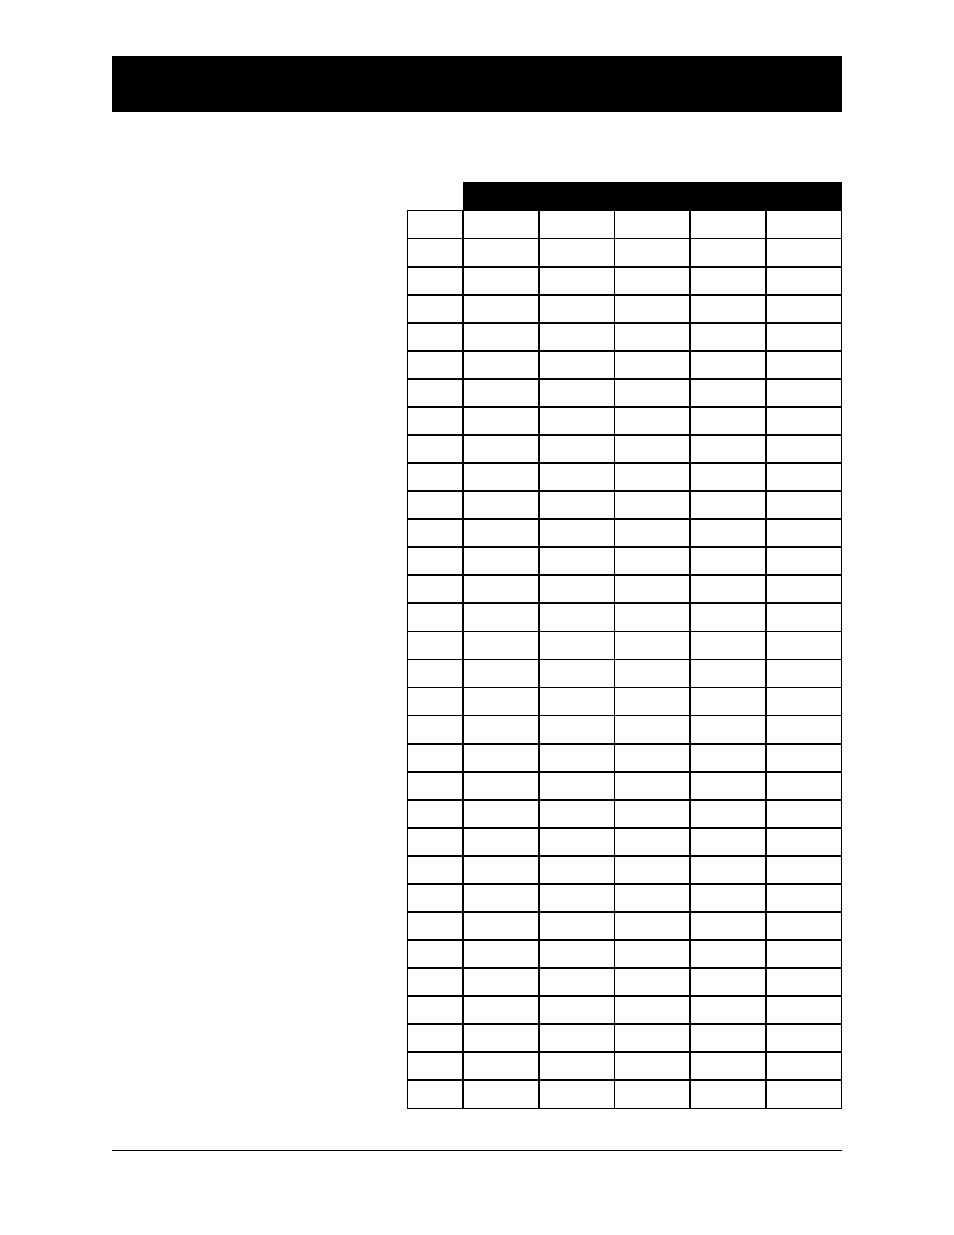
The setting of the switches 8 thru
4 for different values shown on
the right:
4. Set switches 8 thru 4 OFF
and 3 thru 1 ON. Press
the service switch. The
entered values are loaded
into the real-time clock/
calendar. The printer will
print the message “End
clock/calendar set.”
5. Restore DIP switches
to the original settings
recorded in the first step.
NOTE:
The DIP switches (switch 4
through switch 8) are also used
to set the annunciator ID which
printed out in the event log in
all the messages. The ID values
(0 through 31) are set as indicated
in the table on the right. The ID
value is read only upon power up
of the unit and therefore changing
the DIP switch settings during
the clock/calendar setting does not
affect the ID number. However,
the switches should be returned
to their original settings after com-
pleting the clock/calendar set pro-
cedure so that the original ID set-
ting is not affected.
■
■
6
ZNET900A, ZNET900B and ZNET901 Operation and Maintenance Manual (18R-1000)
Zenith Controls, Inc.
■
■