Fig 6), Fig 7), Fig 7a) – Speedhut 4 inch & 4-1_2 inch Tachometer User Manual
Page 2
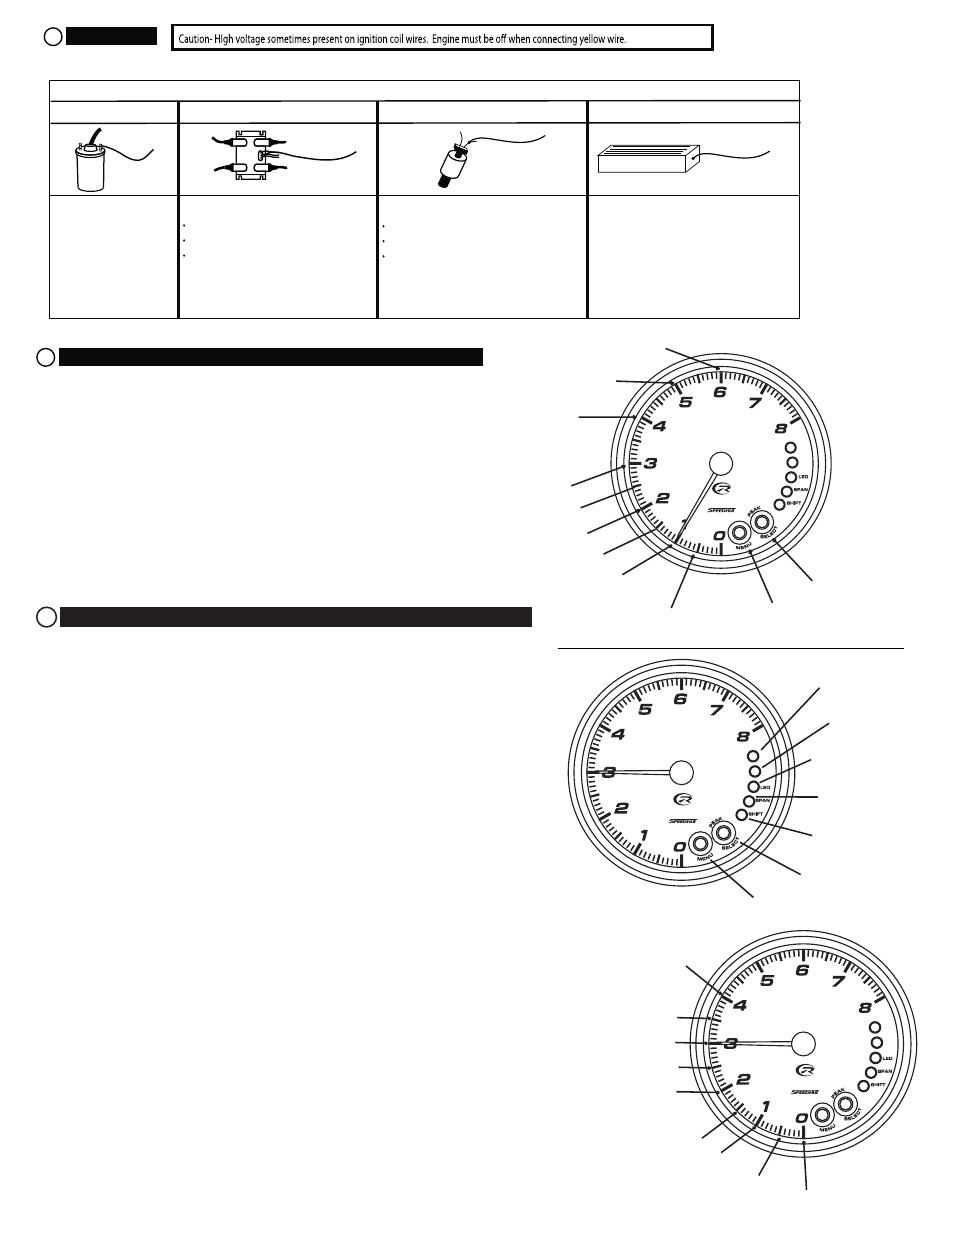
Menu button
0.5 PPR
1 PPR
(factory default)
2 PPR
3 PPR
4 PPR
5 PPR
6 PPR
x 1000
Select button
Set the # of pulses per revolution
4
Type #1 ignitions
- negative
+
Yellow wire
Yellow wire connects to:
negative side of coil.
12 cyl = 6 sparks / rev
10 cyl = 5 sparks / rev
8 cyl = 4 sparks / rev
6 cyl = 3 sparks / rev
4 cyl = 2 sparks / rev
(see step #4)
Yellow wire connects to:
tachometer output terminal
12 cyl = 6 sparks / rev
10 cyl = 5 sparks / rev
8 cyl = 4 sparks / rev
6 cyl = 3 sparks/ rev
4 cyl = 2 sparks / rev
Yellow wire connects to:
negative side of coil (some cars) or
coil control wire (some cars) or
coil trigger wire (some cars).
1 spark / rev. (as a good starting point)
(see step #4)
Yellow wire connects to:
negative side of coil (some cars) or
coil control wire (some cars) or
coil trigger wire (some cars).
1/2 spark / rev. (as a good starting point)
(see step #4)
Fig 5: Tachometer yellow wire hook up options
Yellow wire
C1
g
ul
P
n
o
li
o
C
-
3
#
e
p
yT
s
kc
a
P
li
o
C
-2
#
e
p
yT
Aftermarket ignitions / tach output
Yellow Wire
3
Hook up Yellow wire.
Important note: connecting the tachometer to the wrong wire will NOT damage the tachometer or your ignition. It just won't work!
2.Press and hold the menu button while powering on the tachometer. The pointer
will move to the factory default position of 4 pulses per revolution (4000RPM).
(see fig 6)
3. Press and release the menu button to change the pulse per revolution setting.
Once the pointer is on the desired pulse per revolution setting, press and hold the
menu button for 5 seconds to save the setting. The pointer will return to zero
indicating the setting has been saved.
Note: If nothing is selected after 5 seconds, the gauge will save the setting the
pointer is on and return to zero.
Tachometer will exit menu and return to normal operation.
(fig 6)
1.Turn off power to the tachometer
Over Rev
Red #2
Shift point
Red #1
Brightness LED
Yellow #3
Span LED
Yellow #2
Shift LED
Yellow #1
Select
button
Set your shift point and RPM span
One of the most exciting features of the Revolution tachometer is the integrated shift LED's
in the dial. This new technology lets you anticipate the next shift point by displaying 3 yellow
warning LED's before reaching the set shift point Red #1 LED. The span between the LED's
can also be set. Red #2 is an over-shift light that blinks if you exceed the set shift point by the
set span value. If, for any reason you miss a shift and over- shoot your shift point this light will
blink.
The following procedures can be done at any time during operation of the tachometer while
the tachometer has power.
Shift point set
Red #1 is set shift point. The 3 Yellow LEDs will turn on before the set shift point by the amount
of span selected.
1. Press and release menu button until 'shift' LED is lit.
2. Press and release the ‘Select’ button. LED will blink once to indicate you have selected the RPM shift point.
3. Set shift point.
Press and hold 'Select' button to increase RPM shift point.
Press and hold 'Menu' button to decrease RPM shift point.
After desired shift point is reached release buttons for 2 seconds. LED will blink 2 times to confirm new
shift point has been saved.
Shift RPM Span set
The shift span is the RPM range between the lighting of the LEDs. (See fig. 7a). Setting a span of '0' RPM
will turn on all 5 LEDs at the set shift point.
Example: shift point set at 6500 RPM, span set at 200 RPM. yellow #1 will light at 5900 RPM, yellow #2 at
6100 RPM, yellow #3 at 6300 RPM , red #1 (shift point) at 6500 RPM, finally red #2 will blink at 6700 RPM.
1. Press and release menu button until 'span' LED is lit.
2. Press and release 'select button. LED will blink once to indicate you have selected the RPM span point.
3. Set RPM span.
Press and hold 'Select' button to increase RPM span.
Press and hold 'Menu' button to decrease RPM span.
After desired span is reached release buttons for 2 seconds. LED will blink 2 times to confirm new RPM
span has been saved.
5
0 RPM
50 RPM
100 RPM
150 RPM
200 RPM
(factory default)
250 RPM
300 RPM
350 RPM
400 RPM
x 1000
x 1000
Menu
button
(fig 7)
Yellow Wire
1.5 PPR
2.5 PPR
(fig 7a)