Fig 6), Fig 7) – Speedhut 3-3_8 inch Tachometer User Manual
Page 2
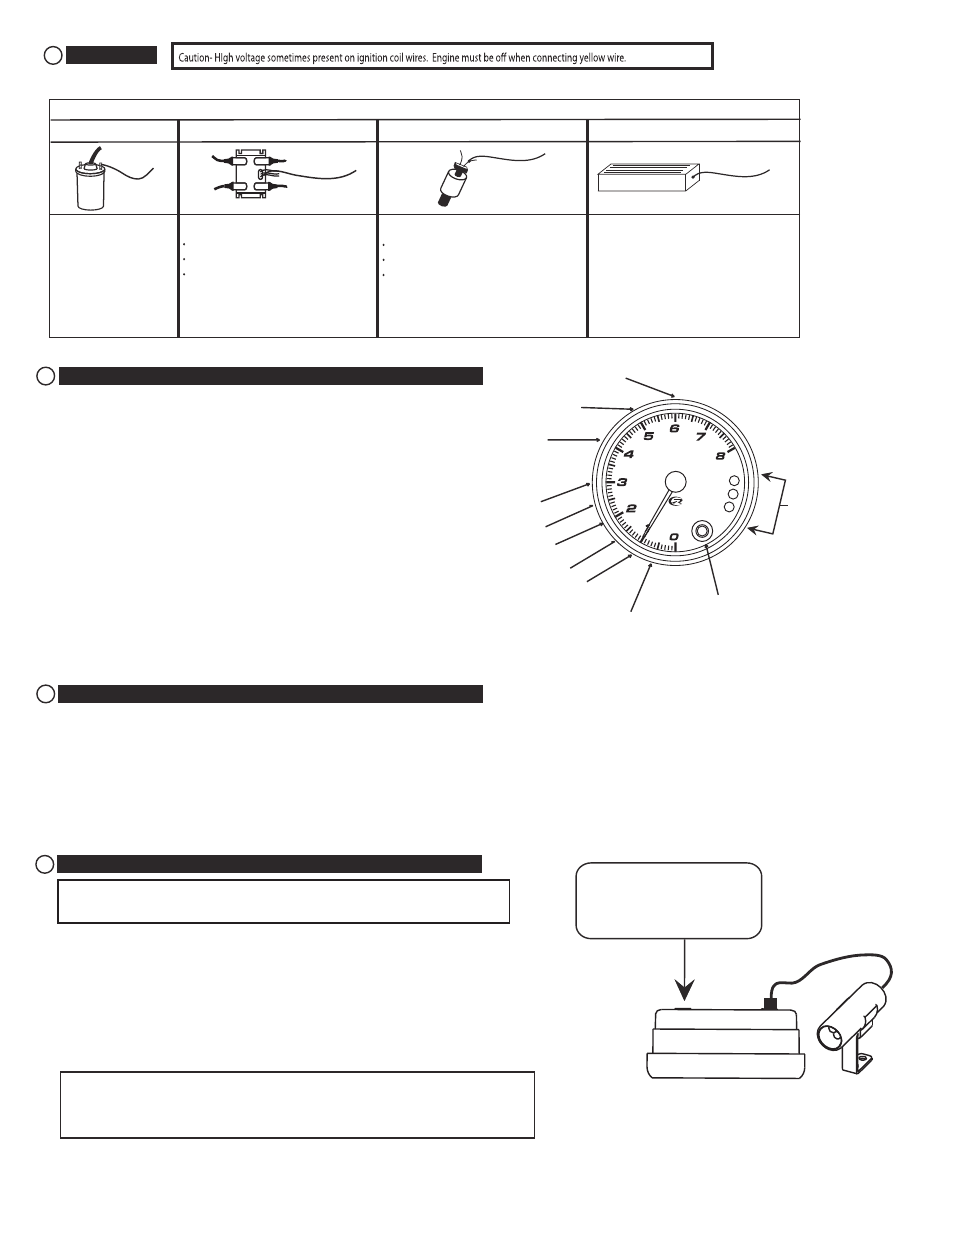
Set the # of pulses per revolution
.5 pulse
per rev
1 PPR
2 PPR
3 PPR
4 PPR
5 PPR
6 PPR
4
x 1000
Programming Button
Some models required the use of
an auxiliary button that connects
to the back of the gauge.
Type #1 ignitions
- negative
+
Yellow wire
Yellow wire connects to:
negative side of coil.
12 cyl = 6 sparks / rev
10 cyl = 5 sparks / rev
8 cyl = 4 sparks / rev
6 cyl = 3 sparks / rev
4 cyl = 2 sparks / rev
(see step #4)
Yellow wire connects to:
tachometer output terminal
12 cyl = 6 sparks / rev
10 cyl = 5 sparks / rev
8 cyl = 4 sparks / rev
6 cyl = 3 sparks/ rev
4 cyl = 2 sparks / rev
Yellow wire connects to:
negative side of coil (some cars) or
coil control wire (some cars) or
coil trigger wire (some cars).
1 spark / rev. (as a good starting point)
(see step #4)
Yellow wire connects to:
negative side of coil (some cars) or
coil control wire (some cars) or
coil trigger wire (some cars).
1/2 spark / rev. (as a good starting point)
(see step #4)
Fig 5: Tachometer yellow wire hook up options
Yellow wire
C1
g
ul
P
n
o
li
o
C
-
3
#
e
p
yT
s
kc
a
P
li
o
C
-2
#
e
p
yT
Yellow wire
Aftermarket ignitions / tach output
Yellow wire
3
Hook up Yellow wire.
Important note: connecting the tachometer to the wrong wire will NOT damage the tachometer or your ignition. It just won't work!
2.Press and hold the button while powering on the tachometer. The pointer will
move to the factory default position of 4 pulses per revolution (4000RPM).
(see fig 6)
3. Press and release the button to change the pulse per revolution setting. Once
the pointer is on the desired pulse per revolution setting, press and hold the
button for 5 seconds to save the setting. The pointer will return to zero indicating
the setting has been saved.
Note: If nothing is selected after 5 seconds, the gauge will save the setting the
pointer is on and return to zero.
Tachometer will exit menu and return to normal operation.
Shift Lights
on some
models
(fig 6)
1.Turn off power to the tachometer
Press and hold gauge button down and gauge needle will display maximum peak reading for as long as button is pressed down. LED (Revolution Tachometer) will stay lit while showing
peak reading.
Note if button is held for longer than 10 seconds, tach will enter shift light set mode. (see step 6 below)
To retain peak reading (NOT CLEAR IT):
While showing peak reading, release button, wait 2 seconds, gauge will return to normal operation and retain the peak reading.
To clear peak reading:
While showing peak reading, release the button, and immediately press and release the button again within 2 seconds.The LEDs will flash(Revolution Tachometer) 2 times and
pointer will travel to zero to indicate peak has been cleared.
Peak memory recall feature
5
*** Steps 5 - 7 apply to Legacy and Revolution models only ***
Set your shift point
The following procedures can be done at any time during operation of the tachometer
while the tachometer has power.
Shift point set
1. Press and HOLD the button for approx. 10 seconds (hold past peak recall). Pointer will travel to current set shift point.
2. Press and Hold to move pointer up and down dial. Releasing button and pressing and holding again will change
pointer movement direction.
3. At desired shift point, release button for 5 seconds. LED will blink and pointer will return to zero position on dial.
New shift point is now stored in memory.
6
Note: Legacy tachometers without internal shift lights can still use a mini shift light. If you
have a legacy tachometer you will need to have a shift light plugged into the back of the gauge
in order to set the shift point.
Note: Tachometers have port
on right side for Mini Shift Light.
(sold separately)
Note: If your tach does not have
a button on front of tach, plug
button cable in back on
LEFT SIDE only
Note: Tachometers can also use the optional mini shift light (sold separately). Simply, plug the
mini shift light into the RIGHT port (see fig 7) on the back of the tachometer and
the mini shift light will operate at the same time as the internal LED shift light. Legacy
tachometers that do NOT have internal LED shift lights can still use a Mini Shift Light.
Gauge Top
(optional accessory)
Mini Shift Light
right side only
(fig 7)
(factory default)
1.5 PPR
2.5 PPR