Dual peak feature, Max peak feature, No peak features – Speedhut 2-1_16 inch & 2-5_8 inch EGT or Cylinder Head Temp Gauge User Manual
Page 2
Setting warning LED for both low and high.
Led can be set to turn on for both a low or high condition, or
To reset LED set point at any time follow this procedure again.
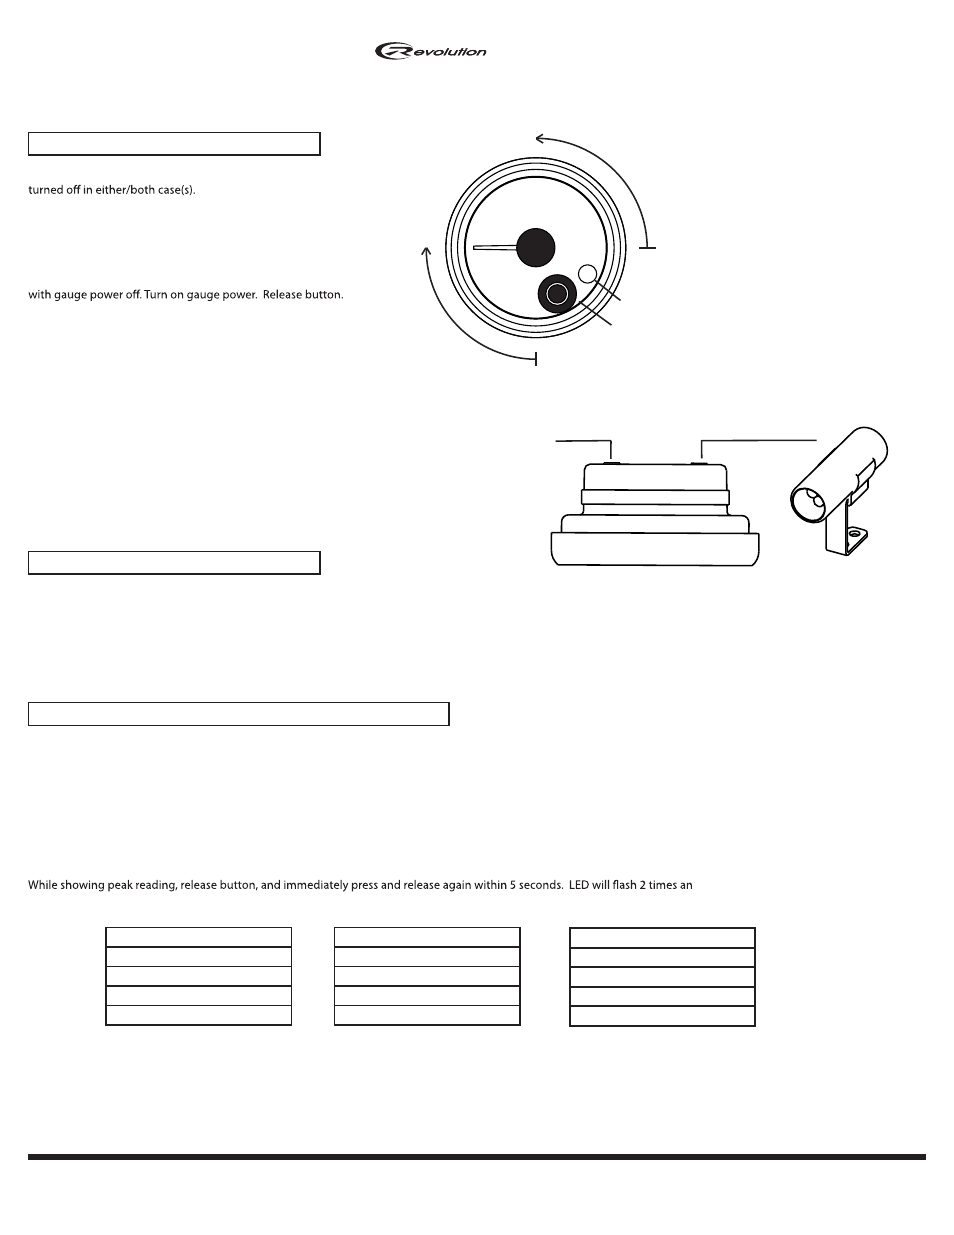
Note for 2-5/8" gauges plug button in left side back of gauge.
1. To enter LED calibration mode, Press and hold LED button
Setting LED brightness both day and night.
2-1/16" LED button
LED
High
set
LED turns on
above the set point.
Low
set
LED turns on
below the set point.
Note: 2-5/8" gauges
plug button in back of
gauge on left side only
.
warning light
right side only
2-5/8" gauges
Peak recall memory (Revolution line only)
Press and hold gauge button down and gauge needle will move between low and high peak. Gauge will continue toggling between low and high peaks as long
as button is pressed.
Note: low peak becomes active once gauge needle travels up at least 1/8 scale initially. Once this condition occurs low peak becomes active and will record the
lowest reading the gauge achieves.
To retain peak reading (NOT CLEAR IT)
While showing peak reading, release button, wait 5 seconds, gauge will return to normal and retain the peak reading.
To clear peak reading
d pointer will travel to zero to
indicate peak has been cleared
----------------------------Note: For Revolution Series gauges with setable warning light see below----------------------------
--------------------------
Dual Peak Feature
Boost
Pressure
Air Fuel
Max Peak Feature
Temperature
EGT
Voltage
NO Peak Features
Fuel level
Vacuum
At any time while gauge is running, press and release LED
button to show current LED brightness. After a couple second
delay, if button is not pressed this current setting is re-saved. LED will blink to indicate setting has been saved. To change LED brightness press and release the button to
advance to next higher brightness level. LED brightness will loop through 5 possible brightness settings including off as you press and release the button. At acceptable
brightness level do not press button for couple second delay. LED will blink to indicate setting has been saved. Note: Setting the brightness level when gauge lighting is on,
will set the night brightness level. Setting the brightness level when gauge lighting is off will set the day brightness level.
WARRANTY - Speedhut inc. warrants to the consumer for a period of 5 years from the date of purchase that the product will be free from defects in materials or workmanship.
Speedhut warrants to the consumer for a "LIFE-TIME" that the gauge circuit board will be free from defects in materials or workmanship. Please contact Speedhut service dept.
If you have a problem with this gauge. [email protected]
2. Pointer will slowly scan clockwise from full low condition on
dial. Press button at desired low warning set point. LED will
blink to indicate low warning has been set. Note: Pressing
button at full low (6 o'clock position) on dial will turn off Lean
LED warning so that it does not light up.
3. Pointer will now travel to full high condition on dial and
slowly scan counterclockwise. Press button at desired set point
for high condition. LED will blink to indicate high warning has
been set. Note: Pressing button at max high position on dial will
turn off high LED warning so that it does not light up.
Note: Setting a low warning will turn on LED when pointer
travels below the low set point. Setting a high warning will turn
on LED above the high set point.