Units calib calib, Installation guide, Zero pressure calibration – Veris Industries PD SERIES Install User Manual
Page 3: Test, Pd series, Units calib test, Calib units

ZL0055-0D
PAGE 3
©2012 Veris Industries USA 800.354.8556 or +1.503.598.4564 / [email protected]
07121
Alta Labs, Enercept, Enspector, Hawkeye, Trustat, Veris, and the Veris ‘V’ logo are trademarks or registered trademarks of Veris Industries, L.L.C. in the USA and/or other countries.
TM
PD SEriES
inStallation GUiDE
sPan Pressure calibration
current outPut calibration
The current output on the PD analog pressure gauge has been set at the factory.
These setting will not normally need adjustment. Perform these steps only if
necessary.
Units
Calib
Test
Current
measurement
device
Calib
Units
OR
Test
Calib
Units
Zero
VERIS INDUSTRIES
http://www.veris.com
1-800-354-8556
®
1-503-598-4564
Digital Pressure Gauge
zero Pressure calibration
Test
Calib
Units
Zero
VERIS INDUSTRIES
http://www.veris.com
1-800-354-8556
®
1-503-598-4564
Digital Pressure Gauge
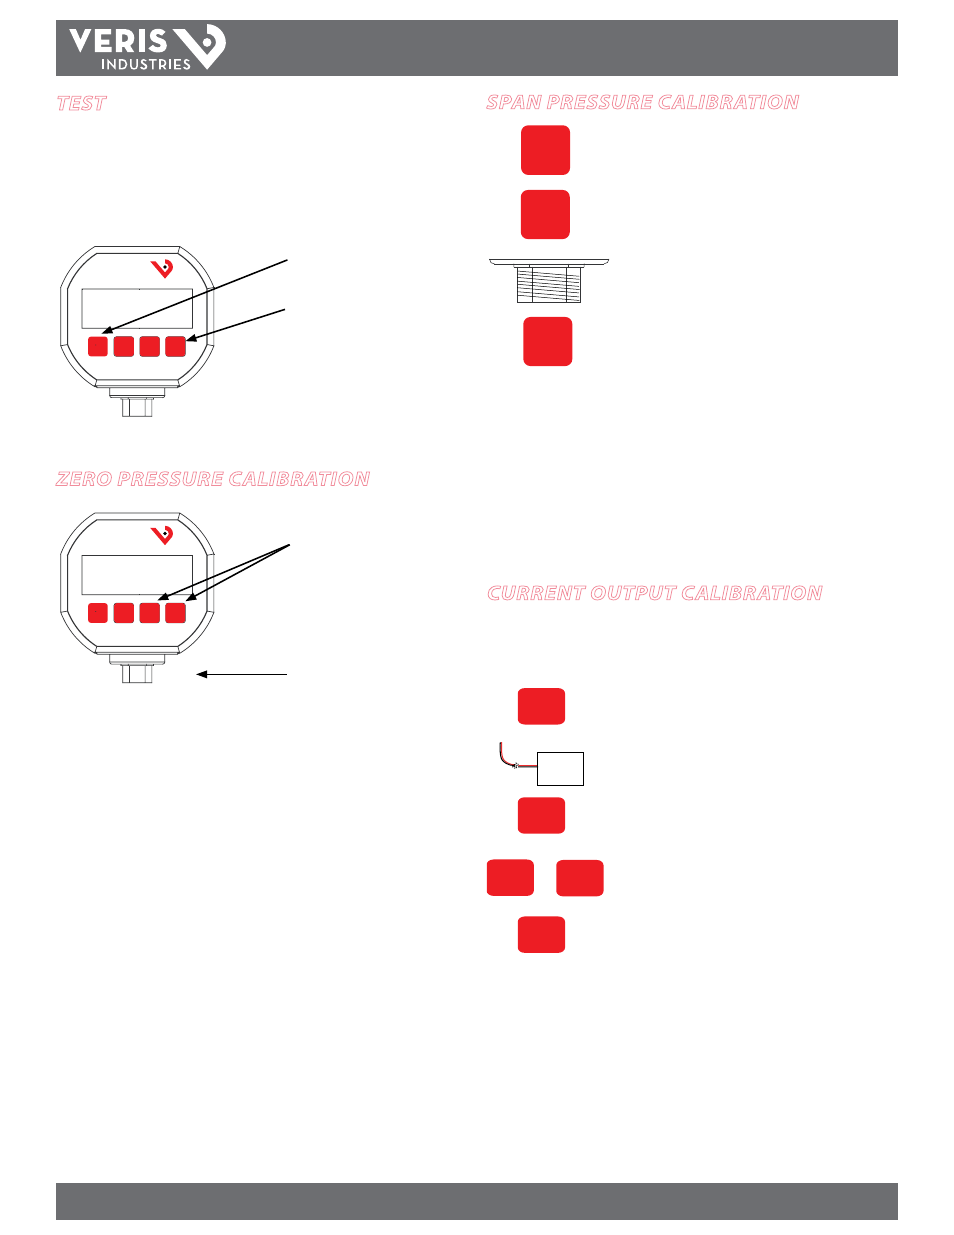
Press ZERO then CALIB.
Hold both for 3 seconds.
Release when display reads zero
pressure.
The PD can be re-zeroed without affecting the span calibration. The gauge port must
be open with no pressure or vacuum applied.
Perform this step when pressure units show in the display (not mA). Zero calibration is retained
after unit is turned off.
Open gauge port.
test
To switch the PD into Test Mode, press and hold down the TEST button. The Test Mode
allows setup and testing of the output voltage without altering the system pressure.
To change the test output level, press and hold the TEST button, and press the CALIB
button while holding TEST. Each time the CALIB button is pressed, the test level
output increases by 2 mA.
Press and hold to enter Test Mode.
To change test output level, press
CALIB while holding TEST.
Units
Calib
Calib
1. Press to select pressure units.
2. Press and hold for 3 seconds, until display alternately
reads “CAL” and the calibration pressure (e.g. “CAL” and
“500” to calibrate at 500 psi).
3. Connect the gauge port to a pressure reference of known
accuracy. Apply pressure level selected in Step 2.
4. Press and hold the CALIB button for 3 seconds until
display reads “DONE.” Calibration is now complete.
Notes:
Only attempt Span calibration if the user has access to a pressure reference of known accuracy. Use
calibration equipment swith at least four times the gauge accuracy. Perform Zero calibration
before span calibration.
If the user tries to calibrate the unit beyond ±10% of the factory calibration, the display will read
“ERR” indicating an erroneous calibration.
To cancel calibration, press and release the CALIB button.
To restore factory calibration, repeat steps 1 and 2, then hold the ZERO button for 3 seconds, until
the display reads “FAC.”
1. Press to select the mA units.
2. Connect the leads to an accurate current measurement
device.
3. Press and hold for 3 seconds, until the display flashes
between “CAL” and “4.00.” Set the loop current to 4.00
mA
4. Press TEST to decrease the output by 0.01 mA. Press UNITS
to increase the output. While the output will change, the
display will not.
5. Press and hold for 3 seconds to accept the calibration at
4.00 mA. The display will change to “CAL” and “20.00.”
6. Repeat steps 3 through 5 to calibrate at 20 mA. Display will now read “DONE.”
Notes:
To cancel calibration changes, briefly press and release the CALIB button.
To restore factory calibration, repeat step 3 only, then hold the ZERO button for 3 seconds, until the
display reads “FAC.”
