Inter-axle differential assembly – Spicer Tandem Drive Axles Service Manual J340-S, J380-S, J400-S, W460-S User Manual
Page 29
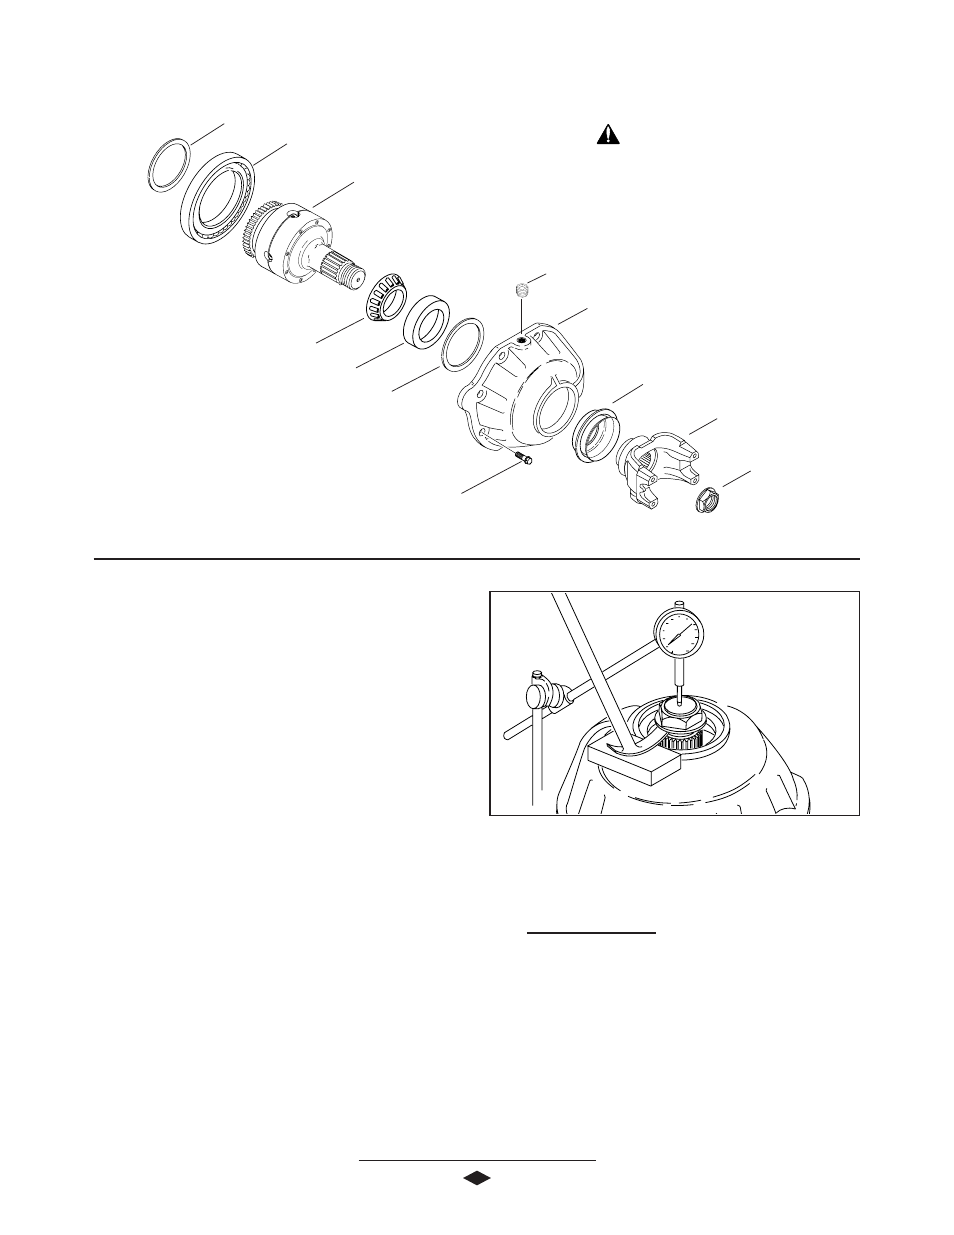
INTER-AXLE DIFFERENTIAL ASSEMBLY
1 . Press input bearing cone onto inter-axle differential case
assembly. Install bearing cup into differential cover
without shims.
2. Install inter-axle differential case assembly into
intermediate case. Then place the inter-axle
differential cover on top of the inter-axle differential
assembly. (the inter-axle differential rear bearing should
not be installed at this time)
3. Secure inter-axle differential cover into place with
four bolts. Bolts do not have to be torqued, but
should be enough to prevent movement.
4. Position a dial indicator on input shaft of inter-axle
differential. See Figure 18
. Use a lever arm and pry
differential up to measure end play. Record this
dimension. Remove inter-axle cover and inter-axle
differential. Remove bearing cup from cover.
5. End play for the inter-axle differential is .001-.005.
From the dimension recorded in step 4, subtract
.001-.005 for correct shim required.
EXAMPLE
.080 in. (2.032 mm) Dial indicator measurement
-.003 in. (.076 mm)
Preferred end play
.077 in. (1.956 mm) Shims required
Install proper shim and bearing cup into inter-axle cover.
6 . Press inter-axle differential rear bearing onto rear case of
inter-axle differential cover.
7. Assemble spiral snap ring onto differential case. Be sure
snap ring is completely seated into groove.
FFFFFigur
igur
igur
igur
igure 1
e 1
e 1
e 1
e 18
8
8
8
8
27
Flanged Hex Nut
(900-1,200 Lb-Ft)
(1,220-1,627N-m)
End Yoke
Assembly
Pinion Oil Seal
Inter-Axle Differential Cover
Shim (Selective)
Input Bearing Cup
Input Bearing Cone
Inter-Axle Differential Case
Assembly
Fill Plug
Inter-Axle Differential Rear Bearing
Spiral Snap Ring
Inter-Axle Differential
Cover Bolt
(75-90 Lb-Ft)
(102-122N-m)
IMPORTANT: Torque
specifications, shown on illustration,
apply only to J Model. See Page 33-
34 for W Model torque specifications.