MSD 2910 Atomic EFI Master Kit Installation User Manual
Page 16
16
INSTALLATION INSTRUCTIONS
M S D
• W W W . M S D P E R F O R M A N C E . C O M • ( 9 1 5 ) 8 5 5 - 7 1 2 3 • F A X ( 9 1 5 ) 8 5 7 - 3 3 4 4
ATOMIC EFI TIMING CONTROL
The Atomic EFI has the ability to control the engines ignition timing. This is an optional feature and
is NOT required for proper functioning of the fuel injection. By implementing ignition timing control
through the Atomic EFI, the engine will have more precise control and an improved idle. It is important
to note that most rough or inconsistent idle issues can be resolved through proper throttle blade
adjustment as outlined on page 15.
MSD recommends that those who wish to use the Atomic’s timing control feature first get the engine
to run without timing control. Splitting the timing control into a secondary process will add very
little time to the total install, but could significantly help with trouble shooting, should it be needed.
The following are a list of items that are required to use the timing features of the Atomic system:
• An MSD Ignition control such as a 6A or 6AL Ignition
• The distributor must be locked-out
• An adjustable rotor is required to achieve accurate rotor phasing. For standard GM size MSD
distributors, use rotor PN 84211. For larger, Ford style MSD distributors it is recommended to fit
the distributor with a smaller cap (PN 8433) and the PN 84211 rotor. If the larger cap must be used,
try rotor PN 8421.
• It is recommended but not required to us an MSD Pro Billet Distributor with a 2-pin mag pickup
connector.
• The balancer must be degreed, or use MSD Timing Tape, PN 8985
• A timing light will be required.
PREPARATION FOR ATOMIC TIMING
See page 17 for wiring information.
Before removing the distributor, bring the number one cylinder to approximately 15° BTDC on the
compression stroke.
1. Remove the distributor cap and note the position of the rotor. You will be removing the distributor
to lock it out, this will be your reference position for
the number one cylinder.
2. Remove the distributor clamp and pull the distributor
out of the engine.
3. If you are using an MSD Distributor (recommended),
follow the steps below to lock-out the mechanical
timing.
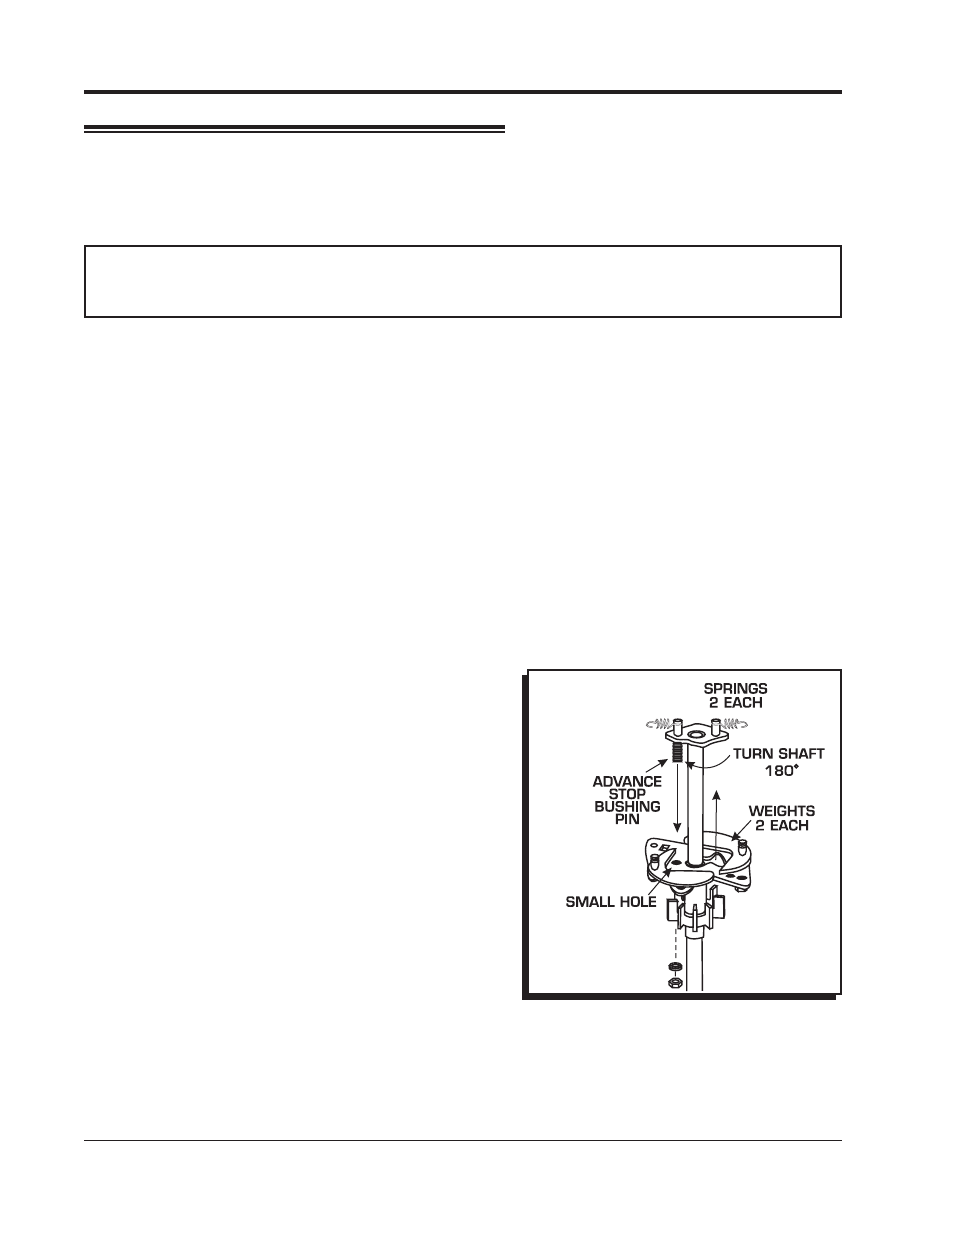
a. Remove the advance components including the
springs, weights and the advance stop bushing
from the advance assembly.
b. Remove the roll-pin from the drive gear and
remove the gear from the housing shaft (except
on Fords).
c. Slide the shaft two inches out of the housing.
d. Rotate the shaft 180° and insert the advance stop
bushing pin into the small hole on the advance
plate (Figure 16).
e. Install the locknut and washer to the advance stop
bushing pin. This locks the advance in place.
f. Put the shaft back in the housing
g. Install the drive gear and roll-pin.
4. Some applications will require the vacuum advance be removed. Please see page 16 for details,
or Appendix A for a complete list of distributors. If your vacuum advance needs removed and
locked out, use the following steps.
a. Remove the two Allen head screws that hold the advance canister (Figure 16).
Figure 6 Locking Out the Centrifugal Advance.
Figure 16 Locking Out the Advance.