Getting started, Using the keypad – Garmin NavTalk GSM User Manual
Page 13
3
Getting Started
Section 2
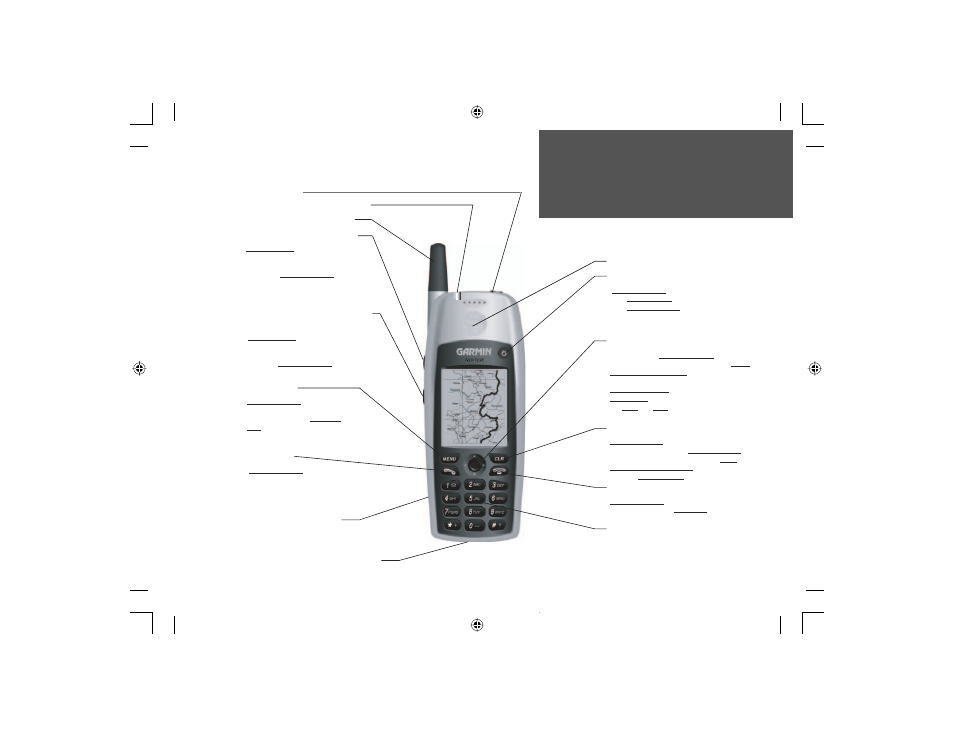
Using the Keypad
Built-in GPS Antenna
POWER key
Press and Release to turn the unit
ON. Press and Hold to turn the unit
Off. Press and Release while the unit
is On to display the Backlight/
Contrast adjustment window.
ENTER & Up/Down-Right/Left keys
(5 position key) Press In for ENTER to highlight,
confi rm a message or select an option. Move
Up, Down, Left, or Right to move from fi eld
to fi eld, tab to tab, or move the map pointer.
Move Up or Down to scroll through a list
Left or Right to move from page to page of a
list. Press and Hold to display the ‘Quick Set’
Menu.
CLEAR key
Press and Release to delete a previous character
or exit a data entry fi eld. Press and Release
again to escape to the Main Menu. Press
Once from the Main Menu to place the unit on
Standby. Press and Hold to delete a fi eld.
END key
Press and Release to end a call or stop the
phone from ringing. Press Once to exit a page
or menu when not on a call.
Dialling and Data Entry KEYPAD
Used to dial phone numbers and enter alpha-
numeric characters for data entry. Also some
special key functions for speed and emergency
dialling, international prefi xes, etc.
Remote Earpiece/Microphone
Connection
Volume UP/Zoom OUT key
Press and Hold to increase earpiece
volume or to zoom out on the map
page to show more map area with
less detail. Press and Release to move
by increments.
Auxiliary Power/Data Connector
Rechargeable Battery
on back of unit
SEND key
Press and Release to call a
dialled number, a highlighted
number from the Contacts List,
or to display the Call History
Page.
MENU key
Press and Release to display
the Main Menu or the Options
Menu for any page. Press and
Hold to display the ‘Find ‘n Go’
fi nd menu.
Volume DOWN/Zoom IN
key
Press and Hold to decrease earpiece
volume or to zoom in on the map
page to show more map detail with
less area. Press and Release to move
by increments.
Wireless Phone Antenna
Refer to Pages 99-101 for information on accessories
and how to connect them to the NavTalk Unit.
Service Status Indicator (LED)
NvTlkGSMManual copy.indd 3
12/2/2002, 8:41:47 AM