Table 47 firewall: services – ZyXEL Communications 802.11g Wireless Firewall Router P-320W User Manual
Page 112
P-320W User’s Guide
112
Chapter 9 Firewall
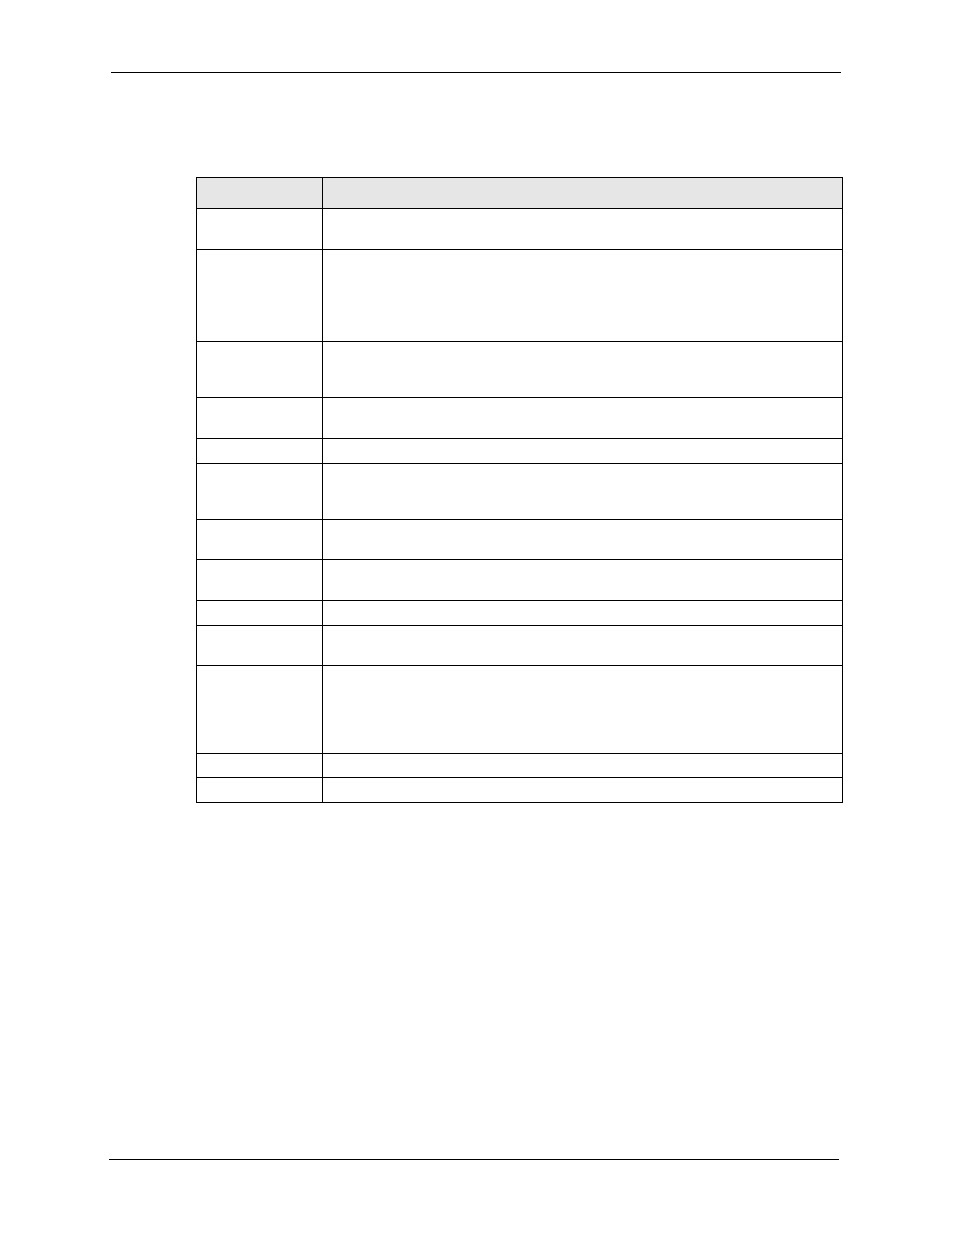
The following table describes the labels in this screen.
Table 47 Firewall: Services
LABEL
DESCRIPTION
Enable Services
Blocking
Select this check box to enable this feature.
Available Services This is a list of pre-defined services (ports) you may prohibit your LAN computers
for more information on services
available.
Select the port you want to block using the drop-down list and click Add to add the
port to the Blocked Services field.
Blocked Services
This is a list of services (ports) that will be inaccessible to computers on your LAN
once you enable service blocking. Choose the IP port (TCP, UDP or TCP/UDP)
that defines your customized port from the drop down list box.
Custom Port
A custom port is a service that is not available in the pre-defined Available
Services list and you must define using the next two fields.
Type
Services are either TCP and/or UDP. Select from either TCP or UDP.
Port Number
Enter the port number range that defines the service. For example, suppose you
want to define the Gnutella service. Select TCP type and enter a port range from
6345-6349.
Add
Select a service from the Available Services drop-down list and then click Add to
add a service to the Blocked Services.
Delete
Select a service from the Blocked Services list and then click Delete to remove
this service from the list.
Clear
Click Clear to empty the Blocked Services.
Day to Block:
Select a check box to configure which days of the week (or everyday) you want the
content filtering to be active.
Time of Day to
Block (24-Hour
Format)
Select the time of day you want service blocking to take effect. Configure blocking
to take effect all day by selecting the All Day check box. You can also configure
specific times that by entering the start time in the Start (hr) and Start (min) fields
and the end time in the End (hr) and End (min) fields. Enter times in 24-hour
format, for example, "3:00pm" should be entered as "15:00".
Apply
Click Apply to save the settings.
Reset
Click Reset to start configuring this screen again.