2 playback, 2-1 preparations for playback, 2-2 playback operation – Sony PDW-1500 User Manual
Page 45: Button/switch settings, Normal playback, Chap te r 4 rec o rdi ng/ pla y ba c k
Chap
te
Rec
o
rdi
ng/
Pla
y
ba
c
k
45
4-2 Playback
4-2 Playback
This section describes playback of video and audio.
4-2-1 Preparations for Playback
Button/switch settings
Before beginning playback, make any necessary button/
switch settings.
For details of the settings of the buttons/switches, see the
pages indicated in parenthesis.
4-2-2 Playback Operation
This section describes the following types of playback:
• Normal playback
Playback at normal (±1) speed
• Playback in jog mode
Variable speed playback, with the speed determined by
the speed of turning the jog dial
• Playback in shuttle mode
Variable speed playback, with the speed determined by
the angular position of the shuttle dial
• Playback in variable speed mode
Variable speed playback, with the speed finely
determined by the angular position of the shuttle dial
Normal playback
First insert a disc.
For details of how to insert a disc, see 3-5-4 “Loading and
Unloading a Disc” on page 39.
REC
VARIABLE
PRESET
PB
L
MIX
R
MONITOR
NETWORK
LOCAL
REMOTE
ACCESS
PHONES
TOP
F REV
F FWD
END
PREV
NEXT
PLAY
AUDIO
MONITOR SEL METER SEL
INPUT CH
INPUT SEL
VIDEO
INPUT SEL
COUNTER
SELECT
SUB
CLIP
THUMB
NAIL
SET RESET
SHIFT
EJECT
HOLD
SYS MENU
MENU
STOP
REC
SH
UTT
LE
JOG
VAR
MARK1
ESSENCE
MARK
S.SEL
MARK2
IN
OUT
ALL/CH-1
CH-2
CH-3
CH-4
OVER
dB
-12
-20
-30
-40
-60
0
CH-
15
BQ DATA
ANA SDI
AE8/EBU
OVER
dB
-12
-20
-30
-40
-60
0
CH-
26
BQ DATA
ANA SDI
AE8/EBU
OVER
dB
-12
-20
-30
-40
-60
0
CH-
37
BQ DATA
ANA SDI
AE8/EBU
OVER
dB
-12
-20
-30
-40
-60
0
CH-
48
BQ DATA
ANA SDI
HOURS
MINUTES
SECONDS
FRAMES
AE8/EBU
VITC
VITC
COUNTER
REC INH
VIUB
EDIT
KEY INH
REMOTE [9P iLINK]
INPUT
i.LINK
SDI
1/2
5/6
3/4
7/8
625
525
IMX[50 40 30]
DVCAM
4 8 CH
18 24 BIT
CMPST
Y-R,B
SG
ALARM
MONITOR
AUDIO
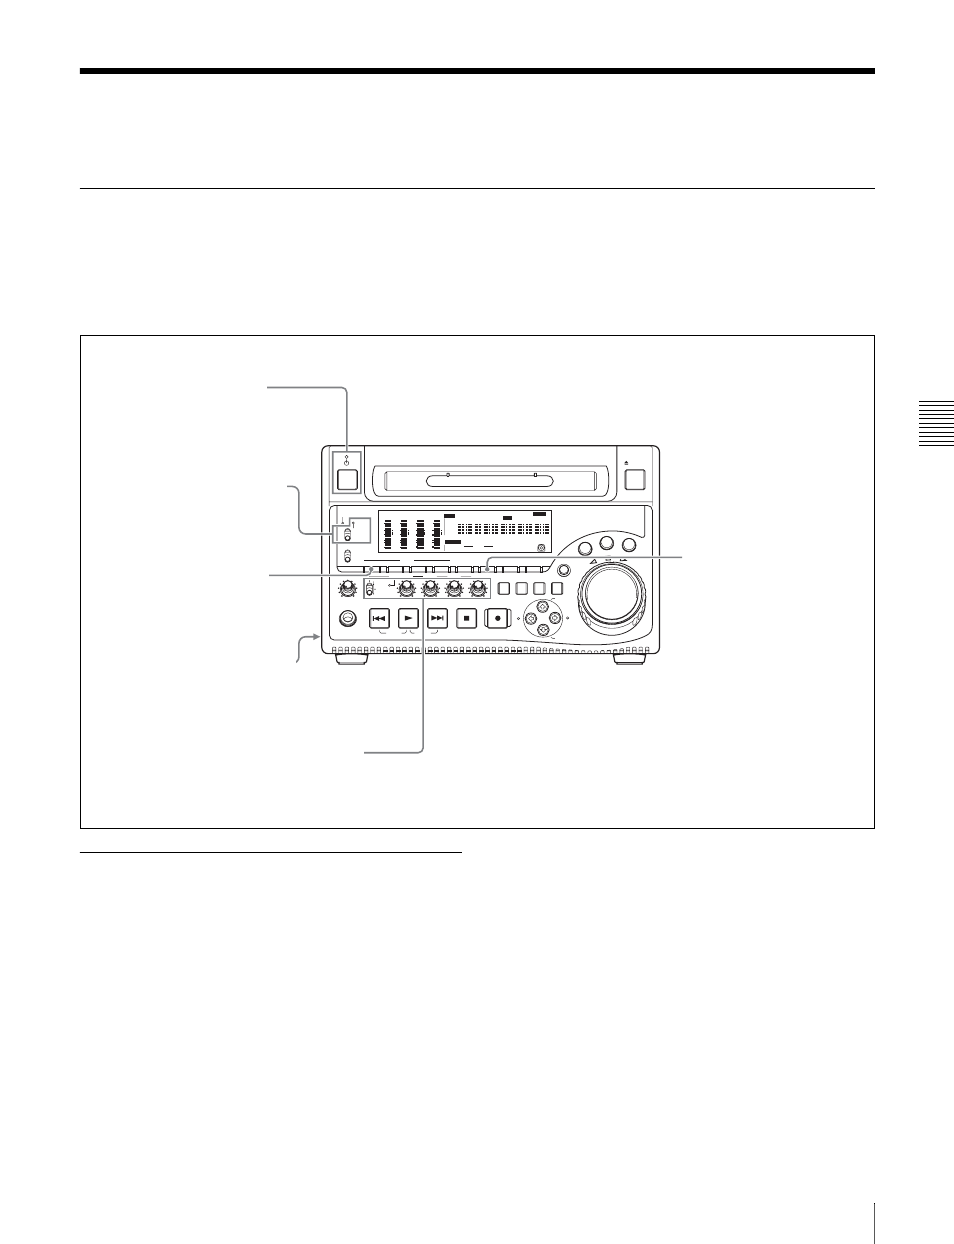
POWER switch (page 28): I side
(on)
On/standby switch (page
20): Indicator (1) lit green.
Audio level adjustment section (page 22):
adjust the audio playback levels
Remote control switch (page
20): LOCAL
COUNTER SELECT button
(page 20): select the data
(elapsed playback time, time
code value or user bit data) to
be displayed in the time data
display. When displaying the
time code value, select TC or
VITC with extended menu
item 629 “TC SELECT.”
AUDIO MONITOR SEL
button (page 21): select
the audio channels to
monitor.