Setting up the management console – IBM DR550 User Manual
Page 44
IBM System Storage DR550
Version 3.0 ------17 March 2006
Page 44
IBM Storage Systems
Copyright © 2006 by International Business Machines Corporation
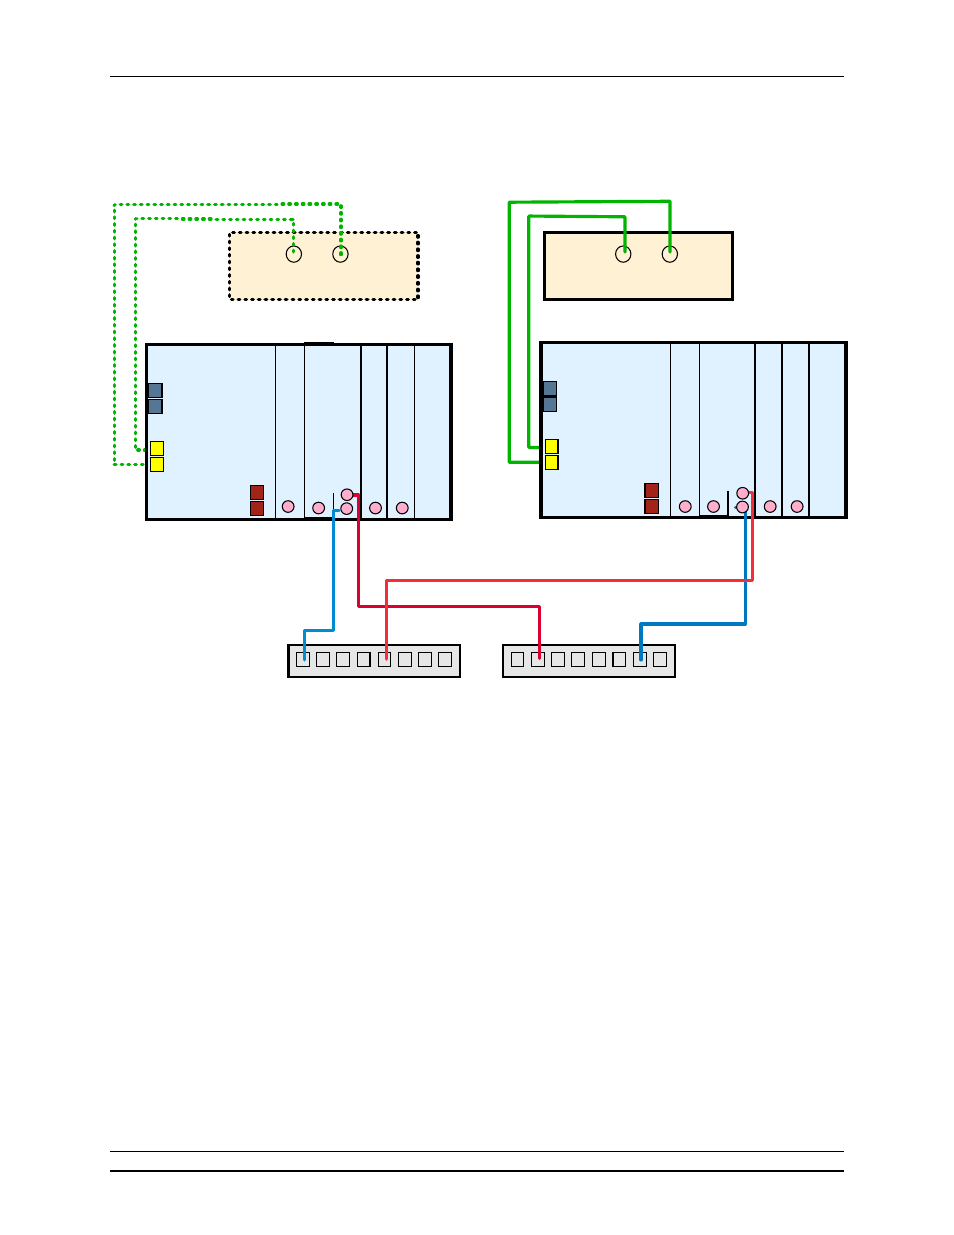
Dual Node
Gigabit (Fiber Optic) Ethernet Connectivity
CtrlB
CtrlA
DS4100#2 (in Rack B)
Gigabit EN Switch #1
(customer's network)
Gigabit EN Switch #2
(customer's network)
Customer supplied
Ethernet cables
IBM supplied Ethernet
crossover cables
IBM supplied Ethernet
crossover cables
P5 520 #1 (DRS_Engine_1)
P5 520 #2 (DRS_Engine_2)
CtrlB
CtrlA
DS4100#1 (in Rack A)
HACMP boot connection
HACMP boot connection
Customer supplied
Ethernet cables
10/100/1000 (T6)
HMC1
HMC2
System
board
10/100/1000 (T5)
USB0 (T7)
USB1 (T8)
10/100/1000 (T6)
HMC1
HMC2
System
board
10/100/1000 (T5)
USB0 (T7)
USB1 (T8)
HACMP standby - customer supplied cables
P
w
r
G
X
T
1
3
5
p
G
ra
p
h
ic
s
A
d
a
p
te
r
-
S
lo
t
2
2
P
o
rt
G
ig
a
b
it
E
th
e
rn
e
t
S
X
P
C
I-
X
A
d
a
p
te
r
-
S
lo
t
3
2
G
b
F
ib
re
c
h
a
n
n
e
l A
d
a
p
te
r
-
S
lo
t
4
(
D
S
4
1
0
0
)
2
G
b
F
ib
re
C
h
a
n
n
e
l A
d
a
p
te
r
-
S
lo
t
5
(
D
S
4
1
0
0
)
2
G
b
F
ib
re
C
h
a
n
n
e
l
A
d
a
p
te
r
-
S
lo
t
1
(
ta
p
e
)
P
w
r
G
X
T
1
3
5
p
G
ra
p
h
ic
s
A
d
a
p
te
r
-
S
lo
t
2
2
P
o
rt
G
ig
a
b
it
E
th
e
rn
e
t
S
X
P
C
I-
X
A
d
a
p
te
r
-
S
lo
t
3
2
G
b
F
ib
re
c
h
a
n
n
e
l A
d
a
p
te
r
-
S
lo
t
4
(
D
S
4
1
0
0
)
2
G
b
F
ib
re
C
h
a
n
n
e
l A
d
a
p
te
r
-
S
lo
t
5
(
D
S
4
1
0
0
)
2
G
b
F
ib
re
C
h
a
n
n
e
l
A
d
a
p
te
r
-
S
lo
t
1
(
ta
p
e
)
Setting up the Management Console
DR550 includes an integrated management console. This console is already connected to each of
the P5 520 servers and to the HMC. Connections are made through the Netbay LCM (Local
Console Manager). To interact with the system software interfaces or to run diagnostics from a
DVD-RAM, it is necessary to use the integrated console.
Userid and Password
The userid for the HMC is HSCROOT with a password of ABC123. You should change this
password as part of the initial installation. Please review your password requirements and create a
password that is appropriate to your installation.
Changing Server Names