Important, Figure 13 – MITSUBISHI ELECTRIC WS-48513 User Manual
Page 24
24
25
DTV Receiver (with RGB connections)
G
R
B
S-VIDEO
VCR
CONTROL
PHONE JACK
RF
REMOTE
OUT TO TV
CH 3
CH 4
CAUTION
RISK OF ELECTRICAL SHOCK
DO NOT OPEN
DIGITAL
AUDIO OUT
White
Red
Incoming
Antenna
or Cable
1
1
SATELLITE IN
IN FROM ANT
or
to antenna,
cable or satellite
AUDIO
L
R
5
2
2
3
3
3
3
5
W
h
i
t
e
R
e
d
H
V
H
4
V
4
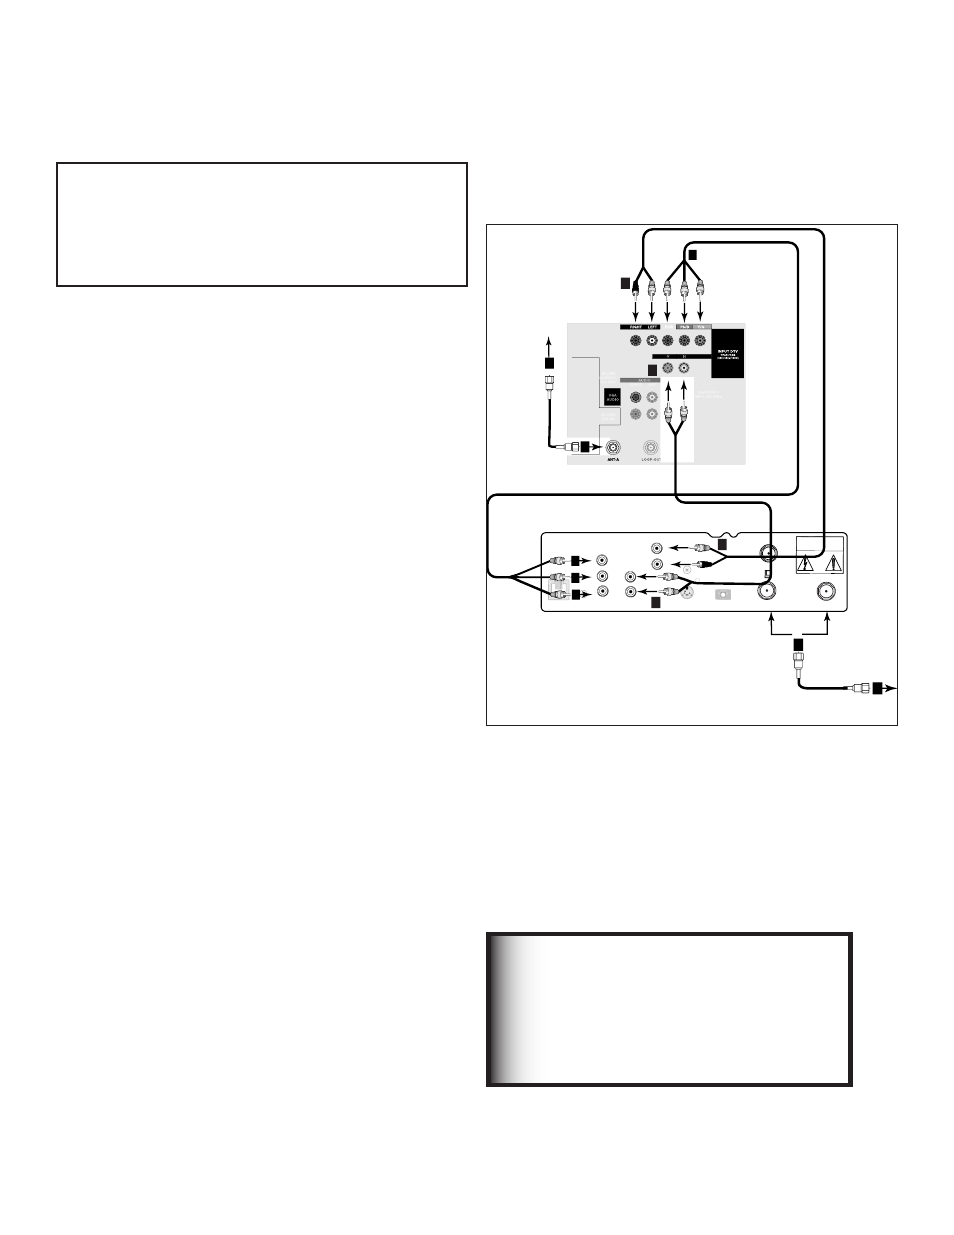
Figure 13. Connecting an External DTV Receiver with
RGB, HV Video Connections
Connecting an External Digital TV (DTV or HDTV) Receiver with
RGB, HV Video Connections
External DTV Receiver with RGB, HV
Video Connections
Figure 13
1. Connect the outside antenna, cable or satellite to ANT
or SATELLITE IN on the DTV receiver (see your DTV
receiver owner’s guide for instructions and cable
compatibility).
2. Connect the incoming terrestrial antenna or cable (not
satellite) to ANT-A on the TV back panel (a coaxial
splitter, available at most electronic supply stores, may
be required to complete this installation).
3. Connect RGB cables from the DTV receiver to Input-
DTV on the TV back panel.
Note: You may need to set the Input-DTV
assignment to RGB instead of YPrPb. Refer to
the Edit NetCommand® Setup for instructions on
changing this setting.
DTV Receiver to TV Back Panel
•
G (green) to Y/G
•
R (red) to Pr/R
•
B (blue) to Pb/B
4. Connect the H & V sync signals as shown below:
•
H (horizontal sync) to H
•
V (vertical sync) to V
All 5 cables (G,R,B,H and V) must be connected. 3 cables or
Sync on green connections are incomplete and will not work.
5. Connect the L (left) and R (right) audio cables from
the DTV receiver to Input-DTV AUDIO on the TV back
panel.
See Appendix B for RGB, HV video signal
compatibility information.
For digital audio connections, see your
DTV Receiver and A/V Receiver Owner’s
Guides.
IMPORTANT
It may be necessary to obtain a VGA to RGB
audio adaptor cable. These are available at most
computer stores and many electronic stores. Some
of the adaptor cables have RCA type connector
ends, others have BNC type ends and will require
adaptors as shown on page 21.