Step 2. right refractory panel installation, F. refractory installation, Step 1. back refractory panel installation – Heat & Glo Fireplace 8000CL-IPI-S User Manual
Page 59
59
Heat & Glo • 6000CL-IPI-S, 6000CL-IPI-T, 8000CL-IPI-S 8000CL-IPI-T • 2165-900 Rev. S • 9/12
Step 2. Right Refractory Panel Installation
The right refractory panel has a rectangular notch on the
bottom side.
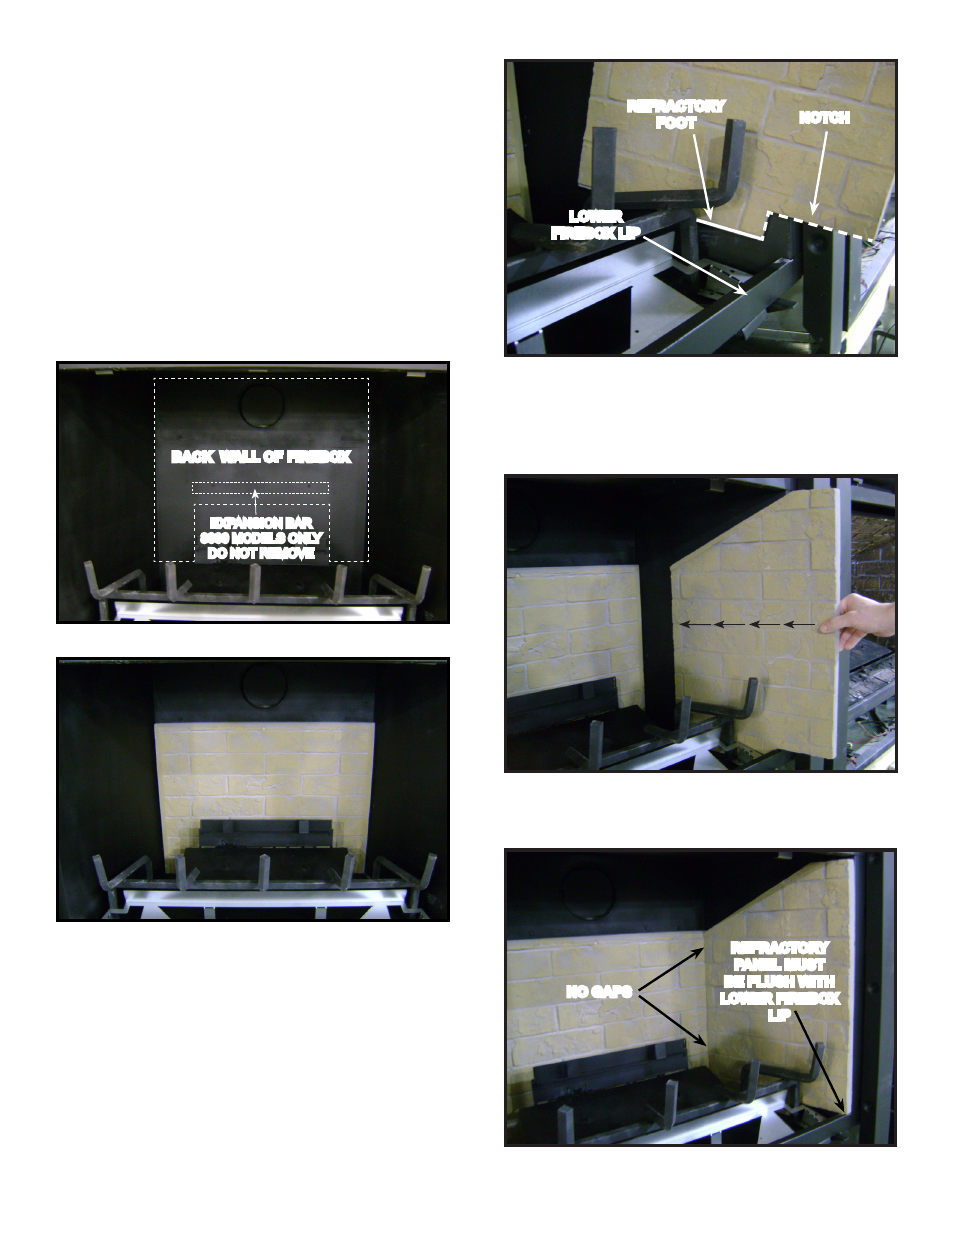
3. Place the right refractory panel against the right side-
wall of the firebox. Rest the rectangular notch located
on the bottom of the right refractory panel over the
lower firebox lip. Let refractory foot rest on firebox af-
ter panel’s notch has been mated with firebox lip. See
Figure 3.
BACK WALL OF FIREBOX
Figure 1
Figure 2
Figure 3
Figure 4
LOWER
FIREBOX LIP
4. Slide the right refractory panel completely into the fire-
box until it securely rests against back refractory panel.
Make sure that right refractory panel makes full contact
with the right sidewall of the firebox. See Figure 4.
NOTCH
REFRACTORY
FOOT
F. Refractory Installation
CAUTION! Risk of Cuts, Abrasions or Flying Debris.
Wear protective gloves and safety glasses during instal-
lation.
CAUTION! Refractory is fragile. Handle with care
Step 1. Back Refractory Panel Installation
The back refractory panel has a rectangular notch on the
bottom side.
1. Hold the back refractory panel with the notch on the
bottom facing down.
2. Place the back refractory panel against the back of the
firebox. Ensure back refractory panel makes full contact
with the back wall of the firebox. See Figures 1 and 2.
Figure 5
5. Verify that right refractory panel is slid all the way back
by looking to see that it’s flush with the firebox lip.
REFRACTORY
PANEL MUST
BE FLUSH WITH
LOWER FIREBOX
LIP
NO GAPS
EXPANSION BAR
8000 MODELS ONLY
DO NOT REMOVE