Panel descriptions, Top panel – Roland FANTOM-7 76-Note Workstation Keyboard User Manual
Page 5
5
1
Controller section
Controller
Explanation
WHEEL1
WHEEL2
You can assign various parameters or functions to these
wheels. To use the assigned function, move a wheel
while you perform.
If you operate the controller while holding down the
[SHIFT] button, the setting screen appears.
[CHORD MEMORY] button
Turns the chord memory function on/off.
[TRANSPOSE] button
Hold down this button and use the OCTAVE [DOWN]
[UP] buttons to raise or lower the pitch range in
semitone steps.
OCTAVE [DOWN] [UP]
buttons
Raise or lower the pitch range in steps of an octave.
[ARPEGGIO] button
Turns the arpeggiator on/off.
[PORTAMENTO] button
Turns the portamento on/off.
[S1] [S2] buttons
Various parameters or functions can be assigned to
these buttons.
Hold down the [SHIFT] button and press one of these
buttons to access a screen that lets you assign a
function.
Pitch bend/Modulation
lever
Varies the pitch or applies vibrato.
2
Zone section
Controller
Explanation
[ZONE 1-8/9-16] button
Switches the zones that you’re operating.
[PAN/LEVEL] button
If you press the button to make it light, control knobs
[1]–[8] adjust the pan of each zone, and sliders [1]–[8]
adjust the volume of each zone.
[ASSIGN1] button
[ASSIGN2] button
Assign other functions to sliders [1]–[8] and control
knobs [1]–[8].
ASSIGN1 assigns parameters that you set for a scene,
and ASSIGN2 assigns parameters that you edit in
system settings.
Hold down the [SHIFT] button and press one of these
buttons to access a screen that lets you assign a
function.
[MASTER VOLUME] knob
Adjusts the volume that is output from the MAIN OUT
jacks and the PHONES jack.
[SPLIT/KEY RANGE]
button
Turns the split function on/off.
If you hold down the [SHIFT] button and press this
button, the key range setting screen appears.
[S3] button
Various parameters or functions can be assigned to
these buttons.
Hold down the [SHIFT] button and press one of these
buttons to access a screen that lets you assign a
function.
ZONE SELECT buttons
[1]–[8]
Select the zone that you want to control (the current
zone). The selected zone becomes the current zone.
Controller
Explanation
CONTROL knobs [1]–[8]
Various parameters or functions can be assigned to
these knobs.
The parameters that can be controlled depend on the
function select buttons located at the left.
ZONE INT/EXT buttons
[1]–[8]
Specify whether the applicable zone does sound
or does not sound when you play the keyboard. In
conjunction with the current zone, this determines how
the internal sound engine (external sound module)
produces sound.
Button
status
When the applicable zone is
the current zone
When the applicable zone is
not the
current zone
Unlit
(COMMON)
The internal sound engine and
the external sound module both
produce sound when you play the
keyboard.
Neither the internal sound engine nor the
external sound module produce sound
when you play the keyboard. You can use
the internal sequencer or MIDI data from an
external device to play the internal sound
engine.
Lit red
(INT)
The internal sound engine
produces sound when you play
the keyboard.
Only if the ZONE INT/EXT button of another
current zone is on (lit red or green), the
internal sound engine produces sound
when you play the keyboard.
Lit green
(EXT)
The external sound module
produces sound when you play
the keyboard.
Only if the ZONE INT/EXT button of another
current zone is on (lit red or green), the
external sound module produces sound
when you play the keyboard.
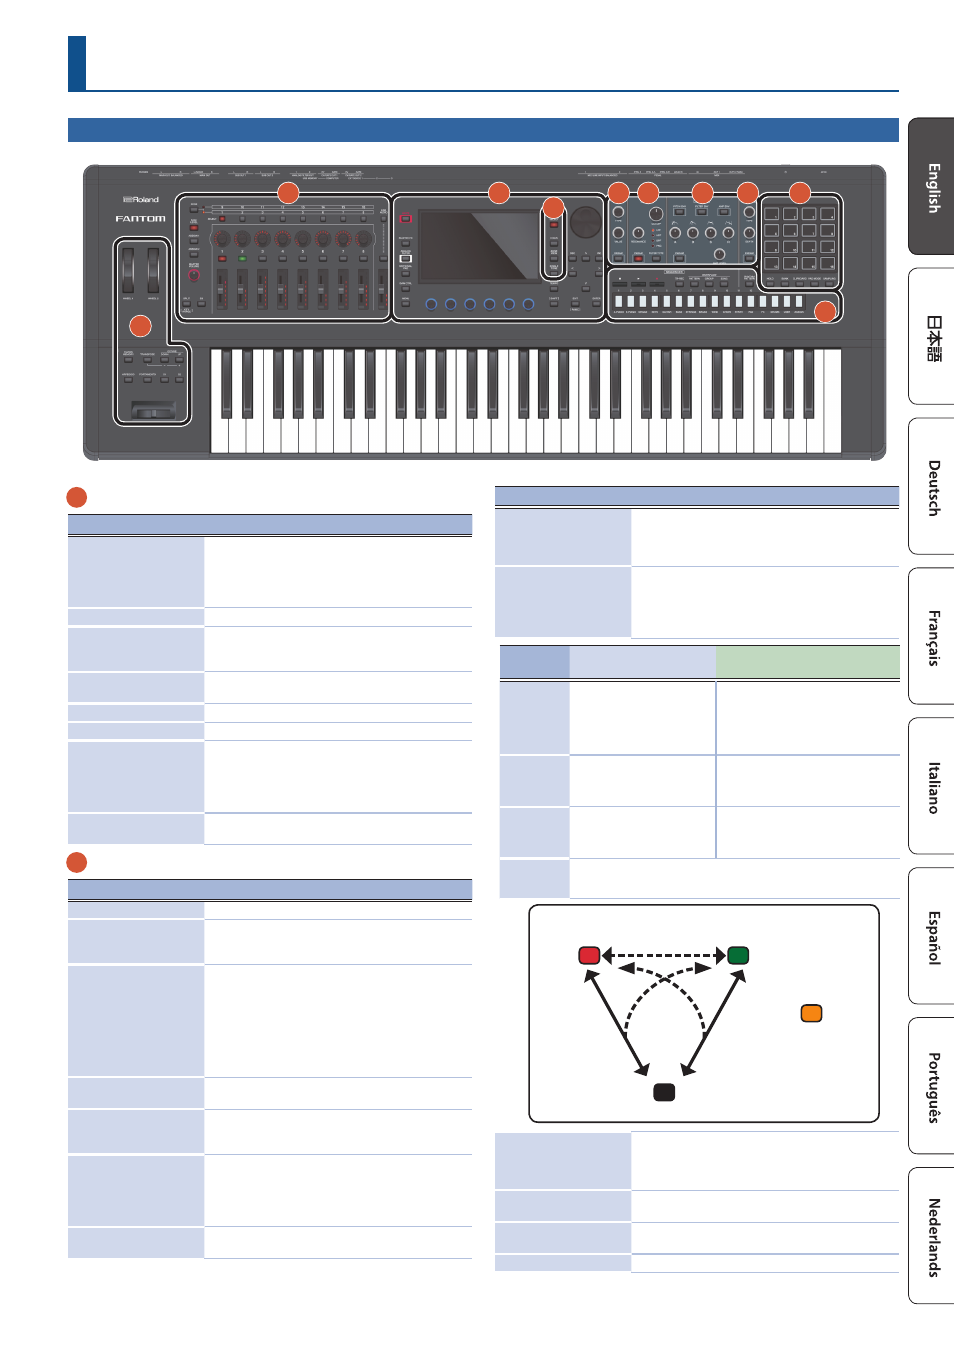
Lit orange
(MUTE)
The sound engine is muted. The internal sound engine does not produce sound.
If the immediately previous state was lit green, the external sound module
produces sound.
EXT
MUTE
INT
COMMON
Set in the MIXER screen
[SHIFT] +
ZONE INT/EXT button
Red
Unlit
Green
Orange
ZONE INT/EXT
button
ZONE INT/EXT
button
Sliders [1]–[8]
Various parameters or functions can be assigned to
these sliders.
The parameters that can be controlled depend on the
function select buttons located at the left.
[USB AUDIO SELECT]
button
The USB AUDIO setting screen appears.
[USB AUDIO IN/OUT]
button
Switches the function of the USB AUDIO slider between
input and output, or turns the USB AUDIO function off.
[USB AUDIO] slider
Adjusts the input level and output level of USB AUDIO.
Panel Descriptions
Top Panel
1
2
3
4
5 6
7
8
9
10