Epson Photo 925 User Manual
Page 28
26
Note:
The photo number is also displayed in the optional Preview Monitor.
See “Preview Monitor Black version” on page 133 for details.
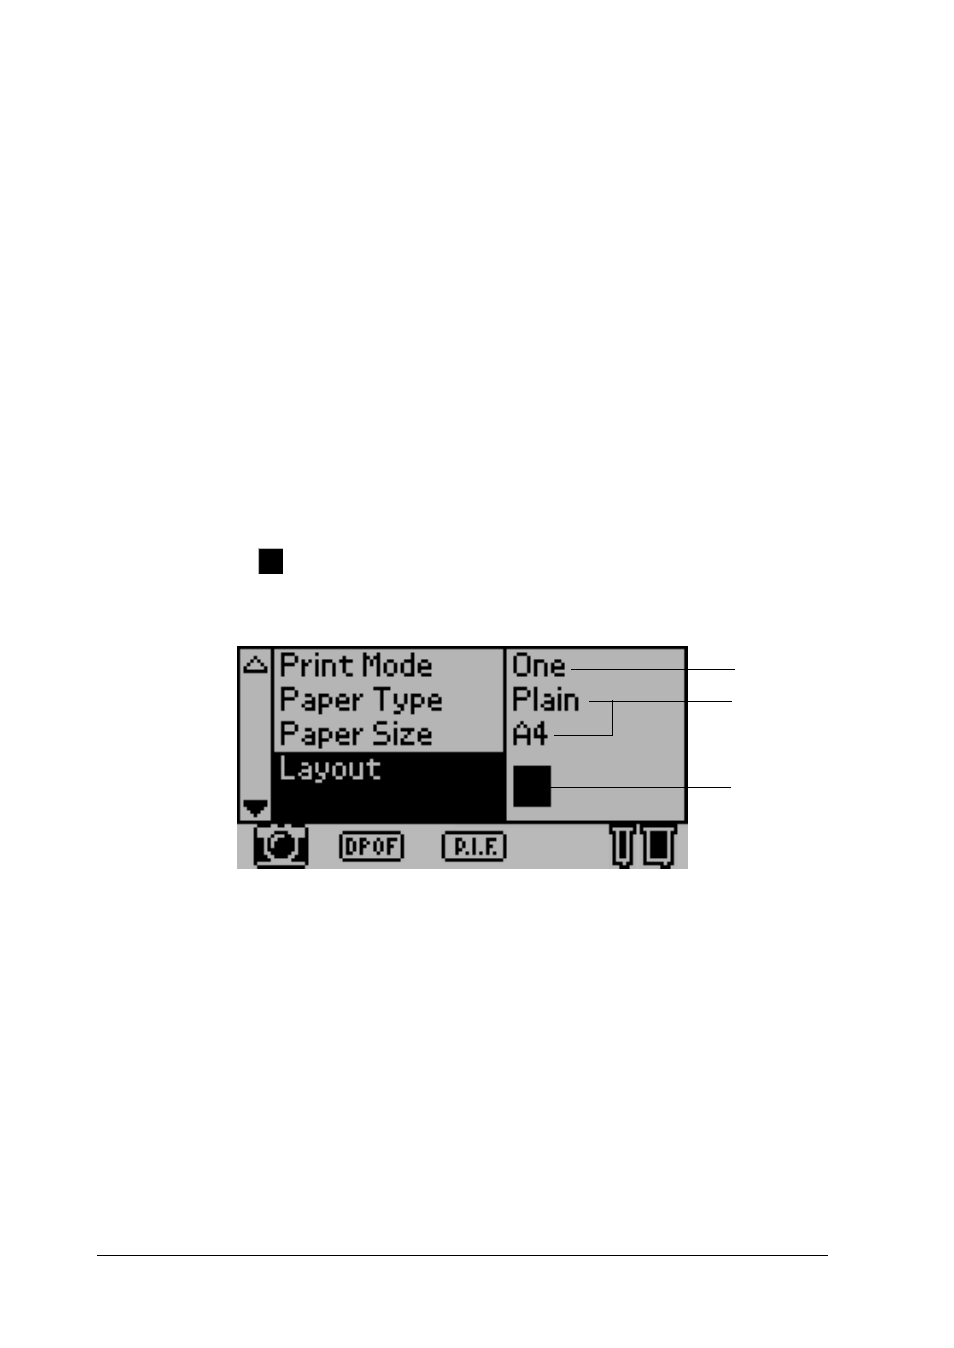
2. Press the u or d buttons to select Print Mode, the press the
Select button to open the Print Mode menu.
Select One in the Print Mode menu, then press the Select
button.
3. Similarly, select Plain as the Paper Type setting, then select
A4 as the Paper Size setting.
4. Select Layout from the LCD panel, and then press the Select
button to open the Layout menu.
Select
in the Layout menu, then press the Select button. It
means No margin printing of cut sheet.
4
3
2
See also other documents in the category Epson Photo Printers:
- R300 (6 pages)
- C120 (2 pages)
- R380 (72 pages)
- STYLUS PHOTO R800 (6 pages)
- PictureMate 239 (3 pages)
- Ultra Hi-Definition Photo Printer R260 (82 pages)
- STYLUS DX6000 (36 pages)
- PictureMate 238 (1 page)
- PictureMate 500 (90 pages)
- Stylus Color 800 (20 pages)
- All in One Stylus CX7800 (12 pages)
- SUBLIJET IQ R800 (53 pages)
- Sylus Pro 10600 (16 pages)
- CPD-18557R1 (1 page)
- PictureMate 222 (1 page)
- T087720 (4 pages)
- PictureMate CZ 283 (2 pages)
- Stylus Photo R300 Series (124 pages)
- 1400 (6 pages)
- Stylus Photo EX 220-240 V (12 pages)
- Stylus Photo 750 (11 pages)
- STYLUS PHOTO 900 (2 pages)
- Photo PX700W (3 pages)
- 221 (2 pages)
- Stylus Pro 9800 (8 pages)
- Stylus Photo R220 (10 pages)
- CPD-19345R0 (119 pages)
- PIS T079620 (4 pages)
- PictureMate (126 pages)
- PictureMate (6 pages)
- 790 (26 pages)
- LQ-680Pro (16 pages)
- STYLUS PHOTO 915 (4 pages)
- RX650 (2 pages)
- STYLUS R2880 (64 pages)
- PowerLite 1260 (2 pages)
- Stylus NX200 (2 pages)
- HP 7960 (1 page)
- R Series (6 pages)
- R340 (40 pages)
- Stylus CX3100 (57 pages)
- 870 (8 pages)
- STYLUS R1900 (56 pages)
- STYLUS R3000 (5 pages)