Magnum Energy MP Extension Box (MPX Series) User Manual
Page 14
3.0 Installation
© 2011 Magnum Energy, Inc.
10
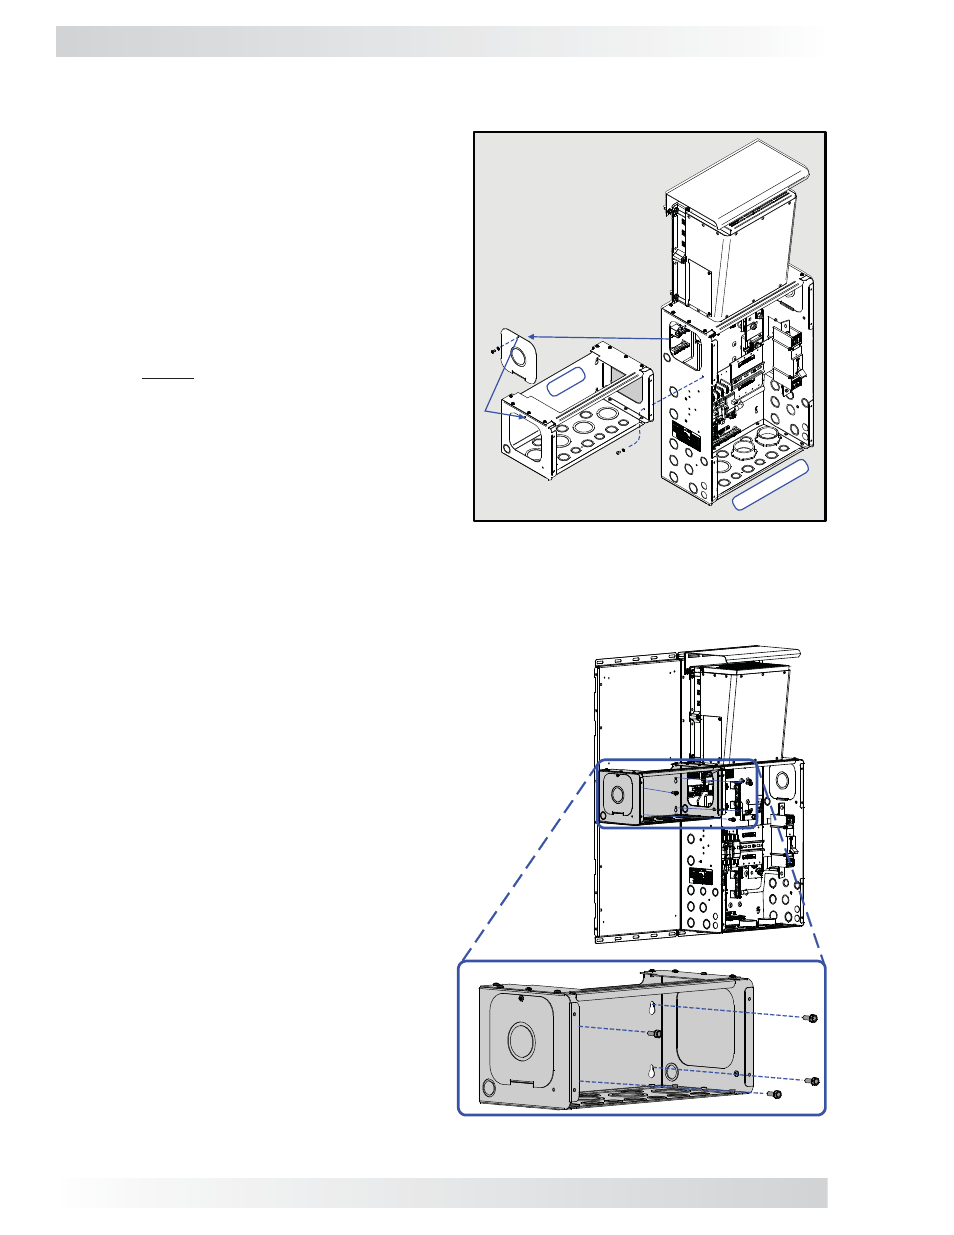
The MPX attaches to the MP enclosure. This pro-
vides unit stability when the MP enclosure is mount-
ed to a backplate/sheathing, and also ensures good
metal-to-metal contact for grounding the MPX and
the MP enclosure together.
1. On the upper side of the MP enclosure, remove
the side access plate – the side to which you will
attach the MPX (see Figure 3-5).
2. Using the same screw and lock washer (see
Item A), attach the side access plate to the
side of the MPX (opposite the side of the MPX
that attaches to the MP).
Note: Before attaching the MPX to the MP
enclosure you should have already removed
a knockout from the bottom of the MPX (see
Figure 3-3). This knockout is needed for run-
ning the communication cables from the router
to the inverters.
3. Use the supplied screw and lock washer (see
Item B) to attach the MPX to the MP enclosure.
The attachment hole is located towards the front
of the (lower) side of the MPX.
Figure 3-5, Attaching the MPX
to an MP Enclosure
The MP enclosure and attached MPX can be mount-
ed on a Magnum backplate or a wall (see the MP
Owner’s Manual for wall requirements).
1. Using eight bolts, screw them halfway into the
backplate/wall in the locations that the MP en-
closure and attached MPX will be mounted (align
with each unit’s four keyhole slots).
Note: If you have purchased a Magnum dual
or single backplate, you will be supplied with
the necessary Hex head bolts (1/4-20 x 3/4”) to
mount the MP and MPX units to the backplate.
If you are mounting to a wall, the installer must
provide the appropriate mounting bolts.
2. Hang the MP enclosure and attached MPX onto
the eight bolts using each unit’s keyhole slots
(see Figure 3-6).
3. Tighten the bolts to secure the MP enclosure
and MPX onto the backplate/wall.
BP-S Magnum
Single Backplate
3.1.2 Attaching the MPX to the MP Enclosure
3.1.3 Mounting the MP/MPX Enclosure to a Backplate/Wall
MPX
MP Enclosure
A
B
Use the supplied (B) #10-
32 x 3/8” (T25) Torx screw
and #10 lock washer
(Figure 2-2, Items 5 & 6) to
attach the MPX to the MP
enclosure.
Figure 3-6, Mounting the MPX to a Backplate/Wall