Midi recording, Live 9 lite quick start guide – Teac Live 9 Lite User Manual
Page 8
Live 9 Lite Quick Start Guide
8
TASCAM
Note
The mixer view is convenient for operations of the mixer such as
adjusting the volume balance of each track, but the timeline view,
which allows you to see recording conditions, is convenient for
recording.
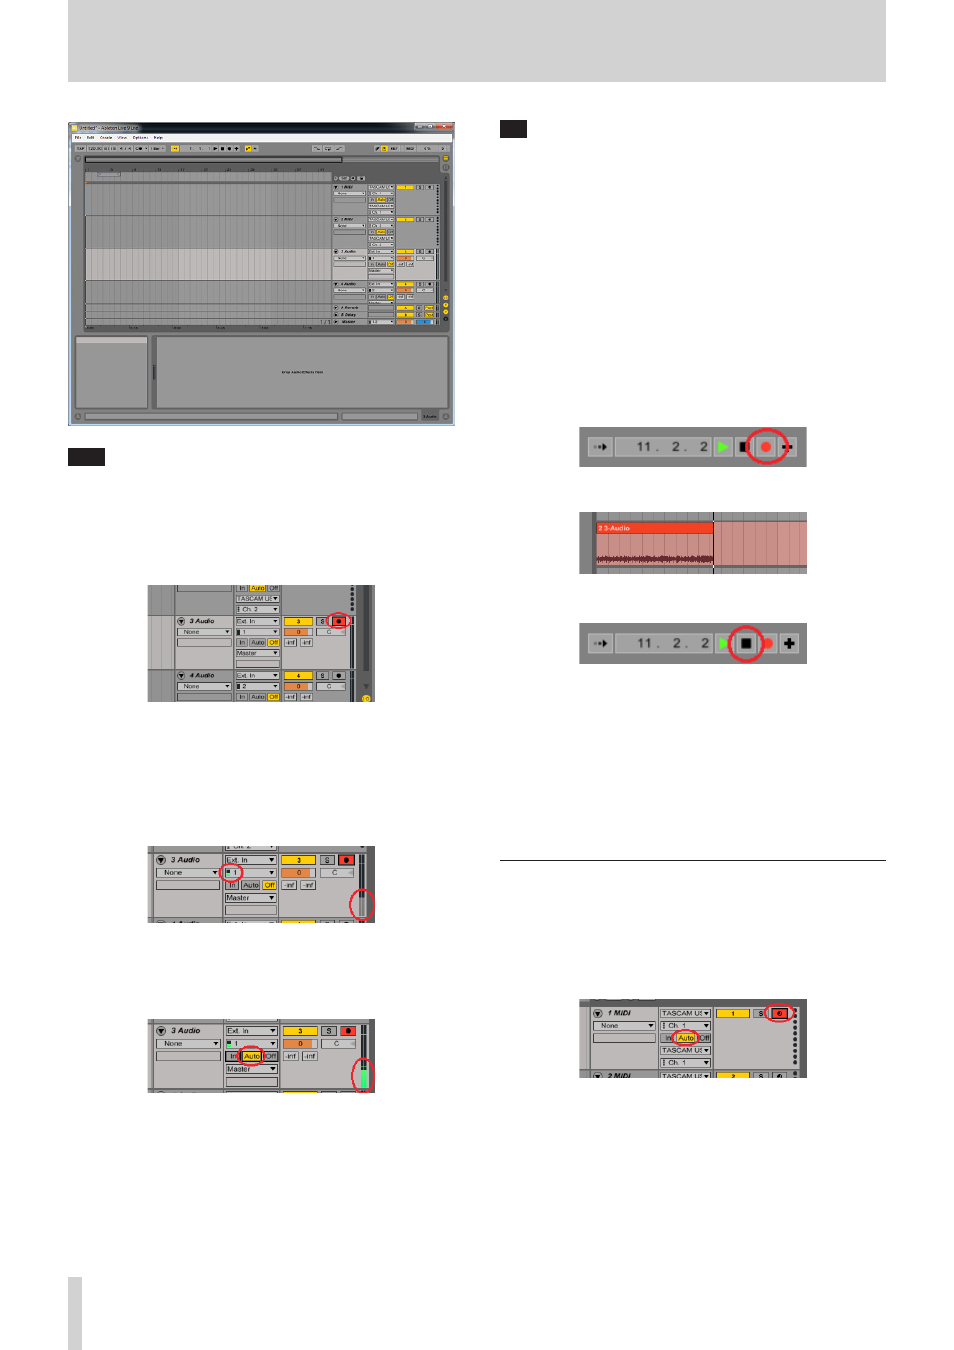
2.
Record a sound in the “3 Audio” track. Click the “Arm” button (button
with a black dot) for the “3 Audio” track to turn on (light up in red).
When a signal is input to the input terminal 1 of the US-2x2 in this
condition, the meter on the left of the channel setting of the input
port lights in green.
This is the input meter, which indicates that a signal is input into
this track. The meter on the right side is the output meter of the
track, and lightning in gray indicates that there is an output signal
but it is not actually output.
That is because the monitoring setting of the track is off and you
cannot listen input sounds in this condition.
To listen input signals, click the “Auto” button for the monitoring
setting to turn on.
Now the output meter of the track lights in green. Output sounds
are mixed with other signals in the master bus and then output
from the output terminal of the US-2x2.
Tip
The 3 buttons, “In”, “Auto”, and “Off” are monitoring setting buttons.
Output signals of the track change depending on the setting.
“In”
Input signals of the track are output with no change.
It is convenient when you want to listen input sounds
at all times.
“Auto”
When the “ARM” button is on, input signals of the track
are output with no change. When the “ARM” button
is off, reproduced sounds of the track are output. It
is convenient for normal recording because during
recording, input sounds are output, and during
reproduction of recorded sounds, reproduced sounds
are output.
“Off”
Nothing is output. It is convenient when you use the
direct monitoring function of the audio interface.
3.
Click the “Record” button of transport buttons on the top side of
the screen to start recording and playing.
The waveform of the signal being recorded in the track is displayed.
4.
After the playing is finished, click the “Stop” button.
5.
It is recommended to click the “Arm” button for the track to turn
off so that no sound is recorded in the track by mistake when
recording in another track.
It is recommended to save the set frequently by selecting “Save Live
Set” from the “File” menu.
6.
Rewind the track and click the “Play” button to listen to the
recorded sound.
7.
Repeat 2. to 5. steps to record in multiple tracks and compose a
piece of music.
MIDI recording
1.
Record a MIDI sound in the “1 MIDI” track.
This case assumes that an internal MIDI sound source (bass) built
into Live 9 Lite is used.
Click the “Arm” button for the “1 MIDI” track to turn on (light up in
red). Also, click the “Auto” button to turn on.
If you play a MIDI keyboard or a MIDI pad connected to the MIDI IN
terminal of the US-2x2 in this condition, the meter on the left of the
input MIDI channel lights in yellow. This is the input meter, which
indicates that a MIDI signal is input into this track. The meter on the
right side is the output meter of the track and lighting in yellow of
the meter indicates that a MIDI command is output from the track.