Sloan 110 Dolphin Flushometer User Manual
Page 5
I. Flushometer does not function (no flush).
A. Control Stop or Main Valve is Closed. Open Control Stop or Main Valve.
B. Handle Socket Assembly is damaged. Replace Handle Socket Assembly
(DO-20).
2. Volume of water is not sufficient to siphon fixture.
A. Control Stop is not open enough. Adjust Control Stop for desired delivery of
water volume.
B. Timing of Flushometer closure is set too fast. Remove DO-1 Cover Nut.
Use a small blade screwdriver to turn DO-3 Regulating Screw clockwise.
Flushometer should be set so that valve closure occurs between 7 and 12
seconds.
C. Water supply volume or pressure is inadequate. If no gauges are available
to properly measure supply pressure or volume of water at the Valve, then
completely open the Control Stop and hold down the Flushometer Handle
without allowing it to close.
• If the supply is adequate to siphon the fixture, increase timing of
closure. Remove DO-1 Cover Nut. Using small blade screwdriver,
turn DO-3 Regulating Screw clockwise until a 7 to 12 second flush is
achieved.
• If the supply is
NOT adequate to siphon the fixture, steps should be
taken to increase the supply pressure and/or volume. Contact the fixture
manufacturer for minimum water supply requirements of the fixture.
3. Flushometer closes immediately.
A. Oil chamber of upper body is empty. Remove DO-1 Cover Nut. Fill oil
chamber with SAE 10 Oil.
B. Piston seal is worn or damaged. Replace DO-6 Piston O-ring seal. Refer to
Dolphin Maintenance Guide for complete instructions.
4. Length of flush is too short (short flush).
A. Volume of oil in oil chamber of upper body is low. Remove DO-1 Cover Nut.
Fill oil chamber with SAE 10 Oil.
B. Timing of Flushometer closure is not adequately adjusted. Remove DO-1
Cover Nut. Using small blade screwdriver, turn DO-3 Regulating Screw
clockwise until a 7 to 12 second flush is achieved.
5. Length of flush is too long (long flush).
A. Timing of Flushometer closure is not adequately adjusted. Remove DO-1
Cover Nut. Using small blade screwdriver, turn DO-3 Regulating Screw
COUNTERCLOCKWISE until a 7 to 12 second flush is achieved.
6. Oil is leaking from handle.
A. Stem seals are worn or damaged. Replace two (2) SH-75 Throttle Seal
O-rings.
7. Valve does not close completely (water trickle).
A. Compression Spring is worn or damaged. Replace DO-16 Compression
Spring. Refer to Dolphin Maintenance Guide for complete instructions.
B. Flex-Sac Assembly is worn. Replace DO-15 Flex-Sac. Refer to Dolphin
Maintenance Guide for complete instructions.
When assistance is required, please contact the Sloan Technical Support at:
1-888-SLOAN-14 (1-888-756-2614)
5
A
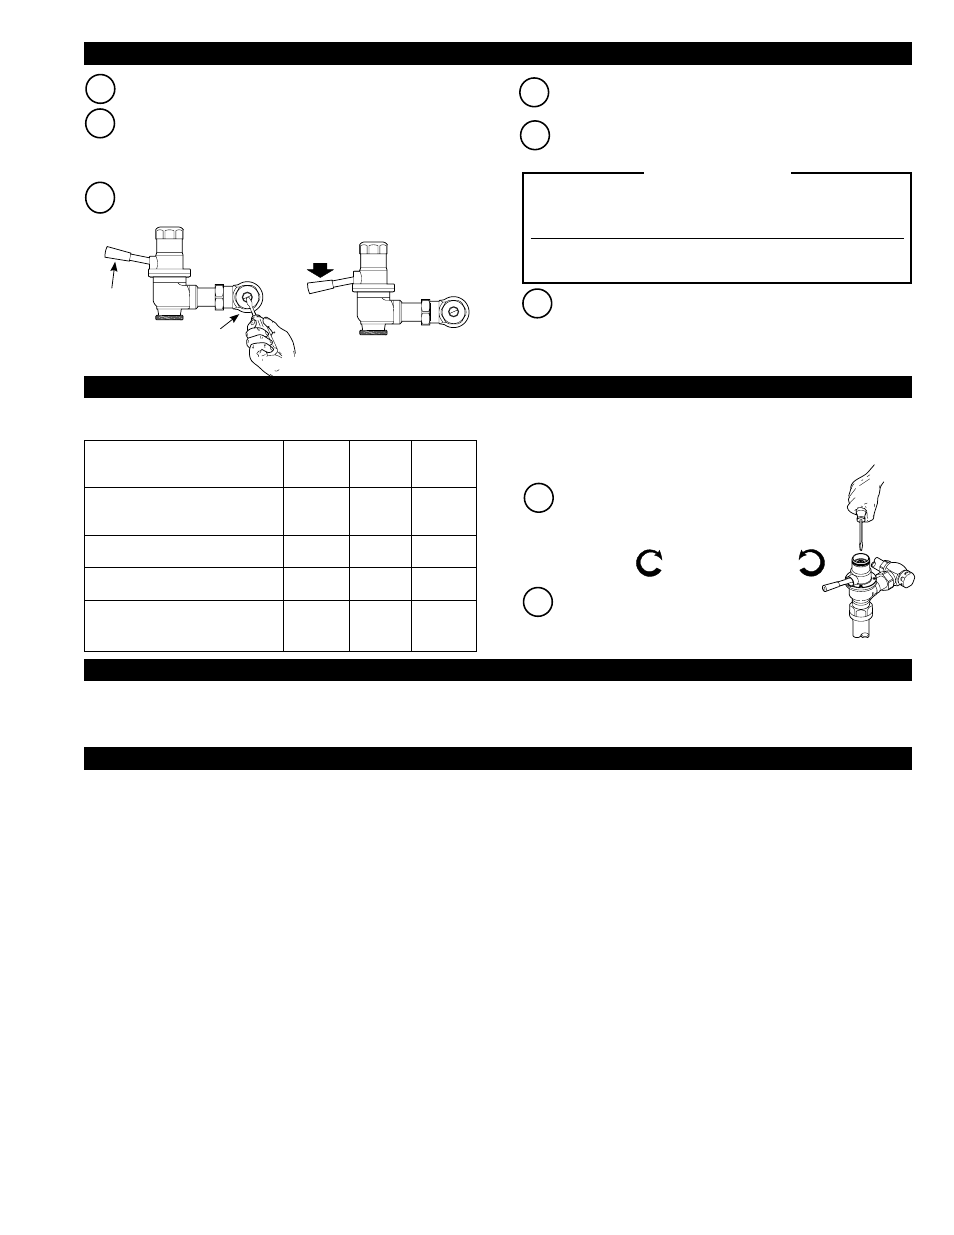
Make sure Control Stop is CLOSED. Turn on water supply.
B
Open Control Stop. Activate Dolphin Flushometer Valve by pushing
Handle down. Hold the Handle down until all dirt and debris is
flushed out from the supply line and the water flowing into the
fixture is clean.
D
Open Control Stop COUNTERCLOCKWISE one FULL turn from
closed position. Activate Flushometer.
E
Adjust Control Stop after each flush until the rate of flow delivered
properly cleanses the fixture.
Release the Handle to begin the flush cycle. When the Handle
returns to the UP position, the flush cycle will finish.
C
The Sloan Dolphin Flushometer is engineered for quiet operation. Excessive water
flow creates noise, while too little water flow may not satisfy the needs of the fixture.
Proper adjustment is made when the plumbing fixture is cleansed after each flush
without splashing water out from the lip AND a quiet flushing cycle is achieved.
Never open Control Stop to where the flow from the valve exceeds the flow
capability of the fixture. In the event of a valve failure, the fixture must be able to
accommodate a continuous flow from the valve.
!!! IMPORTANT !!!
A
Remove the Cover Nut from the Valve body. Using a
flat blade screwdriver, slightly rotate the Regulating
Screw located in the center of the oil chamber.
F
After Control Stop adjustment is complete, install Stop Cap onto
the Control Stop. Wrench tighten Stop Cap to prevent vandalism.
The Sloan Dolphin Flushometer can be adjusted to meet the flushing requirements of any plumbing fixture. The flush volume, in gallons per flush (gpf) or liters
per flush (Lpf), is adjusted by turning the Regulating Screw. Flush volumes will vary with pressure and flow rate.
B
When the delivered water properly cleanses the
fixture, replace the Cover Nut and tighten with a
wrench.
DOLPHIN FLUSHOMETER
VALVE ADJUSTMENT
RANGES
FACTORY
SETTING †
MINIMUM
FLUSH
VOLUME
MAXIMUM
FLUSH
VOLUME
CLOSET MODELS: 110, 115, 120,
Type I Class A Shock Proof, and
Type I Class B Rigid Installation
3.5 gpf
(13.2 Lpf)
0.5 gpf
(1.9 Lpf)
16.0 gpf
(60.6 Lpf)
CLOSET MODELS:
111, 115-1.6 and 120-1.6
1.6 gpf
(6.0 Lpf)
0.5 gpf
(1.9 Lpf)
16.0 gpf
(60.6 Lpf)
CLOSET MODEL: 111-1.28
1.28 gpf
(4.8 Lpf)
0.5 gpf
(1.9 Lpf)
16.0 gpf
(60.6 Lpf)
URINAL MODELS: 186-1.0,
Type II Class A Shock Proof, and
Type II Class B Rigid Installation
1.0 gpf
(3.8 Lpf)
0.25 gpf
(0.9 Lpf)
12.0 gpf
(45.4 Lpf)
PUSH AND HOLD
HANDLE DOWN
HANDLE
IN UP
POSITION
TURN CLOCKWISE TO CLOSE
OR COUNTERCLOCKWISE TO
OPEN CONTROL STOP
COUNTERCLOCKWISE
decreases both length of
flush and flush volume
CLOCKWISE increases
both length of flush and
flush volume
† Factory settings are made at 40 psi (275 kPa). Flush volume
will vary with pressure and flow rate.
5 - FLUSH OUT SUPPLY LINE, ADJUST CONTROL STOP, AND INSTALL STOP CAP
6 - ADJUST DURATION OF FLUSH
TROUBLESHOOTING GUIDE
CARE AND CLEANING
DO NOT USE abrasive or chemical cleaners (including chlorine bleach) to clean Flushometers that may dull the luster and attack the chrome or special
decorative finishes. Use
ONLY mild soap and water, then wipe dry with clean cloth or towel.
When cleaning, protect the Flushometer from any splattering of cleaner. Acids and cleaning fluids will discolor or remove chrome plating.