Besa Lighting Mira (120V Pendants) User Manual
Glass shade installation guide
GLASS SHADE INSTALLATION GUIDE
Model J Series -Mira/Olin (Med. Base Pendant Set 120V)
Mira_Olin, Rev.1 7-14
6695 Taylor Rd. Blacklick, OH 43004
www.besalighting.com
All electrical connections and the installation of this fixture must be in agreement with local codes,
ordinances or the NEC (National Electric Code) or CEC (Canadian Electrical Code).
Do not connect this fixture to an electrical system that does not provide a means for equipment grounding.
IMPORTANT: For installation of pendants and wiring, please refer
to the
Fixture Installation Guide included with fixture canopy
Use With
these Models:
• MIRA
(MIRAxx)
• OLIN
(OLINxx)
NOTE:
Glass Shade is for instructional
purposes. Actual Glass Shade
may vary in size and shape.
A
B
C
G
H
D
E
F
White
Stripe
Clear
Ground
Copper
Alan Head
Set Screw
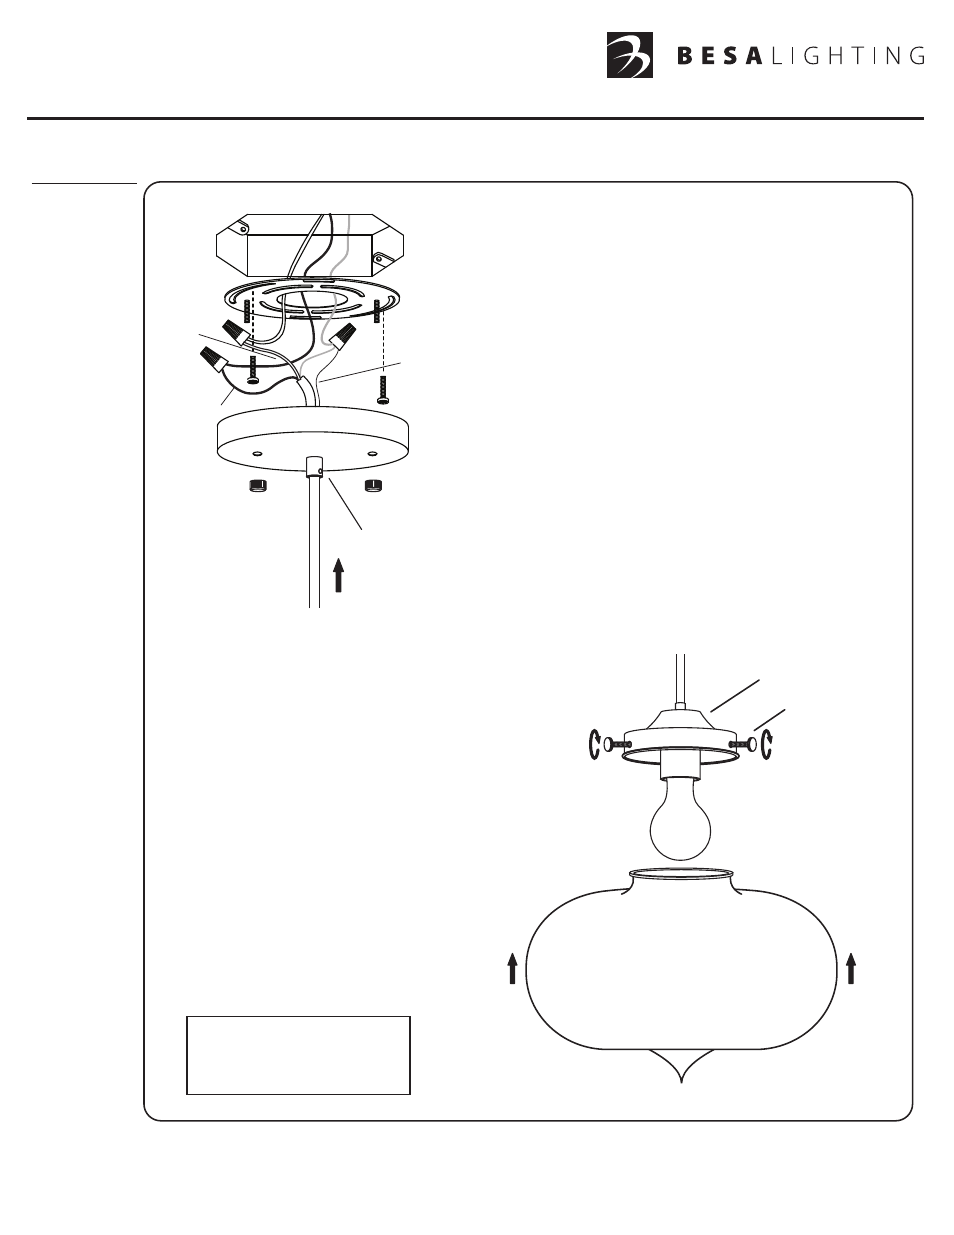
1. Carefully unpack parts. Remove the Mounting Plate (B)
from the Canopy (A), by unthreading the Cap Nuts (F)
from the Threaded Posts (C).
2. Install the Mounting Plate (B) to the Outlet Box (D), as shown.
Feed the Fixture Cord (E) through the Canopy (A) and
connect House Supply Wires to Fixture Cord Conductors as
follows: House Ground Wire to Green Stripe Conductor Cord
and Bare Copper Lead with provided Wirenut (G). Connect
Clear to Black and White to White with provided Wirenuts (H).
Push the wires and wirenuts into the Outlet Box (D).
3. Align the openings on the canopy with the Threaded Posts
on the Mounting Plate. Push the Canopy (A) up over the
Threaded Posts until tight to the ceiling, then secure with
the two Cap Nuts (F).
4. Loosen the Alan Head Set Screw on the Canopy to adjust
the height of the Fixture Cord, then re-tighten the Alan Head
Set Screw to secure in place.
NOTE: Do not overtighten set screw as this may
cause a short.
GLASS INSTALLATION:
1. Install Glass per diagram to the right:
a. Install Lamp.
b. Align top opening of Glass Shade
with the Decorative Cap. Once Glass
Shade flush with Decorative Cap, thread
the Decorative Screws until Glass Shade
is secured in place.
NOTE: Do not overtighten Decorative
Posts as this may damage Glass Shade.
c. Restore power.
Decorative Screws
Decorative Cap