Stan2, rev3, Installation guide – Besa Lighting Standoff (Monorail Component) User Manual
Page 2
INSTALLATION GUIDE
Model STAN2 Swivel Standoff Support
(For use with Besa low voltage lighting systems only)
STAN2, Rev.3 2-09
6695 Taylor Rd. Blacklick, OH 43004
www.besalighting.com
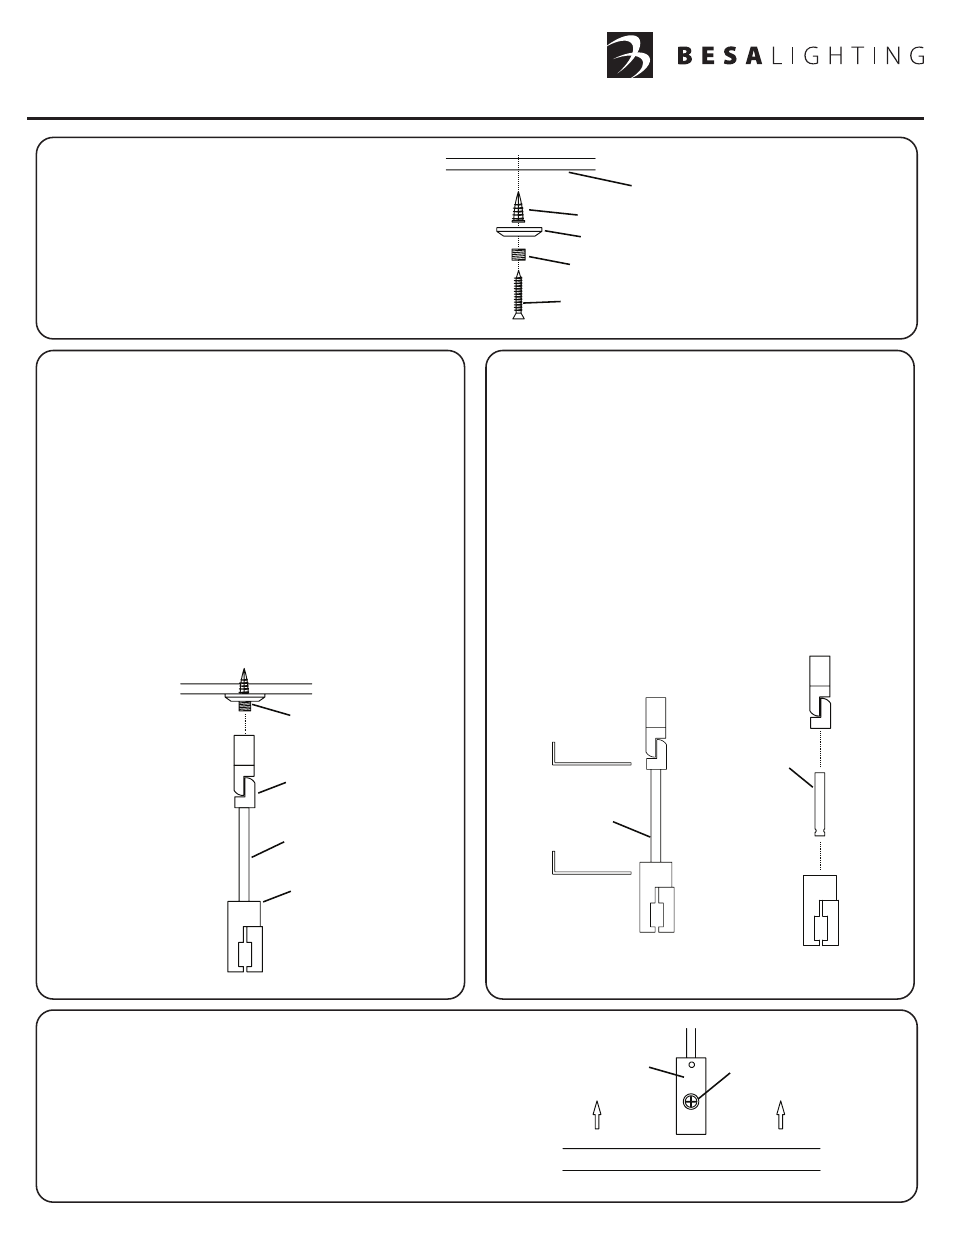
Ceiling
Decorative cap
1. Select standoff location and install
the supplied anchor into ceiling.
2. Secure the Decorative Cap and
Threaded Adapter to ceiling using
the supplied Philips screw.
Anchor
Threaded Adapter
Philips Screw
INSTALL MOUNTING HARDWARE:
Threaded
Adapter
Swivel
Joint
1. To install the Rail, loosen the Set Screw on the Rail Adapter
and lift the Rail into the opening on the Rail Adapter.
Tighten the set screw securely.
2. The rail can be repositioned by slightly loosening the set
screw on each standoff, then retightening when finished.
Rail Adapter
Set Screw
Rail Section
SECURING THE RAIL SECTION:
Hex Wrench
Shortened Post
Remove Post
For monorail installations that require length
adjustment, follow these instructions.
1. Using the supplied Hex Wrench, remove the Post
from the Swivel Standoff and shorten by cutting
with a hack saw.
2. Insert the shortened post into the Swivel Standoff.
Tighten set screws with the supplied Allen Wrench.
The shortened Swivel Standoff is readyto be installed.
* For applications using an Extension Rod
(Besa model number EXT06, EXT12 or EXT18),
the Rod should be installed during this step.
Rail
Adapter
Rigid
Standoff
Securing Swivel Standoff to Mounting Hardware
1. Thread the Swivel Standoff onto the Threaded Adapter.
2. Using the hex wrench provided, the Rail Adapter
can be adjusted by loosening the hex screw on
its side and rotating.
3. For angle adjustment, loosen the set screw on the
Swivel Joint and adjust and needed then retighten.
4. Proceed to
SECURING THE RAIL SECTION below.
If height adjustment is needed, first follow the instructions
at right.