Tukit.11, rev 3 back, Glass shade installation guide – Besa Lighting Juliette (Mini Pendants 12V) User Manual
Page 3
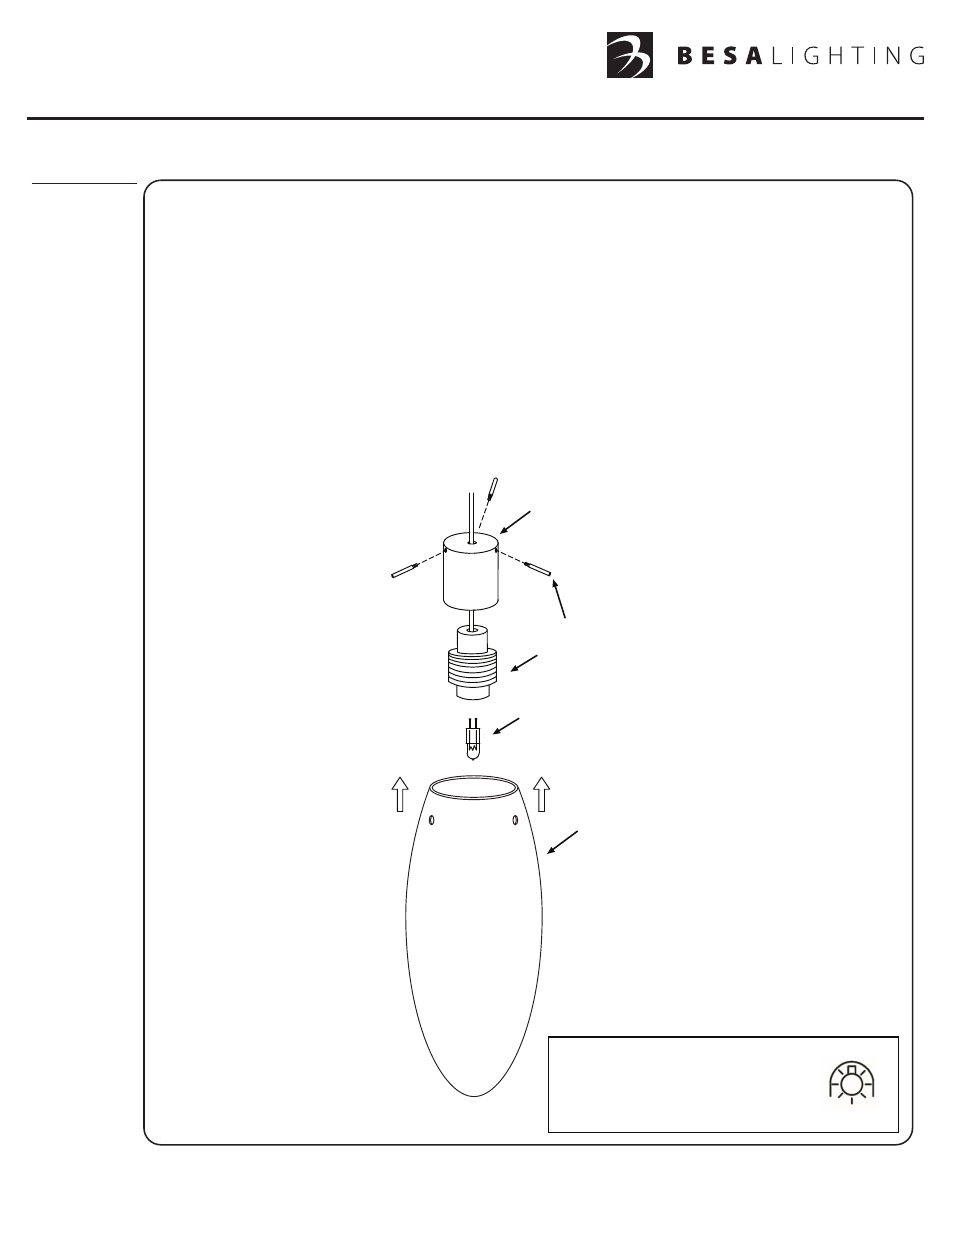
GLASS SHADE INSTALLATION GUIDE
6695 Taylor Rd. Blacklick, OH 43004
www.besalighting.com
All electrical connections and the installation of this fixture must be in agreement with local codes,
ordinances or the NEC (National Electric Code) or CEC (Canadian Electrical Code).
Do not connect this fixture to an electrical system that does not provide a means for equipment grounding.
IMPORTANT: For installation of pendants and wiring, please refer
to the
Fixture Installation Guide included with fixture canopy
Use With
these Models:
• Juliette
(4096xx)
Glass Support Block,
must be installed prior to installing cord
into the ceiling canopy
Glass Shade,
size and shape may vary
Threaded Post
Socket Assembly
Lamp
1. Begin by removing the check ring from the Socket Assembly. Next, slide the cord through
the opening in the top of the Glass Support Block and then slide the Glass Support Block
over the Socket Assembly. A small portion of the lamp socket should extend past the end of
the Glass Support Block.
2. For lamping, plug the provided 35W Lamp provided. For relamping never exceed 35 watts,
as greater wattages could cause overheating, adversely affecting the life of the luminaire.
3. The Glass Shade (size may vary) will be positioned as shown below. Align Glass Shade so
that the Threaded Posts easily fit through the side holes in the Glass Shade and align with
the holes in the Glass Support Block and then thread the Threaded Posts into the Glass
Support Block holes.
While performing the remaining instruction steps, care must be taken to keep the
Glass Shade and Socket Assembly protected, otherwise breakage may occur.
Relamp with a low-pressure type lamp,
either xenon or halogen. Packaging of
this lamp will typically indicate that it’s
“Suitable For Use in an Open Fixture”
or marked with the symbol shown.
- Scope (Mini Pendants 12V) Kiki (Mini Pendants 12V) Zumi (Mini Pendants 12V) Botella (Mini Pendants 12V) Pahu 4 (Mini Pendants 12V) Flat Monopoint (12V Quick Connect Canopies) Focus (Mini Pendants 12V) Kani (Mini Pendants 12V) Kona (Mini Pendants 12V) Trilo 7 (Mini Pendants 12V) Brella (Mini Pendants 12V) Domi (Mini Pendants 12V) Spazio (Mini Pendants 12V) Nico 4 (Mini Pendants 12V) Tay Tay (Mini Pendants 12V) Hoppi (Mini Pendants 12V) Divi (Mini Pendants 12V) Pera 6 (Mini Pendants 12V) Camino (Mini Pendants 12V) Amelia 6 (Mini Pendants 12V) Stilo 7 (Mini Pendants 12V) Copa (Mini Pendants 12V) Tu tu (Mini Pendants 12V) Karli (Mini Pendants 12V) Groove (Mini Pendants 12V) Sasha (Mini Pendants 12V)