1 reversing at seam start, 2 reinforcing end of seam, 1 piqûre en marche arrière en début de couture – SINGER 1411 User Manual
Page 41: 2 pour renforcer la fin d’une couture, Coser hacia atrás al principio del dobladillo, Reforzado de los extremos de los dobladillos, Reinforcing end of seams, Piqûre en marche arrière en début de, Couture, Coser hacia atrás al principio del
Attention! The text in this document has been recognized automatically. To view the original document, you can use the "Original mode".
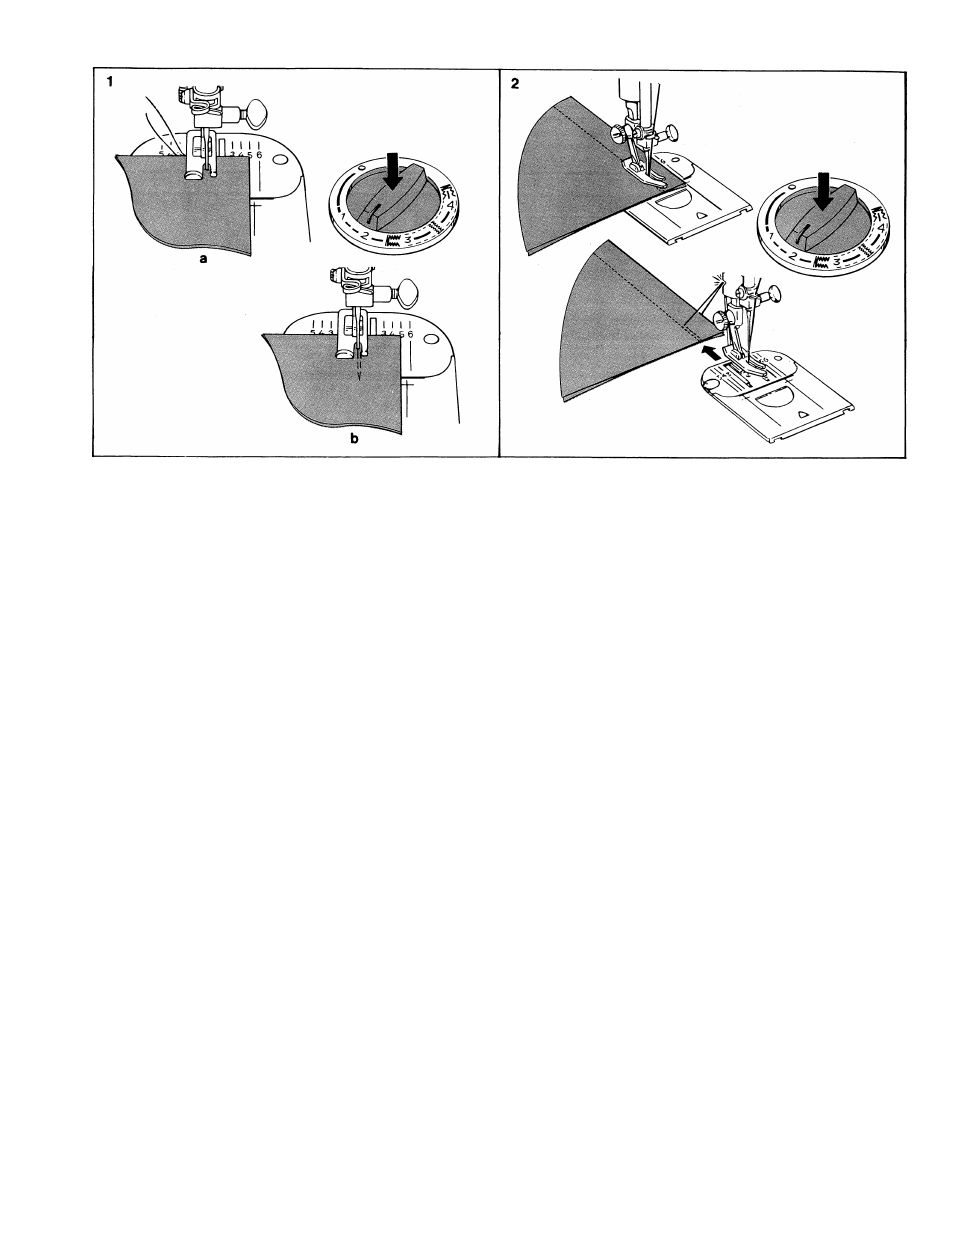
1 Reversing at Seam Start
• Raise presser foot.
•
Raise take-up lever to highest position
by turaihg hand wheel
toward you.
•
Draw both threads under presser foot
and place them toward the back of the
machine diagonally to the left.
a
Position
needle
in
fabric
approxi
mately
'/2
cm
('/4
inch) from fabric edge.
Then lower the presser foot.
b
Start the machine. After a few forward
stitches have been sewn, press stitch
length dial all the way down and hold
in place. Sew a few stitches in reverse
to lock the seam.
•
Release the stitch length dial and sew
in forward direction.
2 Reinforcing End of Seam
•
stitch to the edge of the fabric. (Do not
sew beyond edge of fabric)
•
Press reverse stitch dial and hold in
place. Backstitch approximately 1.5 cm
('/2
inch) to reinforce end of seam. Re
lease reverse stitch dial.
•
Raise needle to highest position by
turning
hand
wheel
toward
you
and
raise presser foot. Remove the fabric
by drawing it to the back and left.
•
Cut threads on thread cutter at rear of
presser bar.
1 Piqûre en marche arrière en
début de couture
• Soulevez le pied presseur.
• Mettez le levier releveur de fil en posi
tion haute en tournant le volant, â la
main, vers vous.
• Tirez les deux fils sous le pied presseur
et placez-les vers l’arrière de la machine,
en diagonale vers la gauche.
a
Placez l’aiguille dans le tissu â environ
V
2
crh du bord du tissu. Puis abaissez
le pied presseur.
b
Faites démarrer la machine. Après quel
ques points en marche avant, appuyez
fermement sur le cadran de longueur
de point et maintenez-le ainsi. Faites
quelques points en marche arrière pour
renforcer la couture.
• Relâchez le cadran de longueur de point
et piquez en marche avant.
2 Pour renforcer la fin d’une
couture
• Piquez jusqu’au bord du tissu.
• Appuyez sur le cadran de longueur de
point et, sans le relâcher, piquez quel
ques points (environ 1 cm) en marche
arrière pour arrêter votre couture. Relâ
chez le cadran de longueur de point.
• Amenez llaiguille en position haute en
tournant vers vous le volant â la main et
relevez le levier du presseur. Retirez
l’ouvrage par l’arriéré de la machine.
• Coupez les fils sur le coupe-fil â l’arrière
de la barre du presseur.
1
. Coser hacia atrás al Principio del
Dobladillo
• Levante el prénsatelas.
• Levante la palanca tira-hilo a su posición
más alta girando el volante
hacia Usted.
• Lleve ambos hilos debajo del prénsatelas y
posiciónelos hacia la parte posterior de la
máquina,
diagonalmente
hacia
la
Izquierda.
a. Posicione la aguja en la tela a aproxima
damente
1/2
cms. del borde de la misma.
Entonces, baje el prénsatelas.
b. Ponga la máquina en marcha. Después de
ejecutar algunos puntos hacia adelante,
apriete totalmente el disco que controla la
longitud del punto y manténgalo en esta
posición. Cosa algunos puntos hacia atrás
para sujetar el dobladillo.
• Suelte el disco que controla la longitud del
punto y cosa adelante.
2. Reforzado de los Extremos de los
Dobladillos
• Cosa hasta el borde del material. (No cosa
más allá del borde).
• Apriete el disco de punto hacia atrás y
manténgalo en esta posición. Cosa hacia
atrás aproximadamente 1,5 cms. para re
forzar el extremo del dobladillo. Suelte el
disco de punto hacia atrás.
• Levante la aguja a su posición más alta gi
rando el volante
hacia Usted
y levante el
prénsatelas. Saque el material llevándolo
hacia atrás y hacia la izquierda.
• Corte los hilos con el corta-hilos en la parte
posterior de la barra del prénsatelas.
39