Top Flite TOPA0708 User Manual
Page 12
12
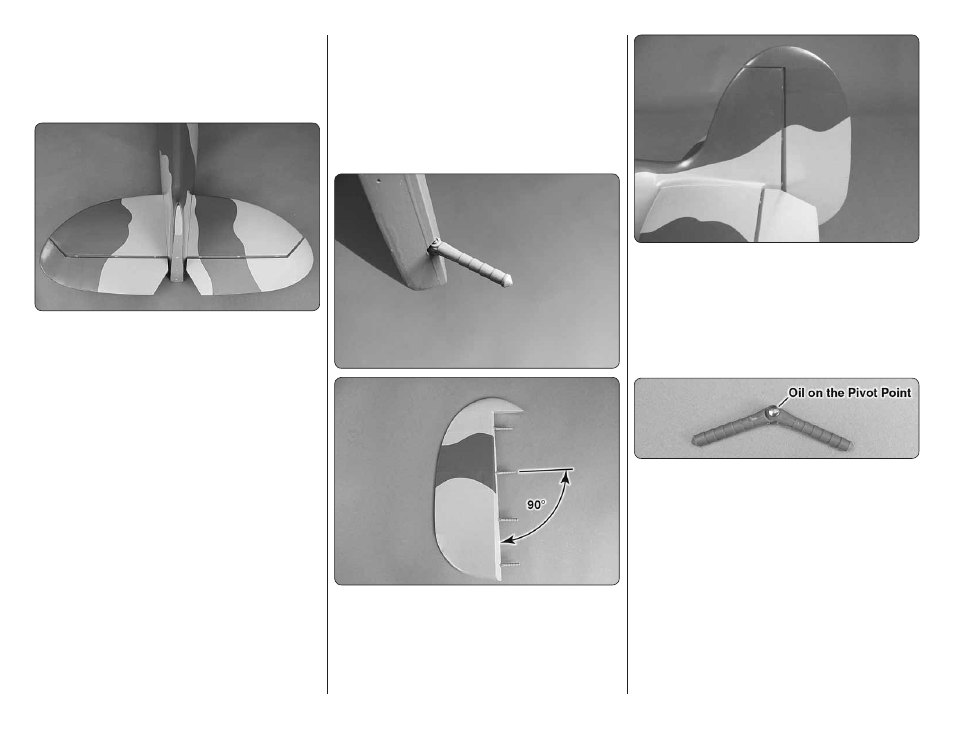
ASSEMBLE THE FUSELAGE
Firmly pull on the elevators to check that the hinges
are securely glued.
INSTALL THE STABILIZER
❏
1. Test fi t the two aluminum stabilizer tubes in the
fuselage and slide the stabilizers on the tubes. The
shorter tube goes in the front hole. If the aluminum tubes
are too tight to slide through the holes, take a sharp
hobby knife and gently scrape the inside of the holes.
During the manufacturing process a small amount of
resin or fi ller may be left behind in the hole.
❏
2. Once you are satisfi ed with the fi t of the stabilizer
halves, remove the stabilizer halves and the joiner tubes.
Use medium grit sandpaper to roughen up the aluminum
tubes. Clean the tubes with denatured alcohol and insert
both tubes back into the fuselage until the end exits on
the opposite side by approximately 1" [25mm].
❏
3. Gather everything required for gluing the stabilizer
halves to the fuselage including 30-minute epoxy, mixing
sticks, epoxy brush, 12" [304mm] long dowel or wire,
masking tape, denatured alcohol and small paper towel
squares. Mix up 3/4 oz. [22.1cc] of 30-minute epoxy.
Apply a generous amount of epoxy to the long side of
the aluminum joiner tubes. Pull the tubes through the
fuselage so that they are close to centered. Pour a small
amount of epoxy into both holes of one of the stabilizer
halves and using a dowel or wire, coat the inside of
the holes. Apply epoxy to the root rib of the stabilizer
and the fuselage. Insert the end of the aluminum tubes
with epoxy on them into the stabilizer and press the
stabilizer against the fuselage. Wipe off any excess
epoxy that may have squeezed out before it runs down
the fuselage. Quickly repeat the process on the other
side. Wipe off any excess epoxy with a dampened paper
towel and denatured alcohol. Use pieces of masking
tape to hold the stabilizer tight against the fuselage
until the epoxy cures.
❏
4. Without using any glue, install four hinges into
the rudder. Note that the pivot point of each hinge
must align with the center of the leading edge of the
rudder. To achieve this alignment, the hinges will be
fairly deep in the rudder. Also note that the hinges must
be perpendicular to the leading edge.
❏
5. Again without glue, test fi t the rudder to the fi n.
Move it left and right a few times to align the hinges.
The rudder doesn’t have to move very far, only 1-3/4"
[44mm] left and 1-3/4" [44mm] right measured at the
widest part of the rudder at the trailing edge. If there
is too much resistance, or if you are not able to move
the rudder left and right 1-3/4" [44mm], widen the gap
slightly between the rudder and fi n.
❏
6. Remove the rudder and all the hinges. Add a
small drop of oil to the pivot point on the hinges. This
will prevent the epoxy from adhering to the pivot point.
Make sure oil does not get on the gluing surface of the
hinge. If it does, clean the oil off with a paper towel
dampened with denatured alcohol.
❏
7. Please read the complete instructions in this step
before mixing up the epoxy. Mix up approximately ¼ oz.
[7.4cc] of 30-minute epoxy. Use a toothpick to thoroughly
apply the epoxy in the holes in the fi n and rudder. Use
the toothpick to get the epoxy out of the opening of the
holes in the rudder and fi n so it doesn’t get into the
pivot point. Wipe away any excess epoxy around the
outside of the holes with a paper towel dampened with
denatured alcohol.