Top Flite TOPA0708 User Manual
Page 11
11
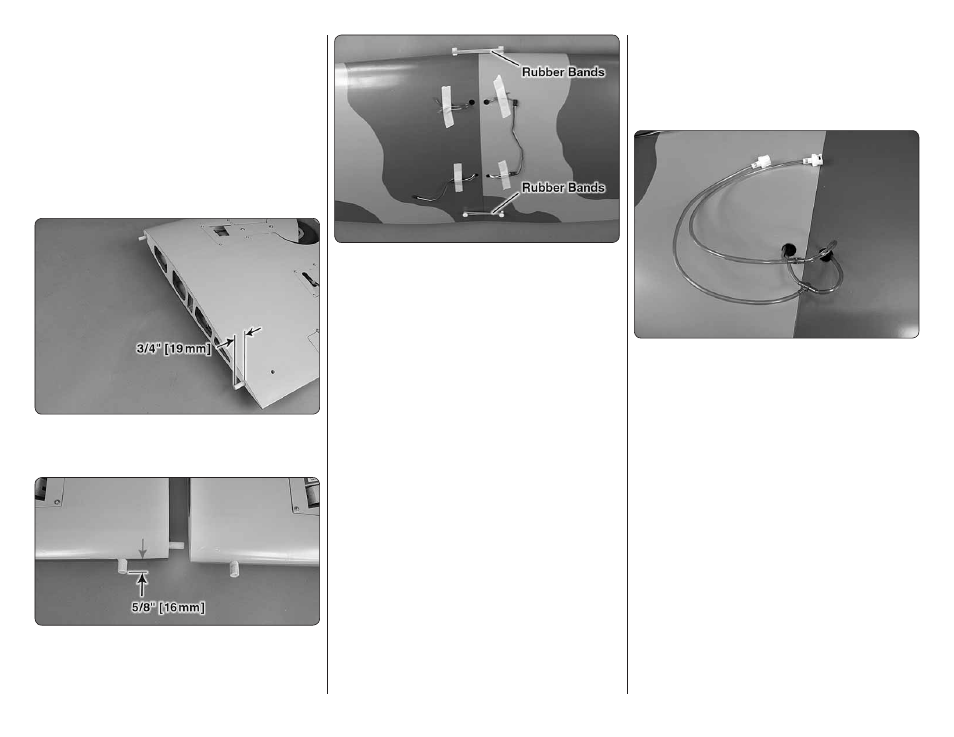
with a 5/32 [4mm] drill bit. Secure the landing gear
cover to the retract with two 6-32 x 1/4" machine screws
and #6 fl at washers. Note that clear plastic shims have
been provided to raise the landing gear cover so that it
is fl ush with the bottom of the wing if needed.
❏
12. Return to step 1 and mount the right retract in
the right wing.
JOIN THE WING
Note: Keep the retracts in the retracted (up) position so
they do not extend and retract as you handle the wing.
❏
1. Use 6-minute epoxy to glue the two 5/16 x 1-5/8"
[8 x 41mm] wing alignment dowels into the root of the
left wing half.
❏
2. Use 6-minute epoxy to glue the two 3/8 x 1-3/4" [9.5
x 44mm] diameter forward wing dowels in the leading
edge of both wing halves. The wing dowels should
protrude approximately 5/8" [16mm] from the wing.
❏
3. Test fi t the hardwood wing joiner in each wing
half, making sure that both wing halves fi t together at
the root without any gaps. Trial fi t clamping the wing
together with rubber bands around the wing dowels
at the leading edge. Insert the two ¼ - 20 x 2" [51mm]
nylon wing bolts and stretch rubber bands around the
wing bolts on the top and bottom of the wing.
❏
4. Read through the next three steps before
mixing any epoxy. Gather everything required for gluing
the wing together including 30-minute epoxy, mixing
sticks, epoxy brushes, 12" [305mm] long dowel or wire,
denatured alcohol and paper towels. Remove the rubber
bands and separate the wing halves. Remove the wing
joiner. Mix 2 oz. [59.1cc] of 30-minute epoxy. Working
quickly, pour a generous amount into the joiner pocket
of one wing half. Use your wire or dowel to thoroughly
distribute the epoxy, coating all surfaces inside the joiner
pocket. Coat the root rib and one half of the wing joiner
that goes into the wing. Insert the joiner in the wing.
❏
5. Coat the joiner pocket of the other wing half and
the other end of the wing joiner. Join the wing halves
together. Then, stand the wing on end with one of the
wing tips resting on the fl oor. Use a piece of R/C foam
or something similar to cushion and stabilize the wing
so it won’t slide around.
❏
6. With the wing resting on end, use a paper towel
dampened with denatured alcohol to wipe off any excess
epoxy as it squeezes out. Wrap the rubber bands around
the wing dowels and wing bolts. Add several strips of
masking tape to tightly hold the wings together as you
continue to wipe off excess epoxy as it squeezes out.
Be certain the leading edge and trailing edges of the
wing accurately align. Do not disturb the wing until the
epoxy has fully cured.
❏
7. Join the matching air lines from each wing half
with a couple of T-fi ttings that came with the air control
kit. Cut two 10" [250mm] pieces of corresponding color
air line (also from the control kit) and fi t each line to the
T-fi ttings. Connect one quick-connector with an O-ring
to one of the air lines and one of the quick connectors
without an O-ring to the other line. This will prevent
improper connection to the quick-connectors on the air
valve when mounting the wing to the fuselage.
❏
8. Connect both servo wires from the aileron servos
to a Y-harness and both servo wires from the fl ap servos
to a Y-harness.