Top Flite TOPA0135 User Manual
Page 20
❏
14. Cut the Upper Forward Fuselage Tops
from a 3/32" x 4" x 30" balsa sheet. This should be
done in two halves with the pieces joining in the
center of the top middle stringer.
❏
15. Wet the outside of an upper forward fuselage
top to soften it, then place it on the upper forward
frame. It should overlap the instrument panel and
F-1 by about 1/8".
❏
16. Glue the top to the fuselage. Cut the other
side of the upper forward fuselage top to fit on the
fuselage then glue it in position the same as you
did the first piece.
FINAL FIT THE CANOPY
RAZORBACK VERSION
❏
1. Use leftover balsa and the templates on the
plans to make the 1/16" Razorback Cockpit
Fairings and the 1/8" Cockpit Fairing Formers.
❏
2. Set the canopy on the fuselage and mark the
location of the cockpit fairing formers. Glue the
formers to the fuselage.
❏
3. Replace the canopy on the fuselage to
confirm the position of the cockpit formers and test
fit the cockpit fairings. Make adjustments if
necessary, then glue the cockpit fairings in place.
❏
4. Apply HobbyLite balsa filler around the
fairings to blend them to the fuselage sheeting.
Apply a couple of thin layers and sand between
each application.
FINAL FIT THE CANOPY
BUBBLE CANOPY
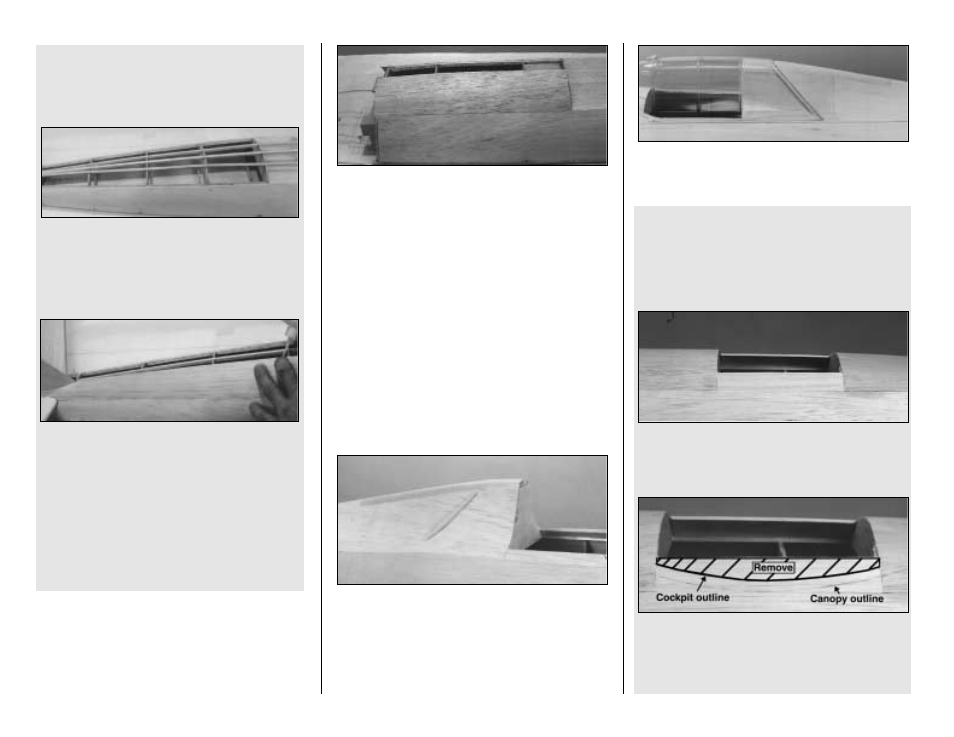
❏
1. Cut the bubble canopy to the trim lines
scribed around its perimeter. Lightly sand the
butyrate to smooth the edges.
❏
2. Fit and glue two pieces of leftover 3/32" balsa
sheet between IP and the cockpit’s aft former.
These pieces should extend about 1" above the
upper stringer as shown.
❏
3. Refer to the plans for the canopy location,
then position the canopy on the fuselage. Trace
around the canopy to define its shape around the
cockpit. Remove the canopy. Draw a second line
parallel to and 1/4" above the first. Trim the excess
balsa to match the second line.
COMPLETE THE FUSE TOP
BUBBLE CANOPY VERSION:
Perform steps 8-10 only if building the Bubble
Canopy version.
❏
8. Reference the cross section on the plans,
then cut a notch in former F-8 for the top stringer.
Trial fit the 3/16" x 3/16" x 24" stringers in the
notches in the tops of the formers. The aft end will
have to be shaped to fit between the stringers at
former F-9. Glue the stringer in position.
❏
9. Use the template on the plans to make a
Right and a Left Aft Fuselage Top from two
3/32" x 3" x 30" balsa sheets. Wet the outside of
one of the tops, then glue it to the top edge of
the aft fuselage side and the stringers. Apply
medium CA to the formers and top stringer, then
roll the sheet into contact. Hold it in position until
the CA cures.
❏
10. Custom fit the other aft fuselage top
then glue it to the other aft fuselage side in the
same manner.
- 20 -