1 control locations 3.2 heater rating plate, 3 service procedures – Reznor CAUA Users Manual User Manual
Page 7
Form O-CAUA, P/N 164772 R7, Page 7
.74
1.275
7/16
.125 ±.015 Spark Gap
5/32
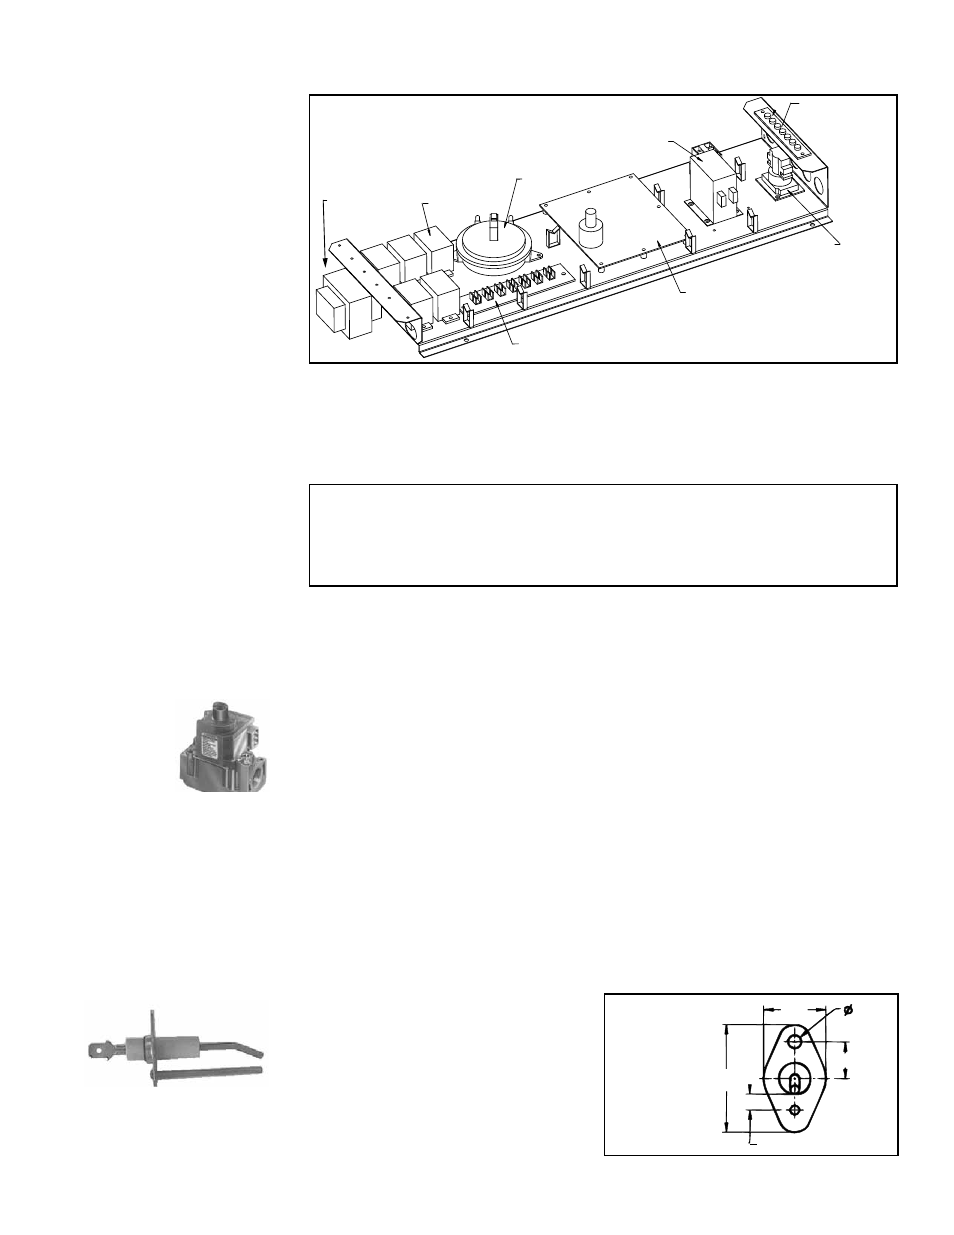
Time
Delay
Relay
Ignition Control
Module
(Circuit Board)
Terminal Strip
Relay
Contactor
or Starter
Thermostat
Terminal
Strip
Pressure
Switch
Transformer
FIGURE 4 - Control
Locations in the
Electrical Compartment
(Remove the control
compartment access
panel)
3.1 Control
Locations
3.2 Heater Rating
Plate
The heater rating plate is a quick reference for information about a heater and its instal-
lation requirements. In addition, the Serial No. on the rating plate identifies components
used in manufacturing that specific heater. The serial number is coded to identify the
gas valve and ignition type that was installed on the heater at the time of manufacture.
This information is required if service and/or replacement parts are required.
Follow the example below to decode the heater Serial No.
Example: Heater Serial No. BIC78Q3N12345
BIC
78
Q3 N
12345
Month and Year
Safety Pilot Code
Type of Type of Consecutive
of Manufacture
(Type of Ignition)
Valve
Gas*
Number
* N = Natural Gas; L = Propane Gas
NOTE: In addition to the
rating plate, each heater
has a "Replacement
Parts Label" attached that
identifies parts specific to
that heater, as well as the
Model and Serial No. of the
heater.
3.3.1 Operating Gas Valve
Function: The gas valve automatically controls the gas flow to the main burners and
regulates the gas pressure.
Service: The valve has no field-repairable parts. Carefully remove external dirt accu-
mulation from the valve and check wiring connections.
Refer to Form I-CAUA, Paragraph 6.1, for instructions on checking manifold pressure.
The gas valve must be checked annually to ensure that the valve is shutting off gas
flow completely; see Maintenance Paragraph 2.2.3.
Gas
Valve
3.3.2 Ignition System
Function: The heater is equipped with a direct-spark integrated control system. The
system monitors the safety devices and controls the operation of the blower and venter
motors and the gas valve.
Control Module: The control module is an integrated board located in the control com-
partment. Supply and control wiring connects into the control module. The module has
an LED troubleshooting light which identifies operating problems. The control module
also acts as a fan control energizing the fan 30 seconds after ignition and delaying fan
shutdown for 160 seconds after the gas valve closes. See
FIGURE 6, page 8, for LED
codes and fan delay dip switch settings.
IMPORTANT: The serial number code can only identify the original equipment. Before servicing, check for a gas conver-
sion label. When inquiring about replacement parts, always provide the complete Model No. and Serial No.
To service this heater, it is necessary to understand the normal operating functions of
the heater controls. Refer to
FIGURE 4 to identify and locate the controls.
Ignitor
FIGURE 5 -
Spark Gap
Front View
of Ignitor
showing
Spark Gap
Measurement
Ignitor: The ignitor is located on the right
side of the burner assembly. Instructions
for cleaning and checking the ignitor are
included in the Paragraph 2.2.5. The spark
gap shown inches in
FIGURE 5 must be
maintained.
Flame Sensor: The flame sensor is located
on the left side of the burner assembly.
Instructions for cleaning and checking the
flame sensor are in Paragraph 2.2.5.
NOTE: This control is on
units manufactured begin-
ning 3/09. To replace an
ignition controller on a unit
manufactured prior to 3/09,
order kit
P/N 258251.
3.3 Service
Procedures