Warning, Caution, Air conditioner maintenance – Reznor JS4BD (1ph) Unit Installation Manual User Manual
Page 6
6
noteS:
• Factory installed modules have different thermostat
demand signal wiring. Always follow manufacturer
wiring instructions when replacing the module.
• After the thermostat demand signal is connected, verify
that 24 VAC across Y & C when demand is present.
Interpreting the Diagnostic LED’s
When an abnormal system condition occurs, the Comfort
Alert
TM
module displays the appropriate ALERT and/or
TRIP LED will flash a number of times consecutively,
pause and then repeat the process. To identify a Flash
Code number, count the number of consecutive flashes.
Each time the module powers up, the last ALERT Flash
Code that occurred prior to shut down is displayed for
one minute. The module will continue to display the LED
until the condition returns to normal or if 24 VAC power
is removed from the module. See Table 10 (page 17) for
flash code identification or Table 11 (page 18) for module
wiring troubleshooting.
LED Description
• POWER LED (Green): indicates voltage is present at
the power connection of the module.
• ALERT LED (Yellow): communicates an abnormal
system condition through a unique flash code.
note: The ALERT LED will flash consecutively,
pause and then repeat the process. The number of
consecutive flashes, referred to as the Flash Code,
correlates to a particular abnormal condition. Detailed
descriptions of these ALERT Flash Codes are listed
in Tables 10 & 11.
• TRIP LED (Red): indicates a demand signal is received
from the thermostat, but current to the compressor is
not detected by the module. The TRIP LED typically
indicates if the compressor protector is open or the
compressor has no power.
The scroll compressor’s r (run), c (common), and S
(start) wires are routed through the holes in the Comfort
Alert
TM
module marked r, c, & S.
note: The common
wire does not need to be routed through the module for
it to operate.
thermostat connections
• Thermostat connections should be made in accordance
with the instructions supplied with the thermostat and
the indoor equipment.
• The outdoor unit is designed to operate from a 24 VAC
Class II control circuit. The control circuit wiring must
comply with the current provisions of the NEC (ANSI/
NFPA 70) and with applicable local codes having
jurisdiction.
• The low voltage wires must be properly connected to
the units low voltage terminal block. Recommended
wire gauge and wire lengths for typical thermostat
connections are listed in Table 2.
• The thermostat should be mounted about 5 feet
above the floor on an inside wall. DO NOT install the
thermostat on an outside wall or any other location
where its operation may be adversely affected by radiant
heat from fireplaces, sunlight, or lighting fixtures, and
convective heat from warm air registers or electrical
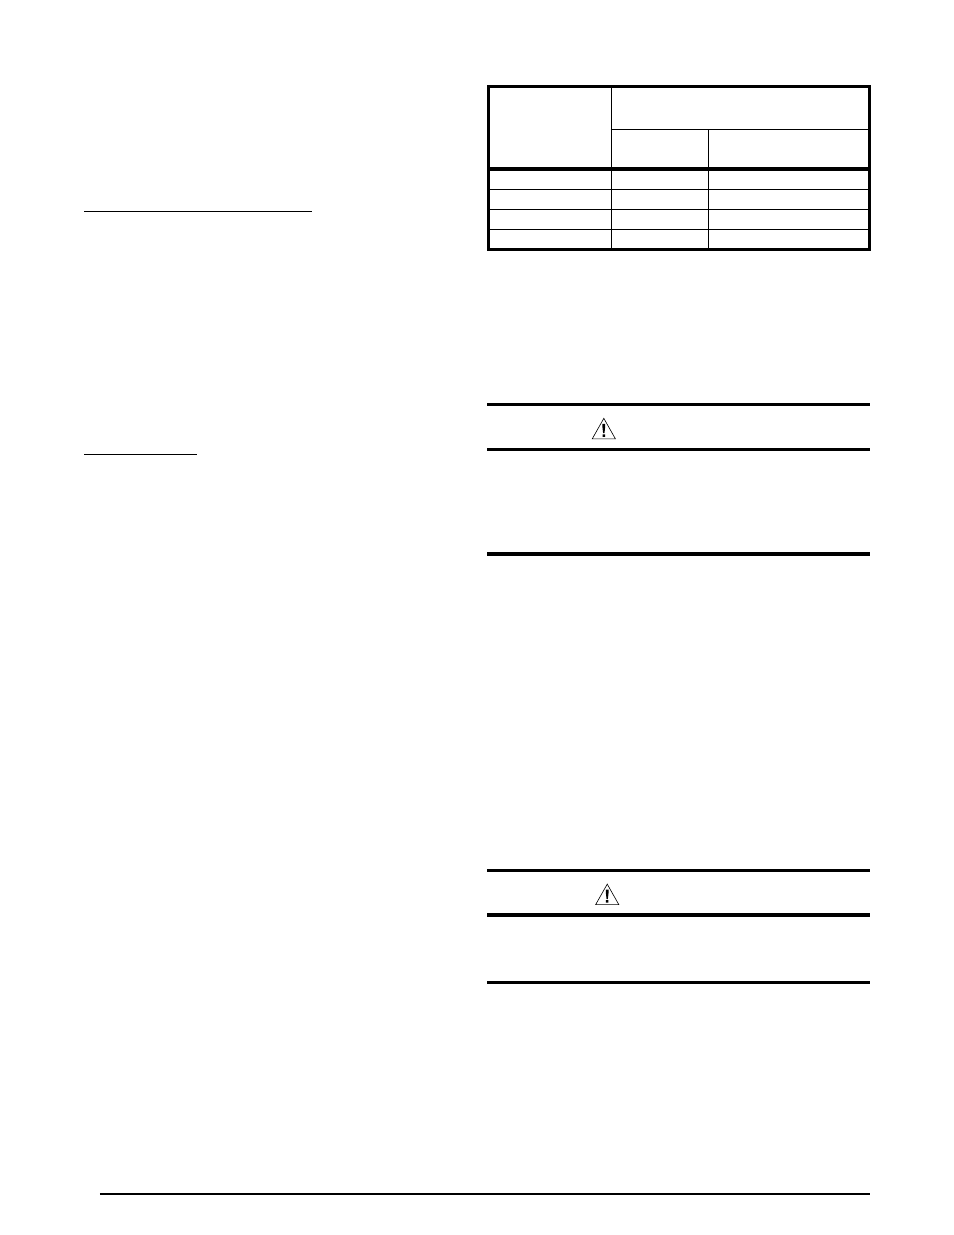
table 2. thermostat Wire gauge
thermostat
Wire gauge
recommended t-Stat Wire
unit to t-Stat (length in ft)
2-Wire
(heating)
5-Wire
(heating/cooling)
24
55
25
22
90
45
20
140
70
18
225
110
air conditioner maintenance
Warning:
to prevent electrical shock, personal injury, or
death, disconnect all electrical power to the unit
before performing any maintenance or service.
the unit may have more than one electrical
supply.
Proper maintenance is important to achieve optimum
performance from the air conditioner. The ability to properly
perform maintenance on this equipment requires certain
mechanical skills and tools. If you do not possess these
skills, contact your dealer for maintenance. Consult your
local dealer about the availability of maintenance contracts.
Routine maintenance should include the following:
• Inspect and clean or replace air filters at the beginning
of each heating and cooling season, or more frequently
if required.
• Inspect the condensate drain and outdoor coil at the
beginning of each cooling season. Remove any debris.
Clean the outdoor coil and louvers as necessary using
a mild detergent and water. Rinse thoroughly with
water.
• Inspect the electrical connections for tightness at the
beginning of each heating and cooling season. Service
as necessary.
caution:
the unit should never be operated without a
filter in the return air system. replace disposable
filters with the same type and size.
• Do not attempt to add additional oil to motors un
-
equipped with oil tubes. The compressor is hermetically
sealed at the factory and does not require lubrication.
appliances. Refer to the thermostat manufacturer’s
instruction sheet for detailed mounting and installation
information.