Rev-A-Shelf TANDEM plus BLUMOTION User Manual
Tandem plus blumotion, Waste/recycle set
Step 1 — Prepare template
Remove template from box and read all instructions carefully. For 12"
or 15" sets, cut off left side of template on the line marked for your set.
Please call 1-800-438-6788 for assistance installing Blum products.
Technical specifications subject to change without notice.
LIT.TDM5500.03.11 ©2011 Blum, Inc. Printed in USA
Do no
t cut t
he t
em
plat
e f
or use in an 1
8" wide cabine
t opening
Cut on t
his line f
or use in a 1
5" wide cabine
t opening
Cut on t
his line f
or use in a 1
2" wide cabine
t opening
FOLD
FOLD
FOLD
FOLD
Cent
erline f
or 1
2" se
t
Cent
erline f
or 1
8" se
t
Cent
erline f
or 1
5" se
t
Cent
erline f
or 1
2" se
t
Cent
erline f
or 1
8" se
t
Cent
erline f
or 1
5" se
t
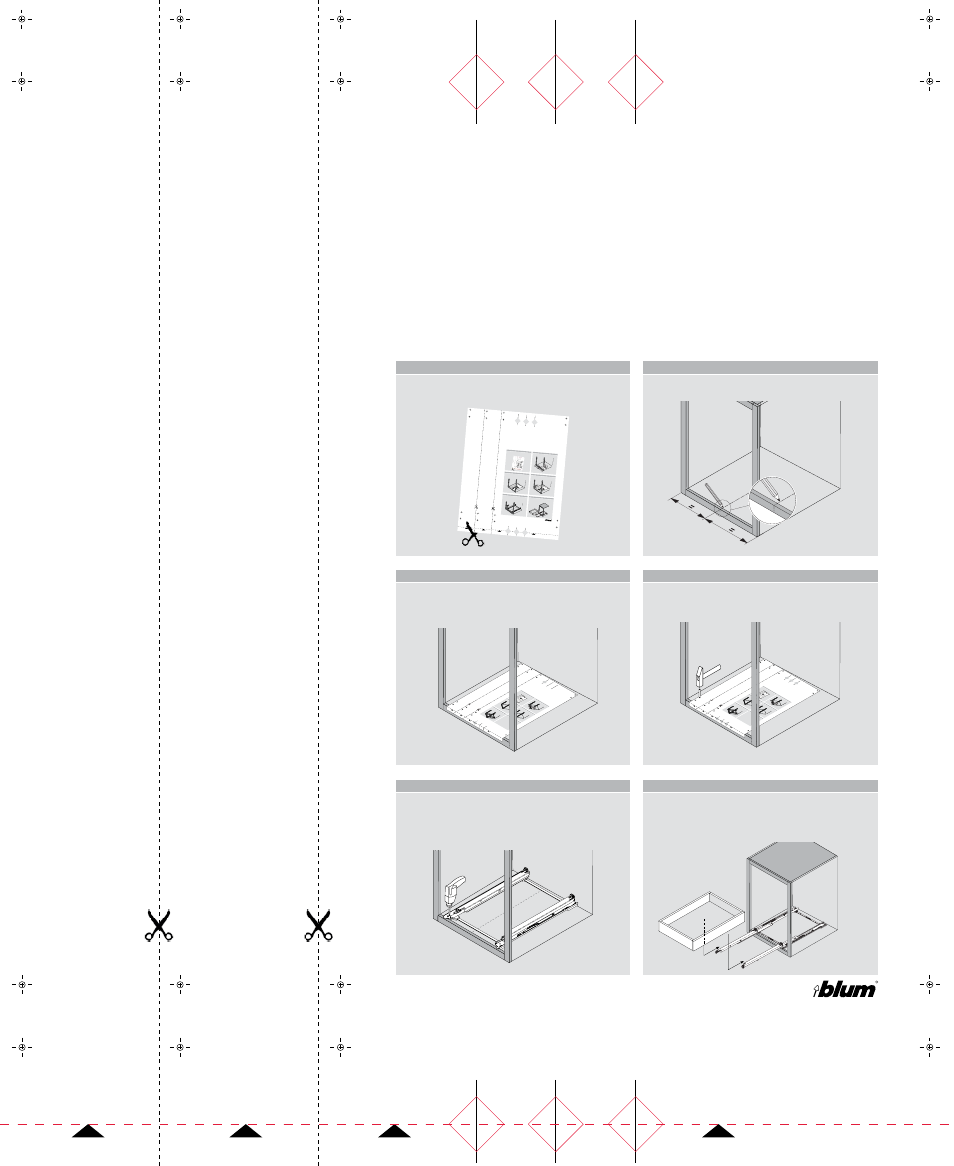
Installation
TANDEM plus BLUMOTION
Waste/recycle set
Step 2 — Mark centerline in cabinet
Using a framing square, mark centerline of cabinet opening. It is
helpful to make a mark that extends 20" into cabinet.
Step 4 — Mark mounting screw locations
Punch eight hole locations marked on the template, pre-boring
through template is not recommended.
Step 3 — Align and secure template
Lay template inside cabinet. Line up fold with the front edge of the
cabinet, then align template on the centerline, front and back. Taping
template to the cabinet face and bottom is required to keep template
in place while marking the holes.
Step 6 — Insert the drawer and bins
Attach drawer front to drawer. Extend the two runners fully and set
drawer on top of them so the runners fit into notches in back of drawer.
Close drawer completely. Listen for a “click” as locking devices
engage runners. Open drawer and insert bins. Your waste/recycle
drawer is now ready to use.
Step 5 — Mount the waste/recycle set
Remove template and place waste/recycle set on bottom of cabinet.
Set runners back 4 mm and line up centerline mark on cabinet bottom
with center marks on the metal crossrails. Use a power drill and a
#2x2" (or longer) Phillips bit to secure all eight pre-attached screws.
Step 1 — Prepare template
Remove template from
box and read all instructions ca
refully. For the
12" or 15" sets, cut off the left sid
e of the template on the line ma
rked
for your set.
Please call 1-800-4
38-6788 for assistance installing Blum
products.
Technical specifications
subject to change wit
hout notice.
LIT.TDM5500.03.11 ©2011 Blu
m, Inc. Printed in USA
Do not cut the
te
mplat
e f
or 1
8" wide cabinet opening
Cut on this dott
ed line f
or use in a 1
5" wide cabinet opening
Cut on this dott
ed line f
or use in a 1
2" wide cabinet opening
FOLD
FOLD
FOLD
FOLD
Cent
erline f
or 1
2" se
t
Cent
erline f
or 1
8" se
t
Cent
erline f
or 1
5" se
t
Cent
erline f
or 1
2" se
t
Cent
erline f
or 1
8" se
t
Cent
erline f
or 1
5" se
t
Installation
TANDEM plus BL
UMOTION
Waste/recycle set
Step 2 — Mark centerline in c
abinet
Using a square, mark the center
line of the cabinet opening. It is h
elpful
to make a mark that extends 20
" into the cabinet.
Step 4 — Prebore for mountin
g screws
Punch the eight hole positions m
arked on the template
, preboring
through the template is not reco
mmended.
Step 3 — Align and secure tem
plate
Lay the template inside the cabin
et. Line up the fold with the front
edge of the cabinet, then align te
mplate on the centerline, front a
nd
back. Taping the template to the
cabinet fl oor is required to keep
the
template in place while marking
the holes.
Step 6 — Insert the drawer an
d bins
Attach the drawer front to the dra
wer. Extend the two runners fully
and
set the drawer on top of them so
the runners fi t into the notches in
the
back of the drawer. Close the dra
wer completely. Listen for a “clic
k” as
the locking devices engage the r
unners. Open the drawer and in
sert
the bins. Your waste/recycle dra
wer is now ready to use.
Step 5 — Mount the waste/rec
ycle drawer set
Remove the template and place
the waste/recycle drawer set on
the
bottom of the cabinet. Set the ru
nners back 4 mm and line up th
e
centerline mark on the cabinet fl o
or with the center marks on the m
etal
cross rails. Use a power drill and
a #2x2" (or longer) Phillips bit to
secure all eight preattached sc
rews.
For
m
ark
for
18"
w
ide
cab
ine
t op
eni
ng
do
not c
ut th
e te
mpla
te
Cut
on
thi
s d
otted
line
for
us
e in
a
15"
w
ide
cabi
net ope
ning
Cut
on
thi
s dot
ted
line
for
us
e in
a 12"
w
ide
cab
inet
op
eni
ng
FOLD
FOLD
FOLD
FOLD
Cen
ter
lin
e fo
r 1
2" s
et
Cen
ter
lin
e fo
r 1
8" s
et
Cen
ter
lin
e fo
r 1
5" s
et
Cen
ter
lin
e fo
r 1
2" s
et
Cen
ter
lin
e fo
r 1
8" s
et
Cen
ter
lin
e fo
r 1
5" s
et
Insta
llatio
n
TAND
EM plus
BLU
MOT
ION
Waste
/recy
cle
draw
er se
t
Step
2 —
Mark
cen
terlin
e in c
abin
et
Usin
g a s
quare
, mar
k the
cente
rline o
f the c
abine
t ope
ning.
It is h
elpfu
l
to m
ake a
mark
that e
xtend
s 20"
into t
he ca
binet.
Step
1 —
Prep
are te
mpla
te
Punc
h out
the fr
ont a
nd ba
ck dia
mond
s ma
rked
on th
e cen
terlin
e for
your k
it (12
", 15"
or 18
"). Th
en, fo
r the
12" o
r 15"
kits, c
ut off
the le
ft
side o
n the
line m
arke
d for
your k
it.
Step
4 —
Preb
ore fo
r mo
untin
g sc
rews
Preb
ore th
e eig
ht ho
le po
sition
s ma
rked
on th
e tem
plate
with
a
2.5 m
m bit.
Step
3 —
Alig
n an
d sec
ure te
mpla
te
Lay th
e tem
plate
insid
e the
cab
inet. L
ine u
p the
fold w
ith th
e fro
nt
edge
of th
e cab
inet, t
hen a
lign te
mpla
te on
the c
enter
line, f
ront a
nd
back
.
NOT
E: Ta
ping i
t to th
e cab
inet fl
oor m
ay he
lp ke
ep th
e tem
plate
in
place
while
preb
oring
the h
oles.
Step
6 —
Inse
rt th
e dra
wer a
nd b
ins
Exte
nd th
e tw
o run
ners f
ully a
nd se
t the d
rawe
r on t
op of
them
so th
ey
fi t into
the n
otche
s in th
e bac
k of th
e dra
wer. C
lose t
he dr
awe
r
com
plete
ly an
d liste
n for
the lo
cking
devic
es to
enga
ge th
e run
ners
with a
“clic
k.” O
pen th
e dra
wer a
nd in
sert th
e bin
s. Yo
ur W
aste/r
ecyc
le
draw
er is n
ow re
ady to
use.
Step
5 —
Mou
nt th
e W
aste
/recy
cle d
rawe
r set
Rem
ove th
e tem
plate
and p
lace t
he W
aste/r
ecyc
le dra
wer s
et on
the
fl oor o
f the c
abine
t. Se
t bac
k the
runn
ers 4
mm
and l
ine u
p the
cente
rline m
ark o
n the
cabin
et fl o
or w
ith th
e cen
ter m
arks o
n the
meta
l
cross
rails
. Use
a po
wer d
rill an
d a #
2x2"
(or lo
nger)
Philli
ps bit
to
secu
re all
eight
preat
tache
d scre
ws.
Ple
ase
call
1-8
00-4
38-
6788
for assis
tan
ce in
stall
i
ng B
l
um
produ
cts.
Tec
hnic
al s
pec
ifica
tion
s su
bjec
t to
chang
e w
itho
ut n
otic
e.
LIT
.W
R
M500
0
.03.11
©2011 P
rinte
d in
US
A
For
m
ark
fo
r 1
8” w
ide
ca
bin
et o
pen
ing
do
no
t c
ut t
he
tem
pla
te
Cut
on
th
is
dot
ted
lin
e fo
r u
se
in
a 1
5” w
ide
ca
bin
et o
pen
ing
Cut
on
th
is
dot
ted
lin
e fo
r u
se
in
a 1
2” w
ide
ca
bin
et o
pen
ing
FOL
D
FOL
D
FOL
D
FOL
D
Cen
ter
lin
e fo
r 12
" se
t
Cen
ter
lin
e fo
r 18
" se
t
Cen
ter
lin
e fo
r 15
" se
t
Cen
ter
lin
e fo
r 12
" se
t
Cen
ter
lin
e fo
r 1
8" s
et
Cen
ter
lin
e fo
r 15
" se
t
Cut
out
for 1
8"
Cut
out
for 1
5"
Cut
out
for 1
2"
Cut
out
for 1
8"
Cut
out
for 1
5"
Cut
out
for 1
2"
Insta
llatio
n
TAN
DEM
plus
BLU
MOT
ION
Was
te/re
cycle
draw
er se
t
Ste
p 2
— Ma
rk c
ente
rlin
e in
cab
ine
t
Usin
g a
squa
re, m
ark th
e cen
terlin
e o
f the
cab
inet o
pen
in
g. It
is he
lpfu
l
to m
ake a
mark th
at exten
ds 2
0” into
the
cab
inet.
Ste
p 1 —
Pre
pare
temp
late
Cut
out
the
dia
mo
nd s
hapes
marke
d on
the
cente
rline
for your
kit (12
”,
15” o
r 18”).
The
n
, for
the 12”
or 15
inch
kits, cut
off th
e left s
ide o
n th
e
line
m
a
rked f
or you
r kit.
Ste
p 4
— P
rebo
re fo
r m
oun
ting
sc
rew
s
Preb
ore
the
eig
ht h
ole p
ositi
ons
m
ark
ed o
n th
e te
mp
late
with
a
2.5 m
m b
it.
Ste
p 3
— A
lign a
nd s
ecu
re te
mp
late
Lay t
he t
em
plate
on
the
fl oo
r of th
e cab
inet li
ning
up
the
fold
with
the
fron
t edge. T
hen a
lign te
mp
late
on
the
cente
rline, f
ron
t and b
ack.
Onc
e it i
s
in th
e corre
ct p
ositi
on
we s
ugge
st tapin
g it d
o
wn s
o it
does
n’t m
ove.
Step
6 — I
nsert
drawe
r an
d b
in
s
Exten
d the
two ru
nne
r
s fu
lly a
nd s
et th
e d
raw
er o
n to
p o
f th
em
so t
ha
t
they fi
t into
the
no
tche
s in
the
ba
ck o
f the
dra
wer
. C
lose
the
dra
wer
com
pletely
an
d lis
t
en f
or th
e L
o
cking
dev
ices to
en
gag
e th
e ru
nne
rs
with
a “clic
k.” O
pen t
he d
raw
er a
nd in
se
rt th
e b
ins. You
r W
aste/re
cycle
draw
er is no
w re
ady
to u
s
e.
Ste
p 5
— M
oun
t th
e
W
aste
/recyc
le dra
wer s
et
Rem
ove th
e te
mp
late
an
d p
lace
the
Was
te/rec
ycle d
raw
er s
et o
n th
e
fl oo
r of th
e cab
inet. S
et b
a
ck th
e ru
nne
rs 4
m
m a
n
d lin
e u
p th
e
cente
rline
m
a
rk o
n th
e
cab
inet fl o
or w
ith th
e ce
nt
er m
a
rks o
n th
e m
eta
l
cro
ss r
ails
. U
se a
pow
er d
r
ill a
nd a #2
x2” (or
lon
ger) Phi
llips b
it to
sec
ure
all e
ight
pre
a
ttac
hed s
cre
w
s.
InstallationTANDEM p
lus
BL
UM
O
TION
W
a
ste/recycle
draw
er set
Step 2
Ste
p
1
Step 4
Step 3
Step 6
Step 5
Ple
ase
ca
1-800-4
38
-6788 for assistance installing Blum products.
Technical specifica
tion
s subject to chang
e
without notice.
LIT.W
RM50
0
0.03.11 ©
2
011 Prin
ted
in USA
For ma
rk fo
r 18” wi
de ca
binet opening
do
no
t cut the
te
m
plate
Cu
t on this
dotted line fo
r use
in a 15” wide c
abi
ne
t op
ening
Cut on
th
is dotted
line
fo
r use
in a 12” wide ca
bine
t open
ing
FOLD
FOLD
FOLD
FOLD
Ce n t e rline for 12" set
C e n t e r line for 18
" set
C en t e rline for 15" s
e t
C e n t e rline for 12" set
C e n t e rline for 18"
s e t
C e n t erline for 15" s
e t
FOL
OL
O
OLD
O
OL
OL
L
LD
FOL
OL
O
OLD
O
OL
OL
L
LD
For
m
ark f
or 1
8" wi
de
cabi
net o
peni
ng
do
not
cut
the
te
mpla
te
Cut
on
this
dot
ted
line
for
us
e in
a 15
" w
ide
cabi
net
open
ing
Cut
on
thi
s d
otted
line
for
us
e in
a 12"
wide
cab
ine
t op
eni
ng
FOLD
FOLD
FOLD
FOLD
Cen
ter
lin
e fo
r 1
2" s
et
Cen
ter
lin
e fo
r 1
8" s
et
Cen
ter
lin
e fo
r 1
5" s
et
Cen
ter
lin
e fo
r 1
2" s
et
Cen
ter
lin
e fo
r 1
8" s
et
Cen
ter
lin
e fo
r 1
5" s
et
Insta
llatio
n
TAN
DEM plus
BLUM
OTION
Waste
/recy
cle
draw
er se
t
Step
2 —
Mark
cen
terlin
e in c
abin
et
Usin
g a s
quare
, mar
k the
cente
rline o
f the c
abine
t ope
ning.
It is h
elpfu
l
to m
ake a
mark
that e
xtend
s 20"
into t
he ca
binet.
Step
1 —
Prep
are te
mpla
te
Punc
h out
the fr
ont a
nd ba
ck dia
mond
s ma
rked
on th
e cen
terlin
e for
your k
it (12
", 15"
or 18
"). Th
en, fo
r the
12" o
r 15"
kits, c
ut off
the le
ft
side o
n the
line m
arke
d for
your k
it.
Step
4 —
Preb
ore fo
r mo
untin
g sc
rews
Preb
ore th
e eig
ht ho
le po
sition
s ma
rked
on th
e tem
plate
with
a
2.5 m
m bit.
Step
3 —
Alig
n an
d sec
ure te
mpla
te
Lay th
e tem
plate
insid
e the
cab
inet. L
ine u
p the
fold w
ith th
e fro
nt
edge
of th
e cab
inet, t
hen a
lign te
mpla
te on
the c
enter
line, f
ront a
nd
back
.
NOT
E: Ta
ping i
t to th
e cab
inet fl
oor m
ay he
lp ke
ep th
e tem
plate
in
place
while
preb
oring
the h
oles.
Step
6 —
Inse
rt th
e dra
wer a
nd b
ins
Exte
nd th
e tw
o run
ners f
ully a
nd se
t the d
rawe
r on t
op of
them
so th
ey
fi t into
the n
otche
s in th
e bac
k of th
e dra
wer. Cl
ose th
e dra
we
r
com
plete
ly an
d liste
n for
the lo
cking
devic
es to
enga
ge th
e run
ners
with a
“clic
k.” O
pen th
e dra
wer a
nd in
sert th
e bin
s. Yo
ur W
aste/r
ecyc
le
draw
er is n
ow re
ady to
use.
Step
5 —
Mou
nt th
e W
aste
/recy
cle d
rawe
r set
Rem
ove th
e tem
plate
and p
lace t
he W
aste/r
ecyc
le dra
wer s
et on
the
fl oor o
f the c
abine
t. Se
t bac
k the
runn
ers 4
mm
and l
ine u
p the
cente
rline m
ark o
n the
cabin
et fl o
or w
ith th
e cen
ter m
arks o
n the
meta
l
cross
rails
. Use
a po
we
r drill
and a
#2x2
" (or lo
nger)
Philli
ps bit
to
secu
re all
eight
preat
tache
d scre
ws.
Ple
ase
call
1-8
00-4
38-
6788
for assis
tan
ce in
stall
i
ng B
l
um
produ
cts.
Tec
hnic
al s
pec
ifica
tion
s su
bjec
t to
chang
e w
itho
ut n
otic
e
LIT
.W
R
M500
0
.03.11
©2011 P
rinte
d in
US
A
For
m
ark
fo
r 1
8” w
ide
ca
bin
et o
pen
ing
do
no
t c
ut t
he
tem
pla
te
Cut
on
th
is
dot
ted
lin
e fo
r u
se
in
a 1
5” w
ide
ca
bin
et o
pen
ing
Cut
on
th
is
dot
ted
lin
e fo
r u
se
in
a 1
2” w
ide
ca
bin
et o
pen
ing
FOL
D
FOL
D
FOL
D
FOL
D
Cen
ter
lin
e fo
r 12
" se
t
Cen
ter
lin
e fo
r 18
" se
t
Cen
ter
lin
e fo
r 15
" se
t
Cen
ter
lin
e fo
r 12
" se
t
Cen
ter
lin
e fo
r 1
8" s
et
Cen
ter
lin
e fo
r 15
" se
t
Cut
out
for 1
8"
Cut
out
for 1
5"
Cut
out
for 1
2"
Cut
out
for 1
8"
Cut
out
for 1
5"
Cut
out
for 1
2"
Insta
llatio
n
TAN
DEM
plus
BLU
MOT
ION
Was
te/re
cycle
draw
er se
t
Ste
p 2
— Ma
rk c
ente
rlin
e in
cab
ine
t
Usin
g a
squa
re, m
ark th
e cen
terlin
e o
f th
e
cab
inet o
pen
in
g. It
is he
lpfu
l
to m
ake a
m
a
rk th
at exten
ds 2
0” into
the
cab
inet.
Ste
p 1 —
Pre
pare
tem
pla
te
Cut
out
the
dia
mo
nd s
hapes
marke
d on
the
cente
rline
for your
kit (12
”,
15” o
r 18”).
The
n
, fo
r th
e
12” o
r 15 in
ch kits,
cut o
ff the
left sid
e o
n th
e
line
m
a
rked f
or you
r kit.
Ste
p 4
— P
rebo
re fo
r m
oun
ting
sc
rew
s
Preb
ore
the
eig
ht h
ole p
ositi
ons
m
ark
ed o
n th
e te
mp
late
with
a
2.5 m
m b
it.
Ste
p 3
— A
lign a
nd s
ecu
re te
mp
late
Lay t
he t
em
plate
on
the
fl oo
r of th
e cab
inet li
ning
up
the
fold
with
the
fron
t edge. T
hen a
lign te
mp
late
on
the
cente
rline, f
ron
t and b
ack.
Onc
e it i
s
in th
e corre
ct p
ositi
on
we s
ugge
st tapin
g it d
o
wn s
o it
does
n’t m
ove.
Step
6 — I
nsert
drawe
r an
d b
in
s
Exten
d the
two ru
nne
r
s fu
lly a
nd s
et th
e d
raw
er o
n to
p o
f the
m s
o th
a
t
they fi
t into
the
no
tche
s in
the
ba
ck o
f the
dra
wer
. C
lose
the
dra
wer
com
pletely
an
d lis
t
en f
or th
e L
o
cking
dev
ices to
en
gag
e th
e ru
nne
rs
with
a “clic
k.” O
pen t
he d
raw
er a
nd in
se
rt th
e b
ins. You
r W
aste/re
cycle
draw
er is no
w re
ady
to u
s
e.
Ste
p 5
— M
oun
t th
e
W
aste
/recyc
le dra
wer s
et
Rem
ove th
e te
mp
late
an
d p
lace
the
Was
te/rec
ycle d
raw
er s
et o
n th
e
fl oo
r of th
e cab
inet. S
et b
a
ck th
e ru
nne
rs 4
m
m a
n
d lin
e u
p th
e
cente
rline
m
a
rk o
n th
e
cab
inet fl o
or w
ith th
e ce
nt
er m
a
rks o
n th
e m
etal
cro
ss r
ails
. U
se a
pow
er d
r
ill a
nd a #2
x2” (or
lon
ger) Phi
llips b
it to
sec
ure
all e
ight
pre
a
ttac
hed s
cre
w
s.
InstallationTANDEM p
lus
BL
UM
O
TION
W
a
ste/recycle
draw
er set
Step 2
Ste
p
1
Step 4
Step 3
Step 6
Step 5
Ple
ase
c
1-800-4
38
-6788 for assistance installing Blum products.
Technical specifica
tion
s subject to chang
e
without notice.
LIT.W
RM500
0.03.11 ©
2
011 Prin
ted
in USA
For ma
rk fo
r 18” wi
de ca
binet opening
do
no
t cut the
te
m
plate
Cu
t on this
dotted line fo
r use
in a 15” wide c
abi
ne
t op
ening
Cut on
th
is dotted
line
fo
r use
in a 12” wide ca
bine
t open
ing
FOLD
FOLD
FOLD
FOLD
Ce n t e rline for 12" set
C e n t e r line for 18
" set
C en t e rline for 15" s
e t
C e n t e rline for 12" set
C e n t e rline for 18"
s e t
C e n t erline for 15" s
e t
FOL
OL
O
OLD
O
OL
OL
L
LD
FOL
OL
O
OLD
O
OL
OL
L
LD
For m
ark
for
18" wide cabinet opening do
not cut the
templa
te
Cut on
this d
otted line
for use in a
15" wide cabinet opening
Cut on t
his dott
ed line
for use in a
12" wide cabinet opening
FOL
D
FOLD
FOLD
FOL
D
Cent
erline
for
12" se
t
Cent
erlin
e for
18" se
t
Cent
erl
ine
for
15" se
t
Cen
terline
for
12" se
t
Cent
erli
ne
for
18" se
t
Cent
erli
ne f
or
15"
set
Installatio
n
TANDEM plus BL
UM
OTION
Waste/r
ecy
cle dr
awer se
t
Step 2
— M
ark c
enterl
ine in
cabin
et
Using
a squ
are, m
ark th
e cen
terline
of the
cabin
et ope
ning. I
t is he
lpful
to m
ake a
mark
that e
xtend
s 20" i
nto th
e cab
inet.
Step 1
— Pr
epare
templa
te
Punch
out th
e fron
t and b
ack d
iamon
ds m
arked
on th
e cen
terli
ne fo
r
your k
it (12",
15" o
r 18").
Then, f
or the
12" o
r 15"
kits, c
ut of
f the le
ft
side o
n the l
ine m
arked
for
your k
it.
Step 4
— Pr
ebore for
mounti
ng sc
rews
Prebo
re the
eight
hole p
ositio
ns m
arked
on th
e temp
late w
ith a
2.5 m
m bit.
Step
3 — Alig
n and
secure
temp
late
Lay t
he te
mplate in
side
the ca
binet.
Line u
p the f
old w
ith the
front
edge o
f the c
abine
t, then
align
temp
late o
n the c
enterli
ne, fro
nt and
back.
NOTE
: Tapin
g it to
the
cabin
et fl oo
r may hel
p kee
p the te
mpla
te in
place
while
prebo
ring th
e hole
s.
Step 6
— In
sert th
e dra
wer and
bins
Exten
d the t
wo ru
nners ful
ly an
d set t
he dra
wer o
n top o
f them
so th
ey
fi t into
the n
otches
in th
e ba
ck of t
he dra
wer. C
lose th
e draw
er
comple
tely a
nd li
sten
for the lo
cking
devic
es to e
ngage
the ru
nners
with a
“click
.” Ope
n the d
rawer
and in
sert th
e bins
. Your
Wast
e/recy
cle
draw
er is n
ow re
ady to
use.
Step 5
— M
ount
the
Waste
/recyc
le dr
awer s
et
Remo
ve the
templa
te and
place
the W
aste/re
cycle d
rawer
set on
the
fl oor o
f the c
abinet
. Set
back
the ru
nners 4
mm
and lin
e up th
e
center
line ma
rk on t
he ca
binet fl
oor w
ith the
cente
r mark
s on th
e meta
l
cross
rails. Use
a powe
r drill a
nd a #
2x2" (o
r long
er) Ph
illips bi
t to
secure
all eig
ht pre
attach
ed sc
rews
.
Plea
se c
all 1
-800
-438
-
6788
for assis
tanc
e in
stalli
ng B
l
um pro
ducts
.
Tech
nica
l spe
cific
atio
ns s
ubje
ct to
chang
e w
itho
ut n
otice
.
LIT.W
R
M500
0
.03.11 ©
2
011 P
rinte
d in
US
A
For
m
ark
fo
r 1
8” w
ide
ca
bin
et o
pen
ing
do
no
t c
ut t
he t
em
pla
te
Cut
on
thi
s d
otte
d lin
e fo
r u
se
in
a 1
5” w
ide
ca
bin
et o
pen
ing
Cut
on
thi
s d
otte
d lin
e fo
r u
se
in
a 1
2” w
ide
ca
bin
et o
pen
ing
FOLD
FOLD
FOLD
FOLD
Cen
terl
ine
fo
r 12
" se
t
Cen
terl
ine
fo
r 18
" se
t
Cen
terl
ine
fo
r 15
" se
t
Cen
terl
ine
fo
r 12
" se
t
Cen
terl
ine
fo
r 18
" se
t
Cen
terl
ine
fo
r 15
" se
t
Cut o
ut
for 18
"
Cut o
ut
for 15
"
Cut o
ut
for 12
"
Cut o
ut
for 18
"
Cut o
ut
for 15
"
Cut o
ut
for 12
"
Insta
llatio
n
TAND
EM p
lus B
LUM
OTIO
N
Waste
/recyc
le dra
wer s
et
Step
2 — Ma
rk c
ente
rline
in c
abin
e
t
Usin
g a squa
re, m
ark th
e cente
rline
of th
e
cab
inet o
pen
in
g. It is h
elpfu
l
to m
a
ke a
ma
rk th
at exten
ds 20”
into t
he
cab
inet.
Step
1 — P
repa
re tem
plate
Cut o
ut th
e dia
mo
nd s
hapes m
arked o
n th
e
cente
rline
for
your k
it (12”,
15” o
r 18”). T
hen, fo
r the 12”
or 15
inch
kits, cut
off th
e left s
ide o
n th
e
line m
a
rked fo
r your k
it.
Step
4 — P
rebo
re for
mo
untin
g sc
rews
Preb
ore t
he e
ight h
ole p
ositio
ns m
ark
ed on
the
tem
plate
with
a
2.5 m
m b
it.
Step
3 — A
lign a
nd s
ecu
re te
mpla
te
Lay th
e te
mpla
te o
n th
e
fl oor o
f the c
abine
t linin
g up
the
fold
with
the
fron
t edge. T
hen a
lign te
mpla
te o
n th
e
cente
rline, f
ront
an
d bac
k.
Onc
e it is
in th
e corre
ct po
sitio
n
we sug
gest t
aping
it down
so it
doesn’t
move.
Step 6
— In
sert d
rawer
and
bin
s
Exten
d the
two ru
nne
r
s full
y an
d se
t the
dra
wer o
n to
p of
them
so th
a
t
they fi t
into
the
notc
hes i
n th
e ba
ck of
the d
raw
er
. Clo
se th
e dra
wer
com
pletely
and
list
en fo
r the
Lo
cking
device
s to e
nga
ge th
e ru
nne
rs
with
a “click.”
Ope
n th
e dra
wer a
nd in
se
rt the
bin
s.
Your W
aste/rec
ycle
draw
er is no
w re
ady t
o us
e.
Step
5 — M
oun
t the
Was
te/recy
cle d
rawer s
et
Rem
ove th
e te
mpla
te a
n
d pla
ce th
e
Waste
/recyc
le dra
wer s
et o
n th
e
fl oor o
f the
cab
inet. S
et b
a
ck th
e ru
nne
rs 4
mm
an
d lin
e up
the
cente
rline
ma
rk on
the
cab
inet fl o
or w
ith th
e ce
nt
er m
a
rks o
n th
e m
etal
cros
s ra
ils. U
se a
pow
er d
r
ill and
a #2
x2” (or
long
er
) Phillip
s bit t
o
secu
re a
ll eig
ht p
rea
ttach
ed sc
rew
s.
InstallationTANDEM pl
us B
L
UMOTION
Waste/recycle
drawer set
Step 2
Ste
p
1
Step 4
Step 3
Step 6
Step 5
Ple
ase
ca
1-800-4
38
-6788 for assistance installing Blum products.
Technical specifica
tion
s subject to change
without notice
.
LIT.W
RM500
0.03.11 ©
2
011 Printe
d
in USA
For ma
rk fo
r 18” wi
de ca
binet openin
g
do
no
t cut th
e
te
m
plate
Cu
t on thi
s
dotted line f
o
r use
in a 15” wide
cab
i
ne
t op
ening
Cut o
n
th
is dotted
line
fo
r use
in a 12” wide ca
bine
t open
ing
FOL
D
FOLD
FOL
D
FOLD
Ce n t e rline for 12" set
C e n t e r line for 18" set C en t erline for 15" set
C e n t e rline for 12" set
C e n t e rline for 18"
s e t
C e n t erline for 15" set
FOL
OL
O
OL
D
O
OL
OL
L
LD
FOL
OL
O
OLD
O
OL
OL
L
LD
For m
ark
for
18" wide cabinet opening do
not cut the
templa
te
Cut on
this d
otted line
for use in a
15" wide cabinet opening
Cut on this dott
ed lin
e for use in a
12" wide cabinet opening
FOL
D
FOLD
FOLD
FOL
D
Ce
nterlin
e fo
r 12
" se
t
Cent
erline
for
18" se
t
Cen
terlin
e for
15" se
t
Cent
erli
ne
for
12"
se
t
Cen
terline
for
18"
set
Cent
erl
ine
for
15" se
t
Installati
on
TANDEM plus BL
UM
OTION
Waste/r
ecy
cle dr
awer se
t
Step 2
— M
ark c
enterl
ine in
cabin
et
Using
a squ
are, ma
rk the
cente
rline o
f the c
abine
t open
ing. It
is help
ful
to ma
ke a m
ark th
at exte
nds 2
0" into
the ca
binet.
Step 1
— P
repar
e tem
plate
Punch
out th
e fron
t and b
ack d
iamon
ds m
arked
on th
e cen
terline fo
r
your k
it (12",
15" or
18"). T
hen, fo
r the
12" or
15" k
its, cu
t off th
e left
side o
n the l
ine m
arked
for
your k
it.
Step 4
— Pr
ebore
for mount
ing
scre
ws
Prebo
re the
eight
hole p
ositio
ns m
arked
on th
e temp
late w
ith a
2.5 m
m bit.
Step
3 —
Align and
sec
ure te
mplat
e
Lay t
he te
mplat
e ins
ide th
e cab
inet. L
ine up
the fo
ld with
the fr
ont
edge o
f the c
abine
t, then
align
templ
ate on
the c
enterli
ne, fro
nt and
back.
NOTE
: Tapin
g it to
the
cabin
et fl oo
r may hel
p kee
p the te
mplate
in
place
while
prebo
ring th
e hole
s.
Step 6
— In
sert th
e dr
awer a
nd bins
Exten
d the t
wo ru
nners ful
ly an
d set t
he dra
wer o
n top o
f them
so th
ey
fi t into
the n
otches
in th
e ba
ck of t
he dra
wer. C
lose th
e draw
er
comple
tely a
nd li
sten
for
the lo
cking
devic
es to e
ngage
the ru
nners
with a
“click
.” Ope
n the d
rawer
and in
sert th
e bins
. Your
Wast
e/recy
cle
draw
er is n
ow re
ady to
use.
Step 5
— M
ount
the
Waste
/recyc
le dr
awer s
et
Rem
ove the
temp
late an
d plac
e the W
aste/re
cycle d
rawer
set on
the
fl oor o
f the c
abinet
. Set
back
the ru
nners 4
mm
and lin
e up th
e
center
line ma
rk on t
he ca
binet fl
oor w
ith the
cente
r mark
s on th
e meta
l
cross
rails. Use
a powe
r dr
ill a
nd a #
2x2" (o
r long
er) Ph
illips bi
t to
secure
all eig
ht pre
attach
ed sc
rews
.
Plea
se c
all 1
-800
-438
-
6788
for assis
tanc
e in
stalli
ng B
l
um pro
ducts
.
Tech
nica
l spe
cific
atio
ns s
ubje
ct to
chang
e w
itho
ut n
otice
.
LIT.W
R
M500
0
.03.11 ©
2
011 P
rinte
d in
US
A
For
m
ark
fo
r 1
8” w
ide
ca
bin
et o
pen
ing
do
no
t c
ut t
he t
em
pla
te
Cut
on
thi
s d
otte
d lin
e fo
r u
se
in
a 1
5” w
ide
ca
bin
et o
pen
ing
Cut
on
thi
s d
otte
d lin
e fo
r u
se
in
a 1
2” w
ide
ca
bin
et o
pen
ing
FOLD
FOLD
FOLD
FOLD
Cen
terl
ine
fo
r 12
" se
t
Cen
terl
ine
fo
r 18
" se
t
Cen
terl
ine
fo
r 15
" se
t
Cen
terl
ine
fo
r 12
" se
t
Cen
terl
ine
fo
r 18
" se
t
Cen
terl
ine
fo
r 15
" se
t
Cut o
ut
for 18
"
Cut o
ut
for 15
"
Cut o
ut
for 12
"
Cut o
ut
for 18
"
Cut o
ut
for 15
"
Cut o
ut
for 12
"
Insta
llatio
n
TAND
EM p
lus B
LUM
OTIO
N
Waste
/recycl
e dra
wer s
et
Step
2 — Ma
rk c
ente
rline
in c
abin
e
t
Usin
g a squa
re, m
ark th
e cente
rline
of th
e
cab
inet o
pen
in
g. It is h
elpfu
l
to m
a
ke a
ma
rk th
at exten
ds 20”
into
the
cab
inet.
Step
1 — P
repa
re tem
plate
Cut o
ut th
e dia
mo
nd s
hapes m
arked o
n th
e
cente
rline
for
your k
it (12”,
15” o
r 18”). T
hen, fo
r the 12”
or 15
inch
kits, cut
off th
e left s
ide o
n th
e
line m
a
rked fo
r your k
it.
Step
4 — P
rebo
re for
mo
untin
g sc
rews
Preb
ore t
he e
ight h
ole p
ositio
ns m
ark
ed on
the
tem
plate
with
a
2.5 m
m b
it.
Step
3 — A
lign a
nd s
ecu
re te
mpla
te
Lay th
e te
mpla
te o
n th
e
fl oor o
f the c
abine
t linin
g up
the
fold
with
the
fron
t edge. T
hen a
lign te
mpla
te o
n th
e
cente
rline, f
ront
an
d bac
k.
Onc
e it is
in th
e corre
ct po
sitio
n
we sug
gest t
aping
it down
so it
doesn’t
move.
Step 6
— In
sert d
rawer
and
bin
s
Exten
d the
two ru
nne
r
s full
y an
d se
t the
dra
wer o
n to
p of
them
so th
a
t
they fi t
into
the
notc
hes i
n th
e ba
ck of
the d
raw
er
. Clo
se th
e dra
wer
com
pletely
and
list
en fo
r the
Lo
cking
device
s to e
nga
ge th
e ru
nne
rs
with
a “click.”
Ope
n th
e dra
wer a
nd in
se
rt the
bin
s.
Your W
aste/rec
ycle
draw
er is no
w re
ady t
o us
e.
Step
5 — M
oun
t the
Was
te/recy
cle d
rawer s
et
Rem
ove th
e te
mpla
te a
n
d pla
ce th
e
Waste
/recyc
le dra
wer s
et o
n th
e
fl oor o
f the
cab
inet. S
et b
a
ck th
e ru
nne
rs 4
mm
an
d lin
e up
the
cente
rline
ma
rk on
the
cab
inet fl o
or w
ith th
e ce
nt
er m
a
rks o
n th
e m
etal
cros
s ra
ils. U
se a
pow
er d
r
ill and
a #2
x2” (or
long
er
) Phillip
s bit t
o
secu
re a
ll eig
ht p
rea
ttach
ed sc
rew
s.
InstallationTANDEM pl
us B
L
UMOTION
Waste/recycle
drawer set
Step 2
Ste
p
1
Step 4
Step 3
Step 6
Step 5
Ple
ase
ca
1-800-4
38
-6788 for assistance installing Blum products.
Technical specifica
tion
s subject to change
without notice
.
LIT.W
RM500
0.03.11 ©
2
011 Printe
d
in USA
For ma
rk fo
r 18” wi
de ca
binet openin
g
do
no
t cut th
e
te
m
plate
Cu
t on thi
s
dotted line fo
r use
in a 15” wide c
abi
ne
t op
ening
Cut o
n
th
is dotted
line
fo
r use
in a 12” wide ca
bine
t open
ing
FOL
D
FOLD
FOL
D
FOLD
Ce n t e rline for 12" set
C e n t e r line for 18" set C en t erline for 15" set
C e n t e rline for 12" set
C e n t e rline for 18"
s e t
C e n t erline for 15" s
e t
FOL
OL
O
OL
D
O
OL
OL
L
LD
FOL
OL
O
OLD
O
OL
OL
L
LD