Tip-out tray system installation instructions, Custom polymer tray installation, Custom slim series tray installation – Rev-A-Shelf 6581-Series User Manual
Page 2: Rev-a-shelf, l.l.c, Tray assembly and installation, Self-holdin’ hinge installation, Euro hinge installation, Choose your hinge type
equired:
Screw Driver
rill and 3/32" Drill Bit
Saw
ood
nstallation see Steps 1 thru 4 for
’ or Euro hinges and Figures A & B.
CUSTOM POLYMER TRAY INSTALLATION
For Hinge installation see Step 1 thru 4 for Self Holdin; or
Euro hinges and Figure A & B.
Tray Assembly and Installation:
Step 7: The 36” tray in most applications will have to be cut to the
proper length. To obtain proper length, measure the opening
width, then subtract 1-1/2” from the opening width and cut
tray accordingly.
A fine tooth saw is recommended for best results, along with a block of wood
immediately adjacent to cut off point for support as shown in Figure C. Remove any burr
from tray ends.
Step 8: With adhesive provided (please read warnings and directions on adhesive tube), apply
all the way around the inside of the end cap channels, which should sufficiently hold the
end caps in place.
Step 9: After adhesive has set, locate on end
caps as shown in Figure D mark panel,
drill and mount screws to sufficient
depth to allow removal of the tray for
future cleaning.
WARNING: If tray is to be shipped
installed in cabinet “tape
securely to panel.”
Refer to preceding note and helpful hints
for easier installation.
Figure B
Self-Holdin’ Hinge Installation:
Step 1:
Remove front panel or panels from sink cabinet.
Step 2:
Install the hinges to both sides of the cabinet as shown in
Figure A. Locate the front edge of the hinges flush with the
outside of the cabinet and install the flat head screws
provided in the approximate middle of the elongated holes.
this will allow for a future “up and down” adjustment of 3⁄16”.
Step 3:
Mark the back of the panel with the cabinet opening less
the 11⁄16”, distances shown in Figure B. Both marks should be
equal from the sides.
Step 4:
Measure the height of he elongated slots using the original
panel position as your reference point mark the panel. Install
the panel to the hinges using the Truss Head Screws provided.
Euro Hinge Installation:
Step 1:
Remove front panel or panels from sink cabinet.
Step 2:
Install the hinges to both sides of the Cabinet as shown
in Figure A. -Locate the front edge of the out side of the
cabinet and install the flat head screws provided in the
approximate middle of the elongated holes. this will allow
for a future “up & down” adjustment of 3⁄16”.
Step 3:
Mark the back of the panel with the cabinet opening less
3⁄8”, distances shown in Figure B. Both marks should be
equal from the sides.
Step 4:
Measure the height of the elongated slots using the
original panel position as your reference point Mark the
panel. Install the panel to the hinges using the
Truss Head Screws provided.
CHOOSE YOUR HINGE TYPE:
Figure A
The adjustment
screw sets the
desired opening
angle between
45 and 90.
Tools required:
#2 Phillips Screw Driver
Optional Drill and 3⁄32” drill bit
Fine Tooth Saw (For Custom Trays)
Block of Wood (For Custom Trays)
Helpful Hints
A. A small amount of bar soap on the screw threads will reduce the
initial installation effort.
B. Pre-installation of the screws or pre threading into holes will also
ease final installation.
C. Your new trays are made from a Hi-Impact Polymer and may be
cleaned using mild soap and water. Avoid scalding water, harsh
abrasives and dishwashers.
POLYMER TRAY (STANDARD & ACCESSORY), STAINLESS, AND SLIM
SERIES TRAY INSTALLATION:
Step 5: Close the panel, reach inside the cabinet and draw a line across the top of the frame
opening on the back of the panel. Open the hinged panel and draw another line
1⁄8 inch below the top of the Tip-Out Tray.
Step 6: Place the top of the tray against your gaging line, centered between the hinges, and
mark the center of the top portion of the mounting holes. Apply the screws of
sufficient depth to allow removal of tray for future cleaning.
Note: In most cases it is easier to remove the panel from the hinges for tray installation,
reinstall and adjust the panel and then slip the tray on the screws.
TIP-OUT TRAY SYSTEM
INSTALLATION INSTRUCTIONS
If you have any questions
please contact a customer
service representative at
1-800-762-9030.
Tools Required:
#2 Phillips Screw Driver
Optional Drill and 3/32" Drill Bit
Fine Tooth Saw
Block of Wood
For Hinge installation see Steps 1 thru 4 for Self
Holdin’ or Euro hinges and Figures A & B.
CUS O S
S
S
INSTALLATION:
CUSTOM SLIM SERIES TRAY INSTALLATION:
For Hinge installation see Step 1
thru 4 for Self Holdin’ or
Euro hinges and Figure A & B.
Tray Assembly and Installation:
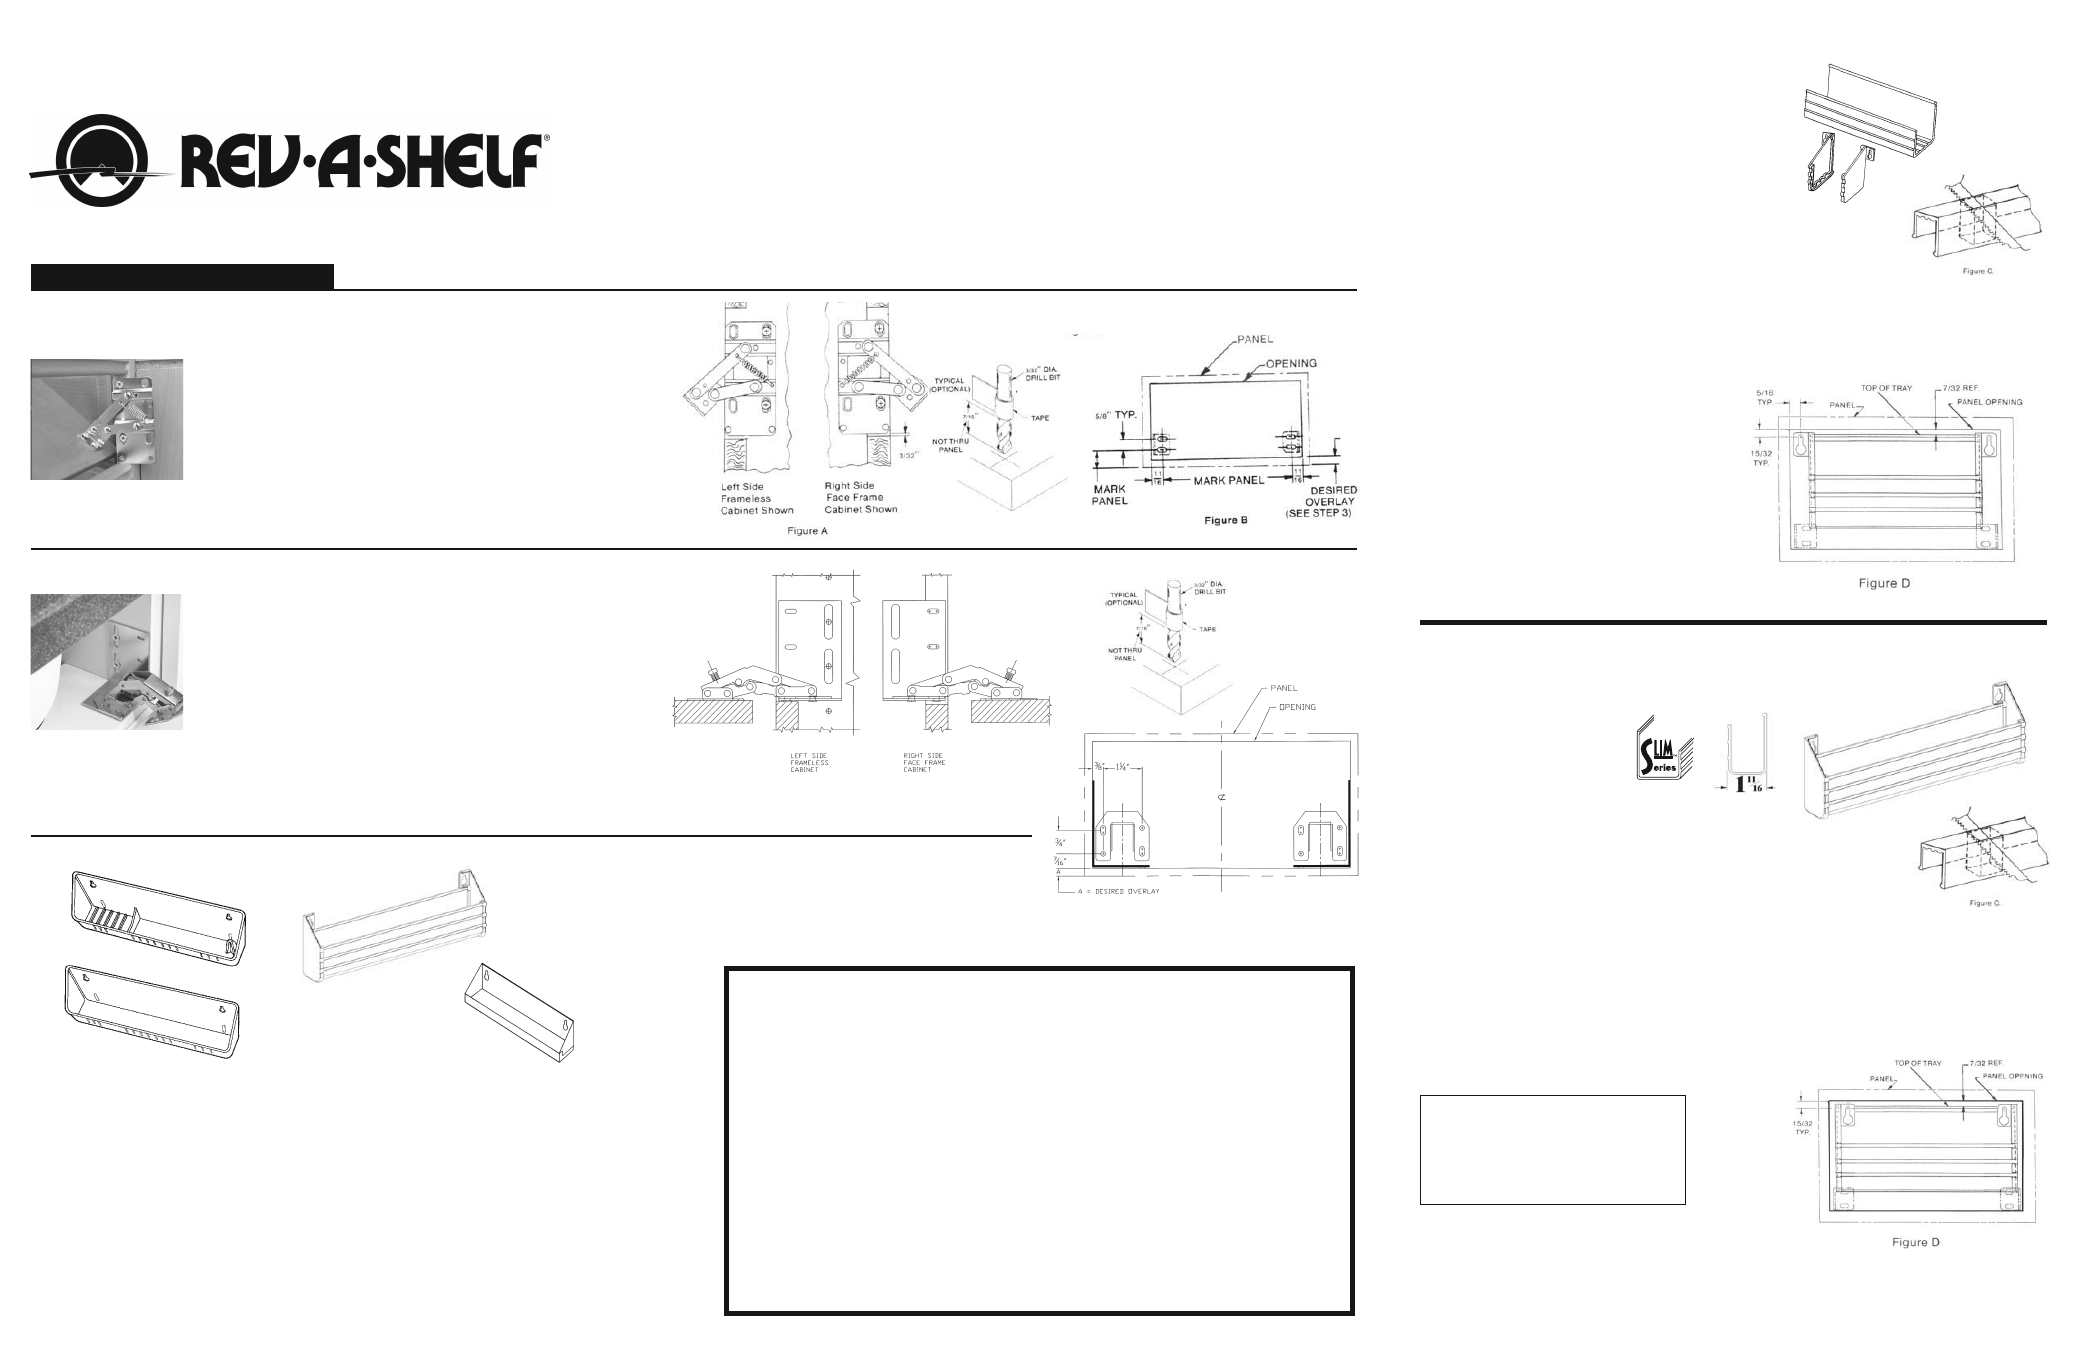
Step 7: The 36” tray in most applications will have to be cut to the
proper length. To obtain proper length, measure the
opening width, then subtract1-1/2” from the opening width
and cut tray accordingly.
Step 8: With adhesive provided (please read warnings and directions on
adhesive tube), apply all the way around the inside of the end cap channels,
which should sufficiently hold the end caps in place.
Step 9: After adhesive has set, locate tabs on end caps as shown in figure D, mark panel, drill and
mount screws to sufficient depth to allow removal of tray for future cleaning.
WARNING: If tray is to be shipped installed in cabinet “Tape securely to panel.”
Refer to preceding note and helpful hints for easier installation.
Rev-A-Shelf, L.L.C.
12400 Earl Jones Way Louisville, KY 40299 • (800) 626-1126 • www.rev-a-shelf.com