30 min, File drawer door mount instructions, Lista de partes: liste des pièces – Rev-A-Shelf RAS-FDSM-DM15-1 User Manual
Page 2
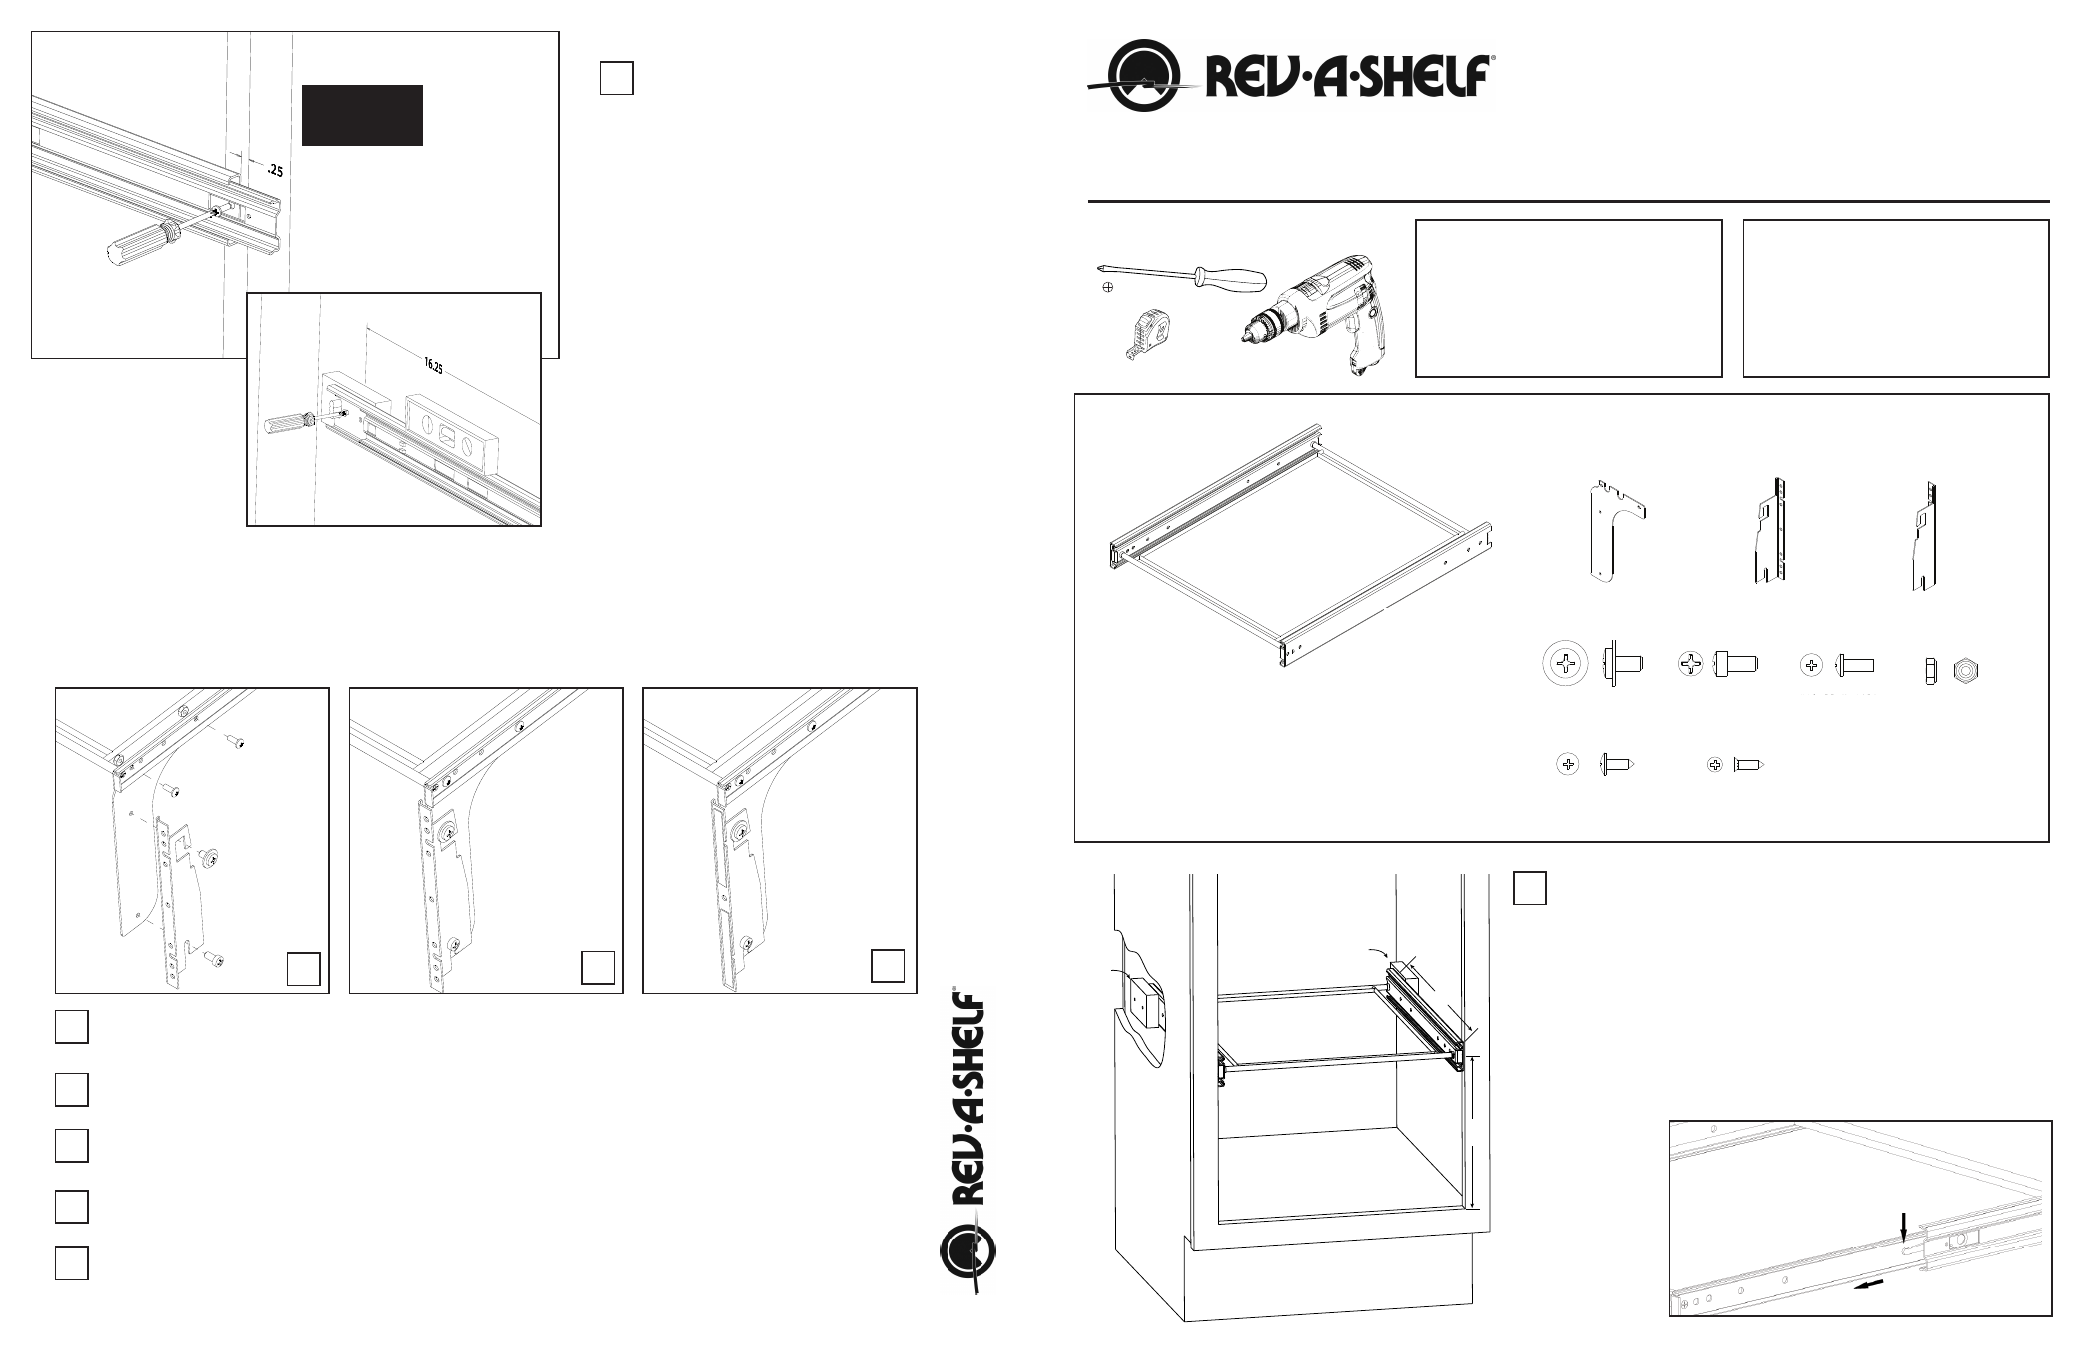
Determine desired height to mount file hanger and mark hole
locations ¼” back from outside of cabinet. Note: 9-1/2” mini-
mum height is required from floor of cabinet for unit to function
properly. Pre-drill holes using 7/64” drill bit.
Shims must be securely screwed into place 16-1/4” from front of
cabinet.
Begin by attaching slide to front of cabinet first. Then attach
rear of slide to shim using a level. Repeat for other side.
Once both slides are attached carefully re-engage wire frame to
slides. Product install is complete unless product is to be door
mounted.
2
TO FRONT
OF CABINET
PREDRILLING
Recommended
(7/64” Bit)
1
2
3
HERRAMIENTAS REQUERIDAS:
OUTILS REQUIS:
TIEMPO ESTIMADO DE ENSAMBLE:
TEMPS REQUIS POUR L’ASSEMBLAGE
CUIDADO Y MANTENIMIENTO:
ENTRETIEN:
30 MIN
Limpie con un paño húmedo y limpie
las partes hasta quedar secas.
Nettoyer avec un linge humide
et essuyer les pièces pour les
sécher complètement.
LISTA DE PARTES:
LISTE DES PIÈCES:
INSTRUCCIONES DE INSTALACIÓN
PARA CAJÓN DE ARCHIVERO
INSTRUCTIONS D’INSTALLATION DU
TIROIR À CHEMISES
Antes de iniciar con el ensamble, instalación u operación del
producto, asegúrese de que todas las partes estén presentes.
Contacte a Servicio a Clientes para partes de repuesto (800) 626-1126.
Avant de commencer l’assemblage, l’installation ou l’opération du
produit, vérifier que toutes les pièces sont inclues. Contacter le service à
la clientèle au (800) 626-1126 pour obtenir des pièces de remplacement.
9-1/2”
MIN
16-1/4”
Shim
Shim
1
Assemble the L-Support Bracket to the frame using (2) #8 x ½” screws and (2) nylock nuts. Repeat for other side
Attach door brackets to L-support using ¼-20 x ½” bolt to top and bottom. (as shown) Repeat for other side.
Apply the double stick tape to the outside of the door brackets.
Carefully place your door over top of the double stick tape and press firmly in place. The tape will provide
enough support to be able to gently pull the unit out and install the provided wood screws.
Once door is attached, use a screwdriver to carefully loosen the door bracket and adjust door as needed.
Once proper alignment, re-tighten.
1
2
3
4
5
ALAMBRE DE GANCHO
PARA ARCHIVERO
SUPPORT POUR CHEMISES
EN FIL MÉTALLIQUE
ESCUADRA DE SOPORTE L
SUPPORT EN L
ESCUADRA PARA MONTURA DE
LA PUERTA IZQUIERDA
SUPPORT DE MONTAGE POUR
PORTE GAUCHE
ESCUADRA PARA MONTURA
DE LA PUERTA DERECHA
SUPPORT DE MONTAGE POUR
PORTE DROIT
1/4-20 X 1/2”
TORNILLO DE
CABEZA PLANA
VIS À TÊTE RONDE
#10-32 X 1/2”
TORNILLO DE
CABEZA PLANA
VIS À TÊTE RONDE
#10-32
TUERCA NYLOCK
ECROU NYLOCK
#8 X 1/2”
TORNILLO DE CABEZA
DE CRUZ
VIS À TÊTE TRUSS
#6 X 1/2”
TORNILLO
VIS
Existen muchos gabinetes que se construyen de manera diferente, por lo cual
es necesario el que se utilice una calza a la medida (no se provee). El marco
de la cara determina el grosor necesario de las calzas. Para aplicaciones sin
marco, usted necesitará cortar 4 calzas. (2 al frente/2 atrás) (No se proveen)
Les caissons sont construits différemment, donc une cale sur mesure devra
être utilisée (non fournie). Le cadrage avant détermine l’épaisseur nécessaire
des cales. Pour Caisson sans cadre : Vous aurez besoin de couper 4 cales. (2
avants / 2 arrières) (non fournies).
Suelte el alambre para el marco de los lados
Désengager le cadre en fil métallique des coulisses
FILE DRAWER
DOOR MOUNT INSTRUCTIONS
1/4-20 X 1/2”
TORNILLO DE CABEZA PLANA
CON ARANDELA
VIS À TÊTE RONDE AVEC RONDELLE
Calza
Cales
Calza
Cales
I-FDSM-0311
12400 Earl Jones Way • Louisville, KY 40299
(800) 626-1126 • rev-a-shelf.com
I-FDSM-0311
12400 Earl Jones Way • Louisville, KY 40299
(800) 626-1126 • rev-a-shelf.com