Series 300 floor mounting – PRG DMX Reference Guide 5.4 User Manual
Page 75
DMX512 REFERENCE GUIDE
67
Series 300 Floor Mounting
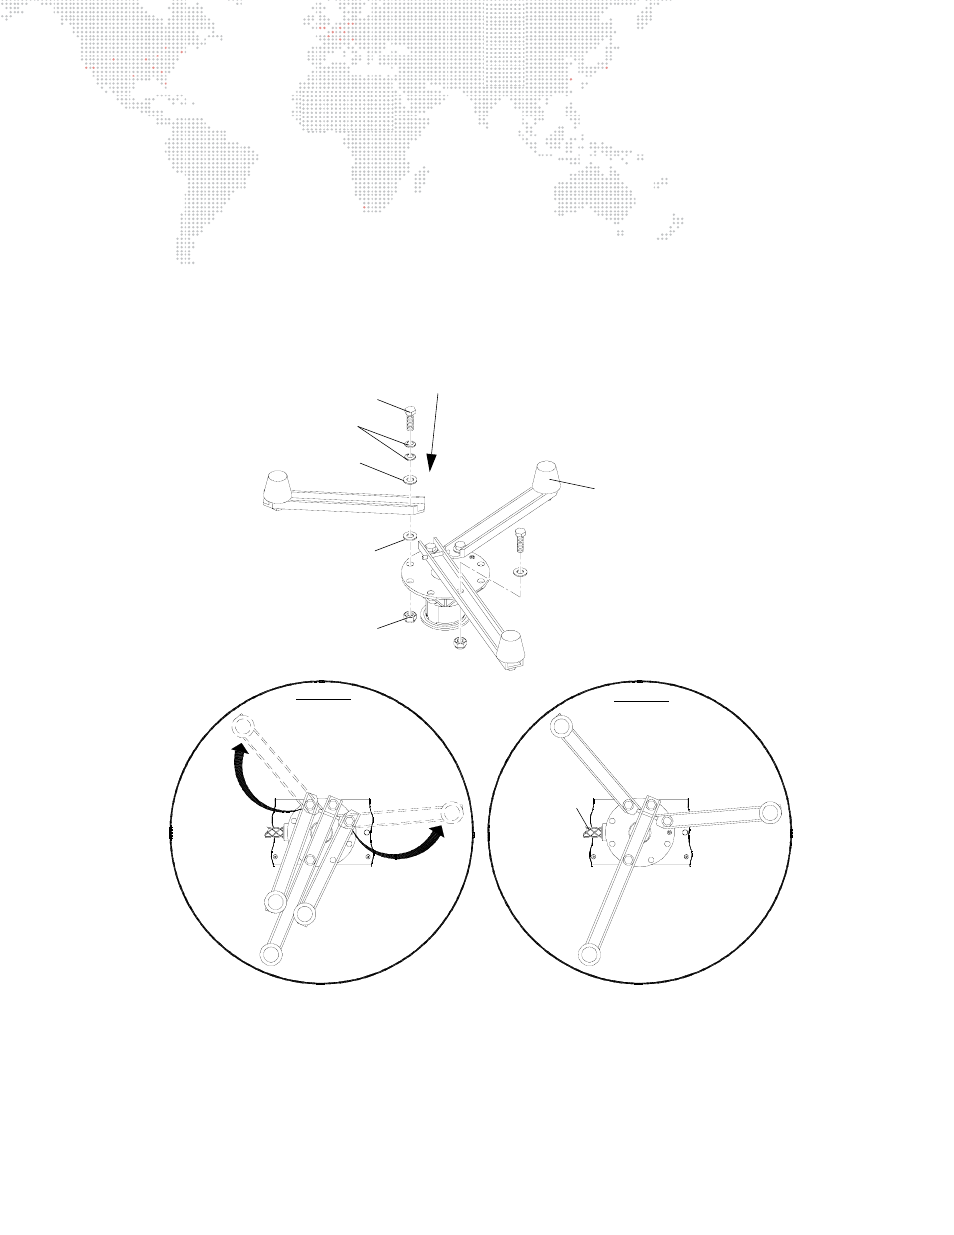
A Series 300 luminaire may be mounted in an upright floor position using a Series 300 floor stand. The floor stand
(22.9634.0161) includes all necessary hardware as shown in Figure 3-19.
To install floor stand:
Step
1. Orient pigtail cable as shown in Figure 3-19 DETAIL B and rotate pan tube accordingly.
Step
2. Secure pivoting legs to pan tube using, on each pivoting leg, one 5/16-18 bolt and nut; with two clutch disc
springs, and one 1/4" flat washer between the bolt and the leg, one 1/4" flat washer between the leg and
the pan tube.
Be sure to install disc springs with concave surfaces facing the flat washer.
Step
3. Tighten nuts and bolts until there is proper tension: just enough so pivoting legs stay in place, but not so
much that the legs don’t pivot. See Figure 3-19 DETAIL A.
Figure 3-19: Installing Floor Stand
Step
4. Place luminaire in desired floor position observing proper clearances.
Step
5. Connect input pigtail cable to Series 300 Lamp Run Cable which is connected to a Smart Repeater or
Smart Repeater Plus unit.
Pigtail Cable
5/16-18 x 1" Grade 5 Bolt (one per leg)
1/4" Flat Washer (two per leg)
Clutch Disc Spring
5/16-18 Nut w/ Nylon
PIVOTING LEG
FIXED LEG
PIVOTING LEG
Insert (one per leg)
(2 per pivoting leg)
FIXED LEG
PIVOTING LEG
PIVOTING LEG
Disc springs should be installed
with concave surfaces facing down
Pivoting legs should
be installed so that
they pivot, yet stay in
place after opening
FIXED LEG
PIVOTING LEG
PIVOTING LEG
DETAIL A
DETAIL B
S300 Floor Stand Assembly
(22.9634.0161)
Rubber Bumper (3)
1/4" Flat Washer (two per leg)