Cover the model – Great Planes RV-4 Park Flyer Kit - GPMA0010 User Manual
Page 26
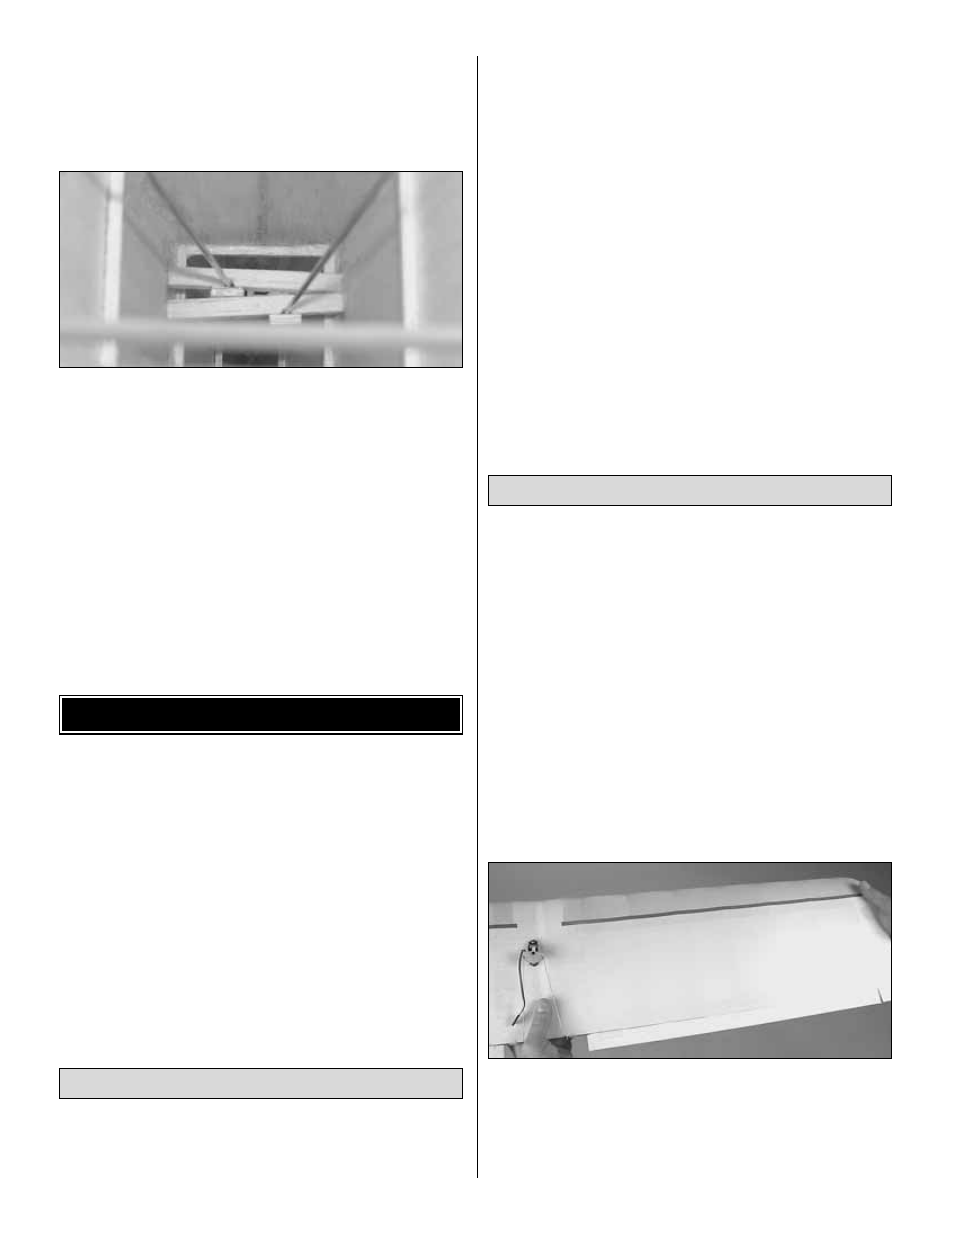
just forward of F6. Use a leftover piece of 1/8" x 1/4" [3.2 x
6.4mm] balsa for the main brace. Cut notches in the brace
where the pushrods cross it. Hold the pushrods in the
notches with leftover 1/8" x 1/8" [3.2 x 3.2mm] balsa. Be
careful not to glue the pushrods to the braces.
❏
13. In a similar manner, install pushrod bracing where
shown on the plan at the rear of the fuselage. This photo
shows the bracing between F7 and F8.
❏
14. Sheet the bottom rear of the fuselage with the
remaining 1/32" [0.8mm] balsa sheeting.
❏
15. Remove the servo arms from the top of the servos.
Pull the pushrods into the fuselage so that the rear ends do
not extend out of the fuselage.
❏
16. Remove the stab and fin from the fuselage. Reinforce
the glue joints of stringers that were tack glued into place.
Sand the stringers even with F4 and F5. Sand all stringers
to a smooth contoured shape. Sand the sheeting even with
the fuselage sides.
❏
1. If you haven’t done so already, sand all parts of the
model smooth with 320-grit, then 400-grit sandpaper.
❏
2. Use compressed air (be careful!), a dust brush or a
tack cloth to remove balsa dust from the model.
❏
3. Determine what material you will be covering the
model with. If using Top Flite EconoKote, the model is ready
to cover. If using Coverite CoverLite, coat the areas to be
covered with Coverite Balsarite Fabric Formula
(COVR2500). Be certain you use the fabric formula for
CoverLite, and not the formula for regular film covering.
❏
4. Follow the suggested covering sequence to cover
the model.
Important: Do not shrink the covering until both sides of
each part are covered. This will reduce the tendency for the
surfaces to twist.
Tail Surfaces:
❏
1. The bottom, then the top of the stabilizer
❏
2. Bottom, then top of elevators
❏
3. Fin
❏
4. Rudder
Fuselage:
❏
1. Bottom
❏
2. Sides and top
Wing:
❏
1. The bottom of the wing
❏
2. Top of the wing
❏
3. Ailerons
Note: It may be easier to cover the wing tips separately,
after the rest of the wing has been covered.
❏
1. After all the tail pieces are covered, inspect the stab
and fin for twists. If necessary, lightly twist the part in the
opposite direction and apply heat to the covering until you
can get it flat.
An important characteristic of most airplanes is their ability
to resist stalling, or to stall gently. Simply stated, a stall is
when the wing no longer produces lift–basically the model
quits flying until it regains airspeed. A stall can occur when
attempting to climb too rapidly, or when the model runs out
of airspeed (such as when trying to land too slowly). One
way to prevent or delay a stall is to add “washout” to the
wing. Washout is an upward twist at both wing tips, so that
the trailing edge is higher than the leading edge. If the
trailing edges are raised slightly, or are at a lower angle then
the rest of the wing, the outer portion of the wing will
continue to produce lift (fly) even though the rest of the wing
has quit flying, thus resisting a stall. Because the RV-4 Park
Flyer is designed to be light, it would be difficult to build this
required twist into the wing during construction. The
following procedure explains how to add washout, which is
common for lightweight structures such as this.
❏
1. Start with the right wing panel. Holding the middle of
the wing in one hand, twist the trailing edge of the right wing
tip upward. The amount of washout to shoot for is 1/8"
[3.2mm], so begin by twisting about 1/2" [13mm] (because
the wing will “spring” partway back to its original position
after re-shrinking the covering in the next step).
Add “Washout”
Suggested Covering Sequence
COVER THE MODEL
26