Install the rudder, Install the rudder servos – Great Planes Yak-55M 50-55cc Sport / 3D ARF - GPMA1230 User Manual
Page 12
12
Install the Rudder
❏
1. Without using any
glue, install four hinges
into the holes in the
trailing edge of the
rudder
.
Note that the pivot point
of each hinge must align
with the center of the
trailing edge. To achieve
this alignment, the hinges
will be fairly deep in the fi n.
Also note that the hinges
must be perpendicular to
the leading edge.
❏
2. Again without glue,
test fi t the rudder to the fi n. Remove the rudder and all the
hinges. Add a small drop of oil to the pivot point on the hinges.
This will prevent the epoxy from adhering to the pivot point.
Make sure oil does not get on the gluing surface of the hinge.
If it does, clean the oil off with a paper towel square dampened
with denatured alcohol.
❏
3. Mix up approximately 1/4 oz. [7.4cc] of 30-minute epoxy.
Use a toothpick to thoroughly apply the epoxy in the holes in
the fi n and rudder. Use the toothpick to get the epoxy out of
the opening of the holes in the rudder and fi n so it doesn’t get
into the hinge pin. Wipe away any excess epoxy around the
outside of the holes with a couple of the small paper towel
squares dampened with denatured alcohol.
❏
4. Use the toothpick to apply epoxy to the ends of the rudder
hinges that go into the fi n. Insert each hinge into the fi n and
wipe away any excess epoxy that squeezes out of the hole.
❏
5. Apply epoxy to the other end of the hinges. Join the
rudder to the fi n, pushing the hinges only about 3/4 of the
way into the rudder. Use a toothpick to wipe away any epoxy
that squeezes out. Then fi t the rudder the rest of the way in.
❏
6. Move the rudder left and right to align the hinges. If
needed, use a length of masking tape to hold the rudder to
the fi n. Allow the glue to fully cure.
Install the Rudder Servos
We have designed this airplane with the option to use one servo
with 250 oz-in. of torque or to use two, lower strength servos
in tandem. If you are more of a sport fl yer and not an aspiring
3-D pilot, you can use a single servo with approximately 125
oz-in. You will need to make a decision on the number of
servos you will be using. Should you decide to use a single
servo and later decide you would like to use two servos you
can add the second servo later.
❏
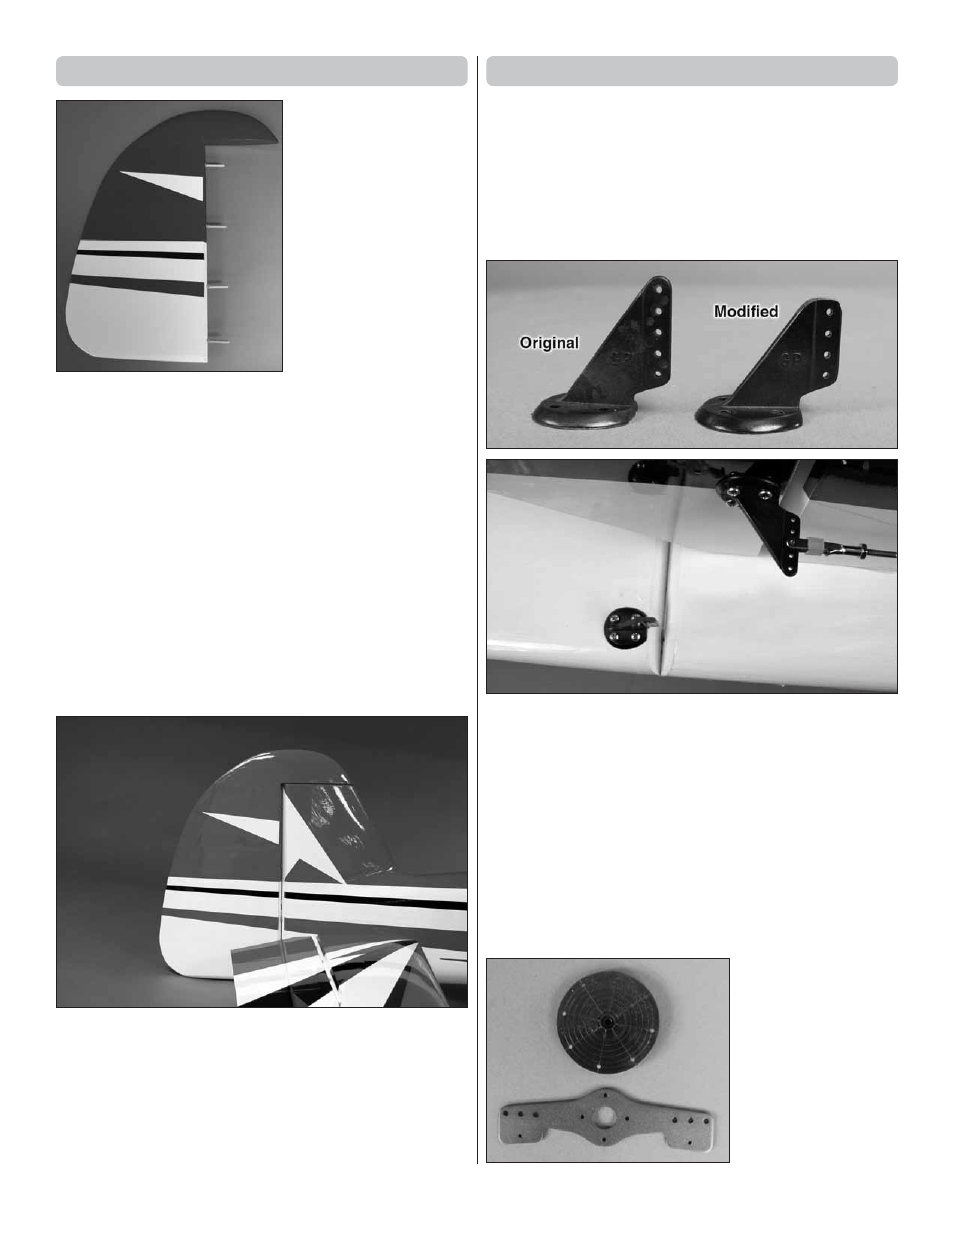
1. Modify two large black nylon control horns as shown.
This is easily completed with a high speed motor tool, small
belt sander or a sanding block with coarse sandpaper. As
you did with the ailerons horns, locate the plywood plate on
each side of the rudder. Position the horns over the plates.
Drill a 3/32" [2.4mm] hole through each of the holes in the
control horn. Drill only through the plywood plate. Do not
drill through the control surface.
Mount the horn with four
#4 x 1/2" [13mm] screws. Do this on both sides of the rudder.
SINGLE SERVO INSTALLATION
If you will be installing two servos, skip ahead to, “Two
Servo Installation”.
❏
❏
2. For the rudder
servo arm installation
you will need one of
the aluminum servo
arms included in the kit
and one of the round
servo disks included
with your radio system.
The round servo disk
needs to be at least 1"
[25mm] in diameter.