Great Planes Yak-55M 50-55cc Sport / 3D ARF - GPMA1230 User Manual
Page 10
10
❏
❏
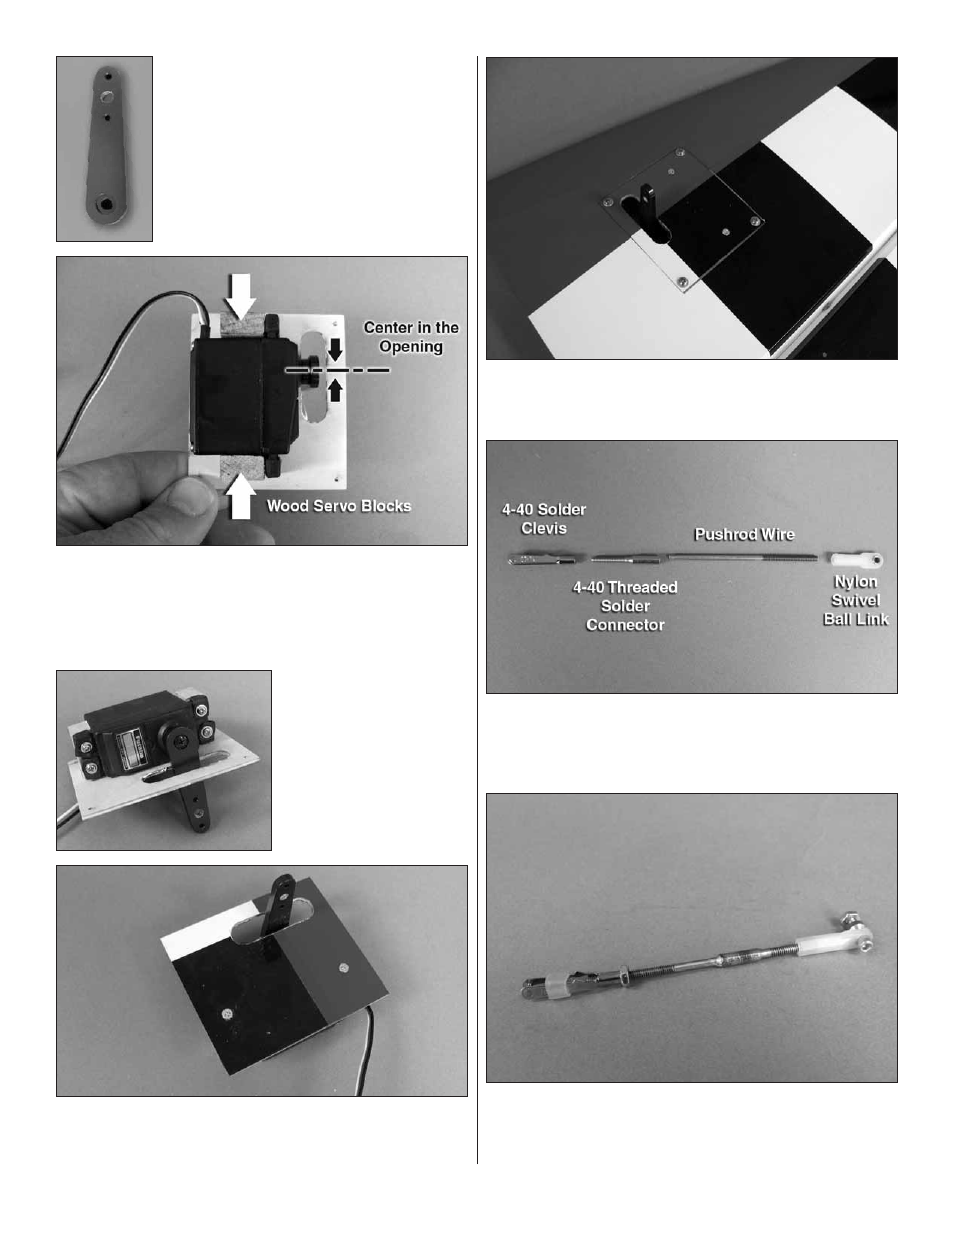
2. To achieve proper elevator control
you will need to use a 1-1/2" heavy duty servo
arm. We used the Futaba aluminum arm
(FUTM2118). Enlarge the hole that is 1-1/4"
[32mm] from the center of the servo spline
with a 1/8" [3.2mm] drill.
(The 1-1/4" [32mm]
dimension is approximate. You may fi nd that
for your brand of servo, the holes might be
spaced slightly different than the Futaba.
Open up the hole closest to this dimension.)
❏
❏
3. Center your servo and then install the arm to the servo.
Remove the servo tray cover from the left stab. Place the
servo on the tray with the servo arm centered in the slot. Glue
a 5/16" x 9/16" x 13/16" [8mm x 14mm x 21mm] wood servo
block on each side of the servo.
❏
❏
4. Drill a 1/16" [1.6mm]
hole through each of the
mounting tabs of your servo.
Mount the servo with the
hardware that came with
your servos.
❏
❏
5. Drill a 1/16" [1.6mm] hole through the servo cover
into the hardwood blocks you glued in place. Install a #2 x 3/8"
[9.5mm] wood screw into each block to secure them.
❏
❏
6. Guide the servo lead through the stab exiting through
the root rib. Secure the servo cover in place with four #2 x 3/8"
[9.5mm] screws and #2 fl at washers.
❏
❏
7. Cut one of the 4-40 x 5-3/4" [146mm] pushrod wires
to a length of 2-3/4" [70mm]. Using the solder technique used
on the ailerons, solder the unthreaded end of the wire to the
4-40 threaded solder connector.
❏
❏
8. Assemble the pushrod as shown in the photo. Be sure
to use thread locker on the nuts when doing the fi nal assembly.
Install the nylon swivel ball link to the servo arm with a 4-40
x 1/2" [13mm] screw and 4-40 nut.