Futaba 8FG 2.4GHz User Manual
Page 83
83
0RGHO0HQX$LUSODQH*OLGHU)XQFWLRQV!
ŏ6HOHFW WKH IXQFWLRQ QDPH
and return to the Model
menu by touching the
RTN button.
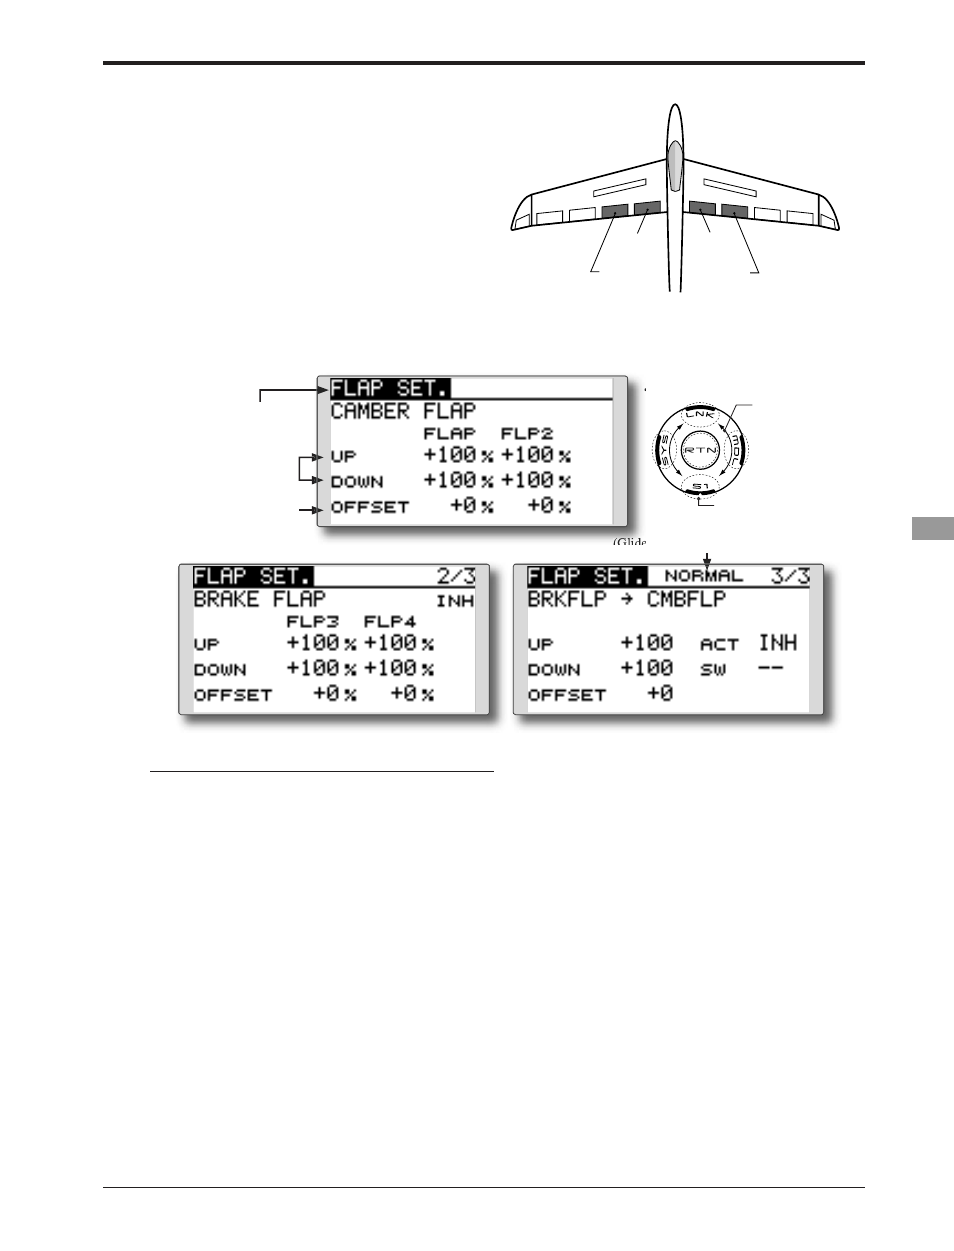
FLP 2
(Camber Flap)
FLP 1
(Camber Flap)
FLP 3
(Brake Flap)
FLP 4
(Brake Flap)
)/$36(7
>&RUUHVSRQGLQJ PRGHO W\SH@ $LUSODQHJOLGHU ÁDSV RU PRUH
7KHXSGRZQWUDYHORIHDFKÀDSFDPEHUÀDSV
)/3 EUDNH IODSV )/3 FDQ EH DGMXVWHG
independently for each servo according to the
ZLQJW\SH
ŏ 7KH RSHUDWLRQ UHIHUHQFH SRLQW RI HDFK ÁDS FDQ EH
offset
The camber flaps of a 4-flap model can
EH PL[HG ZLWK WKH EUDNH IODSV %5.)/3 WR
&0%)/3
ŏ $Q 212)) VZLWFK FDQ EH VHW
*The display screen is an example. The actual
screen depends on the model type.
6HWWLQJPHWKRG
Ɣ)ODSXSGRZQDGMXVWPHQW
Move the cursor to the flap (FLP) 1~4 Up or
Down item according to the wing type and
touch the RTN button to switch to the data
input mode. Adjust the travel independently
by scrolling the touch sensor.
,QLWLDO YDOXH
$GMXVWPHQW UDQJH a
:KHQWKH571EXWWRQLVWRXFKHGIRURQHVHFRQGWKHUDWHLV
UHVHWWRWKHLQLWLDOYDOXH
Touch the RTN button to end the adjustment
and return to the cursor mode.
Ɣ5HIHUHQFHSRLQWDGMXVWPHQW
Move the cursor to the [OFFSET] item and
touch the RTN button to switch to the data
input mode. Adjust the operation reference
point of each flap by scrolling the touch
sensor.
,QLWLDO YDOXH
$GMXVWPHQW UDQJH a
ŏ 2 S H U D W L R Q
reference point
offset
ŏ 8 S
' R Z Q
adjustment
:KHQ WKH 571 EXWWRQ LV WRXFKHG IRU RQH VHFRQG WKH
UHIHUHQFHSRLQWLVUHVHWWRWKHLQLWLDOYDOXH
Touch the RTN button to end the adjustment
and return to the cursor mode.
Ɣ$FWLYDWHWKH%UDNH)/3WR&DPEHU)/3PL[LQJ
Move the cursor to the [ACT] item and touch
the RTN button to switch to the data input
mode. Select the ACT mode by scrolling the
touch sensor.
*The display blinks.
T o u c h t h e R T N b u t t o n t o a c t i v a t e t h e
function and return to the cursor mode. (ON
is displayed.)
To select a switch, move the cursor to the
[SW] item and touch the RTN button to call
the selection screen. Select the switch and
set its ON direction. (Always ON at "--" setting)
)RUDGHVFULSWLRQRIWKHVZLWFKVHOHFWLRQPHWKRGVHHWKH
description at the back of this manual.
ŏ 6HOHFW >)/$3 6(7@ DW WKH 0RGHO PHQX DQG
access the setup screen shown below
by touching the RTN button.
Scrolling
ŏ0RYLQJ FXUVRU
ŏ6HOHFWLQJ PRGH
ŏ$GMXVWLQJ YDOXH
ŏ7R QH[W SDJH
*OLGHU&XUUHQWO\VHOHFWHGFRQGLWLRQQDPH