The epic™ display, Fig. 5 – Crosman BPE3571 User Manual
Page 6
6
5. EPiC™ Display Operation
The EPiC™ display will not display information when the bolt is in the “READY TO FIRE”
position. To view the display, you must have the bolt out of the “READY TO FIRE” posi-
tion. If the bolt is in the “READY TO FIRE” position, move the bolt forward and move the
bolt activation lever so the word “DISABLED” is visible and the bolt cannot move. The
cross block safety should be “ON SAFE”. Critical halts are displayed when the bolt is in
the fire position. See Appendix A.
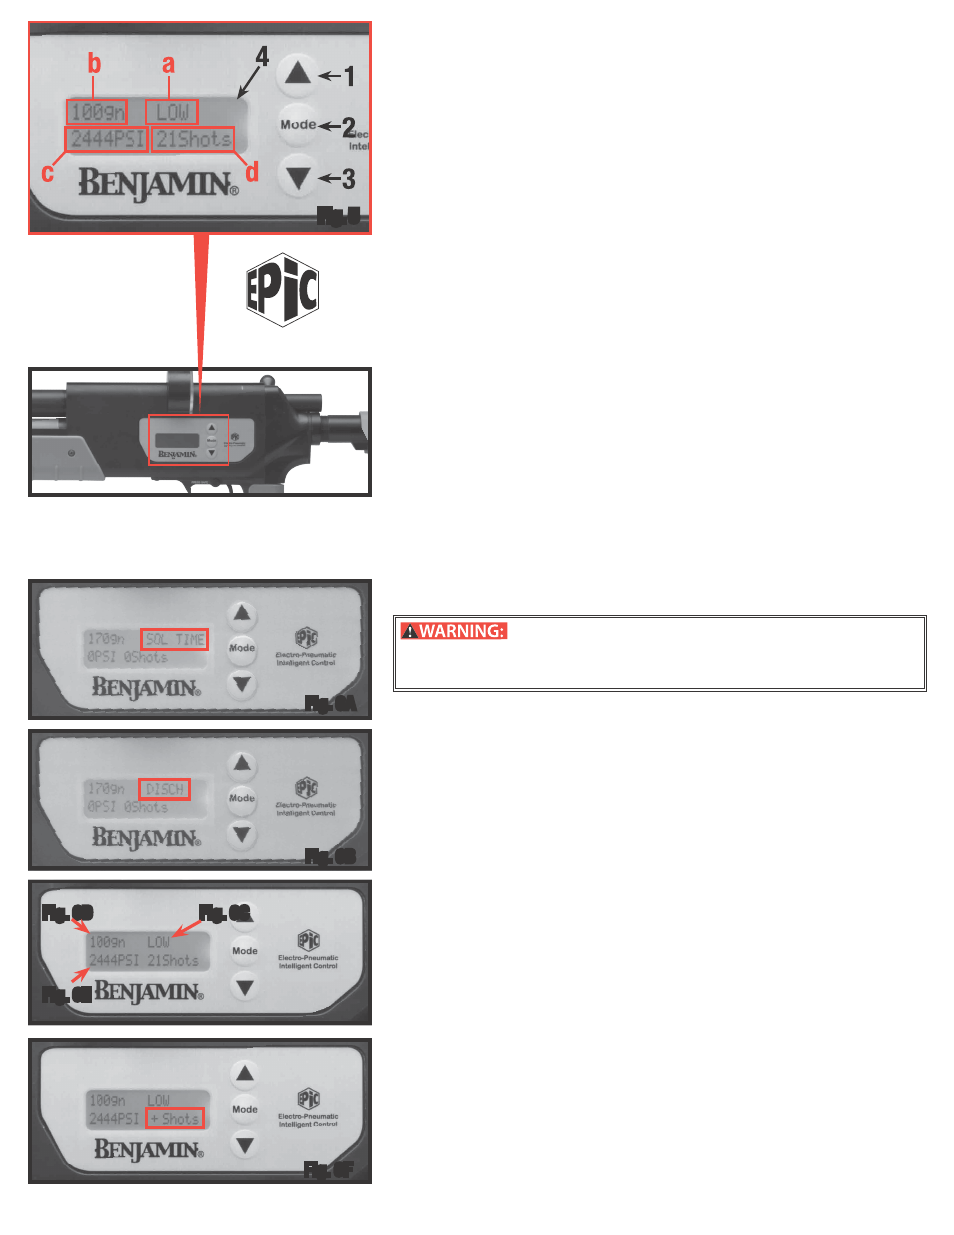
The EPiC™ display
(Fig. 5):
1. Up Arrow Button
2. Mode Button
3. Down Arrow Button
4. LCD Display Screen
a. Displays Operation Modes Manual (“SOL TIME”), Discharge (DISCH),
Foot Pounds of Energy (FPE) (LOW, MEDIUM, or HIGH).
b. Displays bullet weight in grains (gn)
c. Displays air pressure in the airgun in pounds per square inch (PSI).
d. Displays number of shots remaining (Shots)
A. Mode Navigation (Bullet Grain/Power)
Press the “Mode” button on the EPiC™ display to move between the bullet grain weight
and bullet power settings on the display. Use the Up and Down arrows to navigate with-
in each display and push the “Mode” button to select the correct entry in each display.
Press the “Mode” button one time and the upper right hand portion of the display will
blink. Press the Up and Down arrows to navigate to the desired value. Press the “Mode”
button again to select the upper left hand portion of the display. Repeat the steps above
for desired value. The modes are:
I. Manual Mode (Sol Time) (Fig. 6A)
“SOL TIME” – The manual mode (Fig. 6A) uses eVALVE ™ technology to allow you to
manage and calibrate air pressure to control the length of time (“Dwell time”) before the
valve releases air or Nitrogen to discharge the bullet after the trigger is pulled. You can
set the time from 10 to 8000 microseconds. This mode can be used to test various bul-
lets for velocity and trajectory characteristics in this airgun.
II. Discharge Mode (DISCH) (Fig. 6B)
Airgun will not fire on discharge mode if the pressure is less than 1000psi
“DISCH” – The Discharge Mode (Fig. 6B) is to be used after the valve has not had a
complete cycle and has not released all the air or nitrogen. Use this mode to discharge
a bullet left in the barrel. Use of this mode resets the valve. This mode electronically
vents the airgun of pressure with a 7000 microseconds discharge of air.
Performing the above procedure may exhaust air from the bar-
rel at a high rate and fire a bullet from the airgun if one is in the barrel. Therefore,
make certain the airgun is pointed in a SAFE DIRECTION. Failure to follow these
instructions may result in serious injury or death.
III. Change Foot Pounds of Energy (FPE)/Velocity (
“LOW” – “MED” – “HIGH”)
These bullet power settings
(Fig. 6C) adjust the muzzle velocity and, therefore, foot
pounds of energy. Changing this setting changes the valve dwell time which adjusts
the muzzle velocity. For example, if you intend to shoot 170 or 145 grain bullets on the
HIGH setting, then you will need 2600 to 3000 PSI of pressure in the airgun. In contrast,
if you intend to shoot 145 or 100 grain bullets on the LOW setting, then it is best to have
2700 PSI or less in the airgun. (See Section 20C. and figure 19)
B. Grain Weight (Fig. 6D)
Pressing the “Mode” button twice will cause this display to blink. Use the Up and Down
arrows to find the correct bullet weight of the bullet you are using. There are three preset
weights: 100, 145, and 170 grains. Press the “Mode” button to select the correct weight. If
you are using a bullet with a different weight, select the preset weight nearest to the weight
of the bullet you are using.
C. Pressure Reading (PSI)(Fig. 6E)
The LCD will continuously display the pressure as PSI contained in the reservoir.
D. Shot Counter
This displays the following information:
“X Shots”= This shows the approximate number of shots remaining based on PSI vs.
power setting and bullet variables. You must press the “Mode” button after each shot to
update this information.
“+ Shots” (Fig. 6F) = This means your airgun will shoot with excessive velocity.
To correct, lower your reservoir pressure (See Section 7) or choose a higher power or
nearest grain weight setting.
“- Shots” (Fig. 6G) = This means your airgun will shoot with low velocity. To correct, raise
your reservoir pressure by adding compressed air or N
2
or choose a lower power setting.
E. EPiC™ Error Codes:
See appendix A for a list of critical halt error codes.
(Page 12)
F. EPiC™ LCD Backlight Display (Fig. 6H)
To activate the LCD Backlight press both the up and down arrow keys at the same time
until the backlight is active. The back light will help you see the LCD information in low
light conditions. The backlight does consume significant battery life and should be used
sparingly to conserve the batteries.
Fig. 6B
Fig. 6A
Fig. 6C
Fig. 6D
Fig. 6E
Fig. 6F
Electro-Pneumatic
Intelligent Control
TM
Fig. 5