Crosman BPE3571 User Manual
Page 10
10
13. Maintaining Your Airgun
Apply a moly graphite Extreme Pressure (EP) grease to the sliding bolt mechanism every
3 months or 500 shots, whichever occurs first
(Figs. 11A – B).
Keep all petroleum-based lubricants away from the high pressure air fill nipple.
Petroleum-based lubricants
MUST NOT be introduced into the high pressure reservoir.
Explosion Danger. Do not introduce petroleum based products
into the high pressure reservoir, or it may cause an explosion. Failure to follow the
instructions may result in serious personal injury or death.
DO NOT MODIFY OR ALTER YOUR AIRGUN. Attempts to modify the airgun
in any way inconsistent with this manual may make your airgun unsafe to use, cause
serious injury or death, and will void the warranty. If you drop your airgun, visually check
to see that it works properly before you use it again. If anything seems changed, like a
shorter or weaker trigger pull, this may mean worn out or broken parts. Call Crosman
customer service for assistance before using your airgun again.
14. Fill Nipple Service or Removal
It is not suggested that you remove the fill nipple for any reason.
If the fill nipple needs service or repair please return the airgun to Crosman
®
for repair.
15. Grip, Stock Adjustment and Removal
(Fig. 12A) To remove the grip for cleaning or replacement. Use a .1875 in. allen wrench to
loosen and remove the grip screw. To replace, reverse the steps.
To adjust the length of the stock, depress the lever
(Fig. 12B). Move the stock to the desired
position and then release the lever. To remove the stock, loosen the phillips screw
(Fig. 12C)
and turn the stock counter clockwise. To replace reverse the steps.
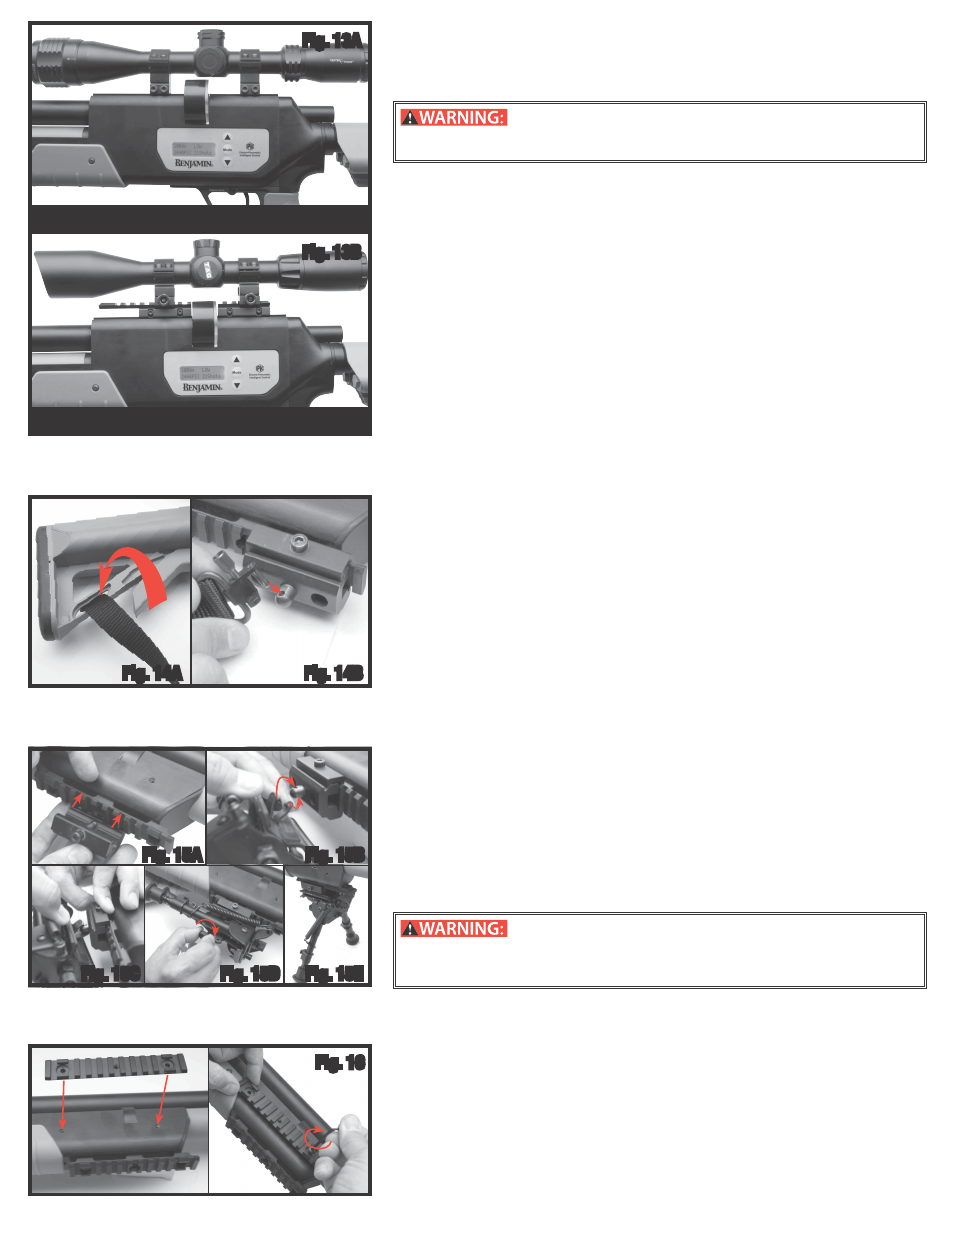
16. Mounting Your Scope (Optional)
The integrated receiver dovetail is 3/8th in. or 11mm. It requires use of scope rings
designed for airguns. We suggest using a CenterPoint
®
scope that includes these rings.
There are adaptor interfaces that step up the dovetail size to Weaver and or Picatinny
dimensions for use with standard hunting (non-airgun) sized rings. You can learn more
about mounting scopes at Crosman.com
(Fig. 13A).
TAG scopes (Optional): CenterPoint
®
offers specialized scopes that account
for the trajectory ballistics (bullet drop) of big bore airgun bullets
(Fig. 13B). Go to
Crosmanhunting.com to learn more about these scopes.
17. Attaching a Sling (Optional)
The airgun has a loop opening attachment point for a sling on the butt stock. To attach
a sling to the foregrip you will need a Picatinny/Weaver rail adaptor with a sling swivel
attachment
(Fig. 14).
18. Attaching a Bipod (Optional)
To attach a bipod to the foregrip of the airgun you will need a bipod designed for Pica-
tinny/Weaver attachment or a bipod interface designed for Picatinny/Weaver attachment.
See image sequence for attachment steps.
(Fig. 15A-E)
19. Attaching the Accessory Rails (Optional)
The airgun forearm is predrilled and tapped for mounting Benjamin
®
Product Accessory
Rails (BPARS) with the provided screws for sides of the forearm
(Fig. 16). These rails are
Picatinny/Weaver design.
20. Advanced Tuning Techniques
A. Adjusting the Trigger
The airgun trigger assembly can be adjusted but unless you are experienced in making
such adjustments, Crosman recommends that adjustments to factory settings be made
only by a qualified gunsmith after reading all instructions. Adjusting the trigger assembly
can result in a light trigger pull that could make the airgun more susceptible to discharge
when dropped. Make only the adjustments identified in this manual.
This airgun comes with an adjustable trigger, which could allow
the airgun to fire if dropped or jarred, with or without the safety engaged. As
always, treat the airgun as though it is loaded and with same respect you would a
firearm. Failure to follow these instructions may result in serious injury or death.
Tools Needed (not included) If Following Advanced Tuning Techniques
.125 in. Allen Wrench
NOTE: These adjustment features are for advanced shooters. Most shooters can use the
factory settings provided and should not need to make modifications.
• The trigger on your airgun is an adjustable unit for weight of trigger pull only. It has
been factory set to an efficient setting that will suit most hunting and target uses. If
you, as the owner, wish to alter the factory settings you should do so only after read-
ing the following instructions carefully.
• Put the airgun “ON SAFE”, remove the clip and keep the airgun pointed in a SAFE DIRECTION.
• Depressurize the airgun (See Section 7)
Fig. 13A
Fig. 13B
3/8th DOVETAIL SCOPE mounted to airgun
WEAVER/PICATINNY mounted using adapters
Fig. 14A
Fig. 14B
Fig. 15A
Fig. 15B
Fig. 15C
Fig. 15D
Fig. 15E
Fig. 16