Fig. 19 – Crosman BPE3571 User Manual
Page 11
11
Adjustment of trigger screw (A) could inhibit proper function of
the safety lever (C). Thus, always check for full engagement and smooth function
of the safety lever upon completion of any changes to the trigger screw. If you are
not sure if the safety is engaging and operating properly, take your airgun to an
experienced gunsmith.
Fig.17 A Spring Adjuster
Fig.17 B Trigger
Fig.17 C Safety
• Trigger pull spring adjustment using an .125 in. allen wrench for adjustment of
screw (A) will change the force of the trigger spring. Turning screw (A) clockwise will
increase the force of the spring. These adjustments could affect switch engagement,
and therefore may not allow the airgun to fire when the trigger is pulled. You will
need to look at the EPiC display for a Critical halt error. If you get a critical halt error
for trigger SW2 (See Appendix A), you will need to re-adjust the spring setting for
less force.
• After adjusting your trigger, always check that the trigger and safety are functioning
properly. If you are not sure if the trigger or safety is operating properly, take your
airgun to an experienced gunsmith.
In the event your trigger becomes contaminated with debris and is not functioning prop-
erly, contact Crosman
®
to examine for repair or maintenance.
B. Adjusting for Various Fill Pressures
• The airgun is designed to be tuned to work at various fill pressures from 1000 psi
(69 Bar) up to 3000 psi (207 Bar).
• The airgun has been factory set for an efficient fill pressure that will suit most hunting
and target uses. If you, as the owner, wish to alter the factory settings you should do
so only after reading the following instructions carefully.
Never attempt to work on, repair or disassemble a pressurized
airgun to correct for overfill or valve lock. Doing so may cause parts to fly from the
airgun at dangerous speeds. Failure to follow these instructions may result in seri-
ous injury or death.
C. Changing bullet impact Foot Pounds of Energy(FPE)/Velocities
The Rogue air rifle bullet impact, foot pounds of energy or velocity, can be changed by
using the EPiC™ control panel.
(Fig. 18) The middle button next to the display screen
is the mode selector. The mode selector will cycle through the options of changing the
power level or grain weight of the bullet. The up and down arrow buttons change the
power level or grain weight of the bullet to the closest preset weight.
For best bullet performance and consistent velocity use
Fig. 19
chart for your particular applications.
Example: You are using the airgun and you decide to change bullets to 100 grain hollow
point. Put the airgun “ON SAFE”. Confirm the bolt is in the forward position. Press the
mode button until the bullet grain weight is flashing. Use the down button to change num-
ber to 100. Press the mode button to power level. Power level will start flashing. Change
power with the down button to Low. Cycle the bolt to load a bullet. Take “OFF SAFE”
when ready fire a shot. Put the airgun back “ON SAFE”.
21. Open Bolt Indicator (OBI) (Fig.20A-B)
This product is shipped with open bolt indicator (OBI). You must first understand the use
of the OBI. We recommend using the OBI enhanced safety feature whenever the airgun
is not in use. The purpose of the OBI is to indicate to the user the breech is clear and
the bolt is open. Open the bolt and insert the OBI into the barrel breech all the way to
the elbow
(Fig. 20B). If there is a bullet in the breech, the OBI will not insert to the elbow.
Clear the barrel by shooting the airgun in a SAFE DIRECTION.
Use of the OBI does not guarantee that there is not a bullet in front
of the breech. As always treat the airgun as though it is loaded and with the same
respect you would a firearm.
22. Reviewing Safety
• NEVER point the airgun at any person or at anything you do not intend to shoot.
•
ALWAYS treat the airgun as though it is loaded and with the same respect you
would a firearm.
•
ALWAYS aim in a SAFE DIRECTION. Always keep the muzzle of the airgun
pointed in a SAFE DIRECTION.
•
ALWAYS keep the airgun on safe until you are ready to shoot.
•
ALWAYS check to see if the airgun is “ON SAFE” (See Section 2A) and unloaded
when handling the airgun from another person or from storage.
•
ALWAYS keep your finger off the trigger and out of the trigger guard until ready
to shoot.
• You and others with you should always wear shooting glasses to protect your eyes.
• If your reading or prescription glasses are not safety glasses, make sure you wear
shooting glasses over your regular glasses.
• Use Benjamin
®
and Benjamin
®
by Nosler
®
.357 caliber bullets in your Rogue air rifle.
• NEVER reuse ammunition.
• Do not shoot at hard surfaces or at the surface of water. The bullet may bounce
off or ricochet and hit someone or something you had not intended to hit.
• Place the backstop in a location that will be safe should the backstop fail.
Fig. 17
Fig. 18
Fig. 20B
Fig. 20A
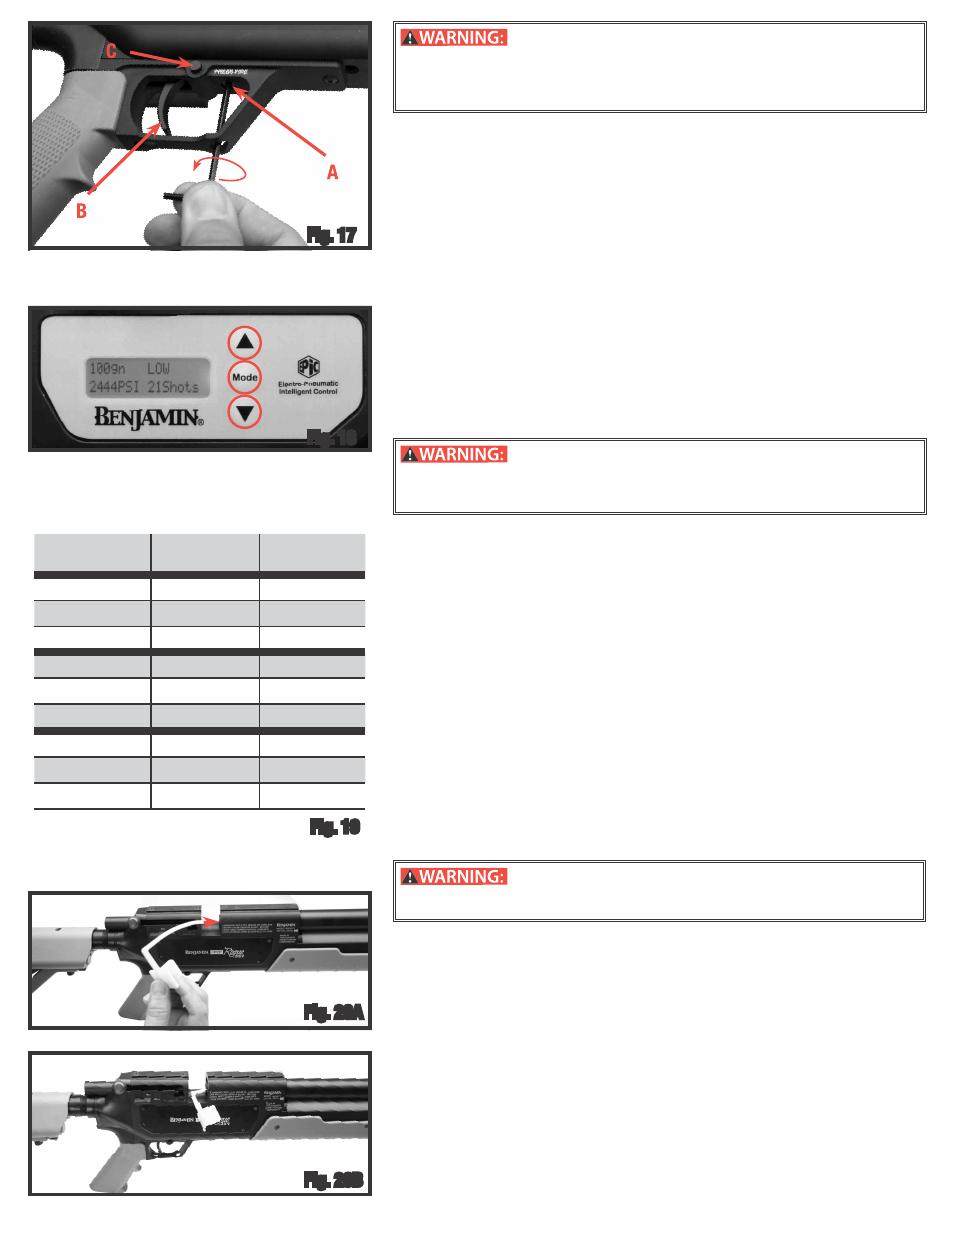
Program
Starting
Pressure PSI
Ending Pres-
sure PSI
170 HIGH
3000
2600
170 MED
3000
2100
170 LOW
3000
1550
145 HIGH
3000
2700
145 MED
3000
2300
145 LOW
2700
1600
100 HIGH
3000
2400
100 MED
2600
1700
100 LOW
2200
1250
Fig. 19