On safe” “off safe – Crosman BPE3571 User Manual
Page 5
5
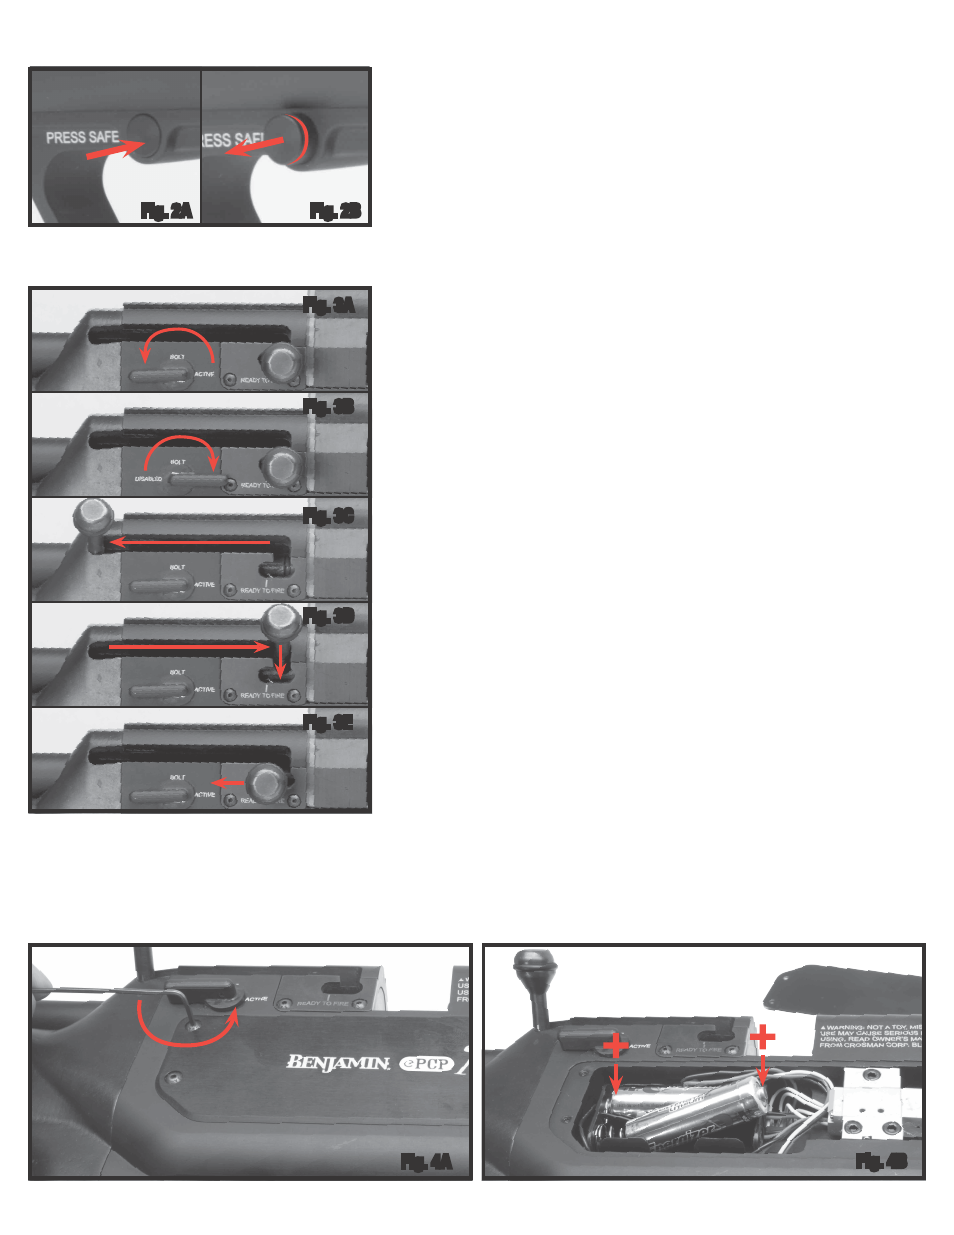
2. Operating the Cross Block Safety
The words PRESS FIRE and PRESS SAFE are on the top of the trigger guard. The
PRESS FIRE and PRESS SAFE indicate the safety condition when pressed flush with
the trigger guard
(Fig 2A).
A. To Put the Airgun “ON SAFE”:
• Locate the safety at the top of the trigger guard.
• The safety is ON and the airgun is “ON SAFE” when the safety button is pushed from
the left to the right (No Red Showing)
(Fig 2A).
B. To Take the Airgun “OFF SAFE”:
• The safety is OFF and the airgun is “OFF SAFE” when the safety button is pushed
from the right to the left (Red Showing)
(Fig 2B).
• When the airgun is “OFF SAFE,” the trigger can be pulled and the airgun can be fired
if it is charged (filled) with air or nitrogen, loaded, and the bolt is in the correct posi-
tion, all of which are described in the following instructions (Sections 6,8).
Like all devices, an airgun safety can fail. Even when the safety is “ON SAFE”, you
should continue to handle the airgun safely.
NEVER point the airgun at any person.
NEVER point the airgun at anything you do not intend to shoot.
3. Operating the Bolt Activation Lever
The small lever underneath the bolt handle
(Fig. 3A) is used to activate and deacti-
vate the bolt
(Fig. 3B). This is a safety feature for use when the airgun is charged and
loaded. Your must first understand the operation of the bolt.
Note: The LCD screen will not be visible when the bolt is in the “READY TO FIRE” position.
When the bolt handle is moved rearward
(Fig. 3C), the EPiC™ display will be visible.
When the bolt handle is moved forward, a bullet will be loaded from the clip (if a loaded
clip is in place) into the chamber
(Fig. 3D). The bolt handle then needs to be moved or
rotated downward
(Fig. 3D) and then back rearward into the “READY TO FIRE” posi-
tion
(Fig. 3E).
After loading a bullet into the chamber and unless you are in a stationary position waiting or
ready to fire the airgun, the bolt handle should be kept in the downward and forward posi-
tion “NOT READY TO FIRE”
(Fig. 3B) and the bolt activation lever should be rotated fully
clockwise so the word “DISABLED” is visible. This prevents the bolt from moving intentionally
or unintentionally into the “READY TO FIRE” position and prevents you from firing the airgun.
Thus, whenever you are walking or moving with this airgun when it is charged and loaded,
you should always keep the Bolt Activation Lever in the position so the word “DISABLED”
is visible.
When you are in a stationary position and ready to fire, rotate the Bolt Activation
Lever 180 degrees counter-clockwise so the word “ACTIVE” is visible. You must then move
the bolt handle rearward to the “READY TO FIRE” position to be able to fire the airgun.
Note: You should also keep the bolt in the “DISABLED” position whenever you are filling
your airgun with air or nitrogen. In addition to preventing any movement of the bolt, this
will insure the airgun does not vent air or nitrogen through the valve and waste your air
pressure.
The Bolt Activation Lever is not a substitute for the cross block safety. The cross block
safety should be kept “ON SAFE” at all times and should be moved to “OFF SAFE” only
when you are ready to shoot.
4. Installing AA Batteries (not included) (Lithium AA recommended)
A. Lay the airgun flat with right side facing up (Fig. 4A).
B. Remove the right side cover screws with a .0625 in. allen wrench.
C. Remove cover.
D. Install batteries as shown (Fig. 4B).
E. Replace cover and install screws to hand tight.
F. Confirm safety is “ON SAFE” then move the bolt handle to the forward position and
downward position “NOT READY TO FIRE” and check the EPiC™ display screen.
Fig. 3A
Fig. 3B
Fig. 3D
Fig. 3E
Fig. 3C
Fig. 2A
Fig. 2B
“ON SAFE”
“OFF SAFE”
Fig. 4B
Fig. 4A