Table 1-1. common switch settings – Comtrol API (6508) for the MS-DOS User Manual
Page 6
6
Installating RocketPort/ISA Systems
Installating RocketPort/ISA Systems
Note: Press <
F1
> on any item for button-sensitive Help.
5.
Select the
I/O
address range for each RocketPort series controller.
a.
Use the<Tab> key and the <
ALT
> <Down Arrow> key combination or
<click> on the arrow next to the
I/O
Address Range box to view the
I/O
address ranges.
b.
Use an <Arrow> key or the mouse cursor to highlight the
I/O
range you
want to select.
c.
Press <Enter> or <Click> to execute the selection.
The
I/O
address identifies the location in the system’s
I/O
space used to pass
control information between the system and the controller.
For the first controller, you will select a 68-byte
I/O
address range. For
subsequent controllers, you will select a 64-byte range.
Most peripherals use
I/O
address ranges between 0 and 3FF hexadecimal.
If you have peripherals installed above 400h, you may experience an
I/O
conflict.
RocketPort controllers use
I/O
address ranges at 400h intervals above the
I/O
address range. Make sure that other peripherals in the system do not
use these
I/O
address ranges. See Table 3-1 for information about common
I/O
usage.
4.
Enter a path name for the
API
directory, if you do not want to use the
default path,
\ROCKET
.
5.
Select an interrupt (
IRQ
) for the controller that does not conflict with an
existing interrupt.
6.
Select <Ok to Install>.
7.
Select <
OK
> at the confirmation screen.
8.
Set the
DIP
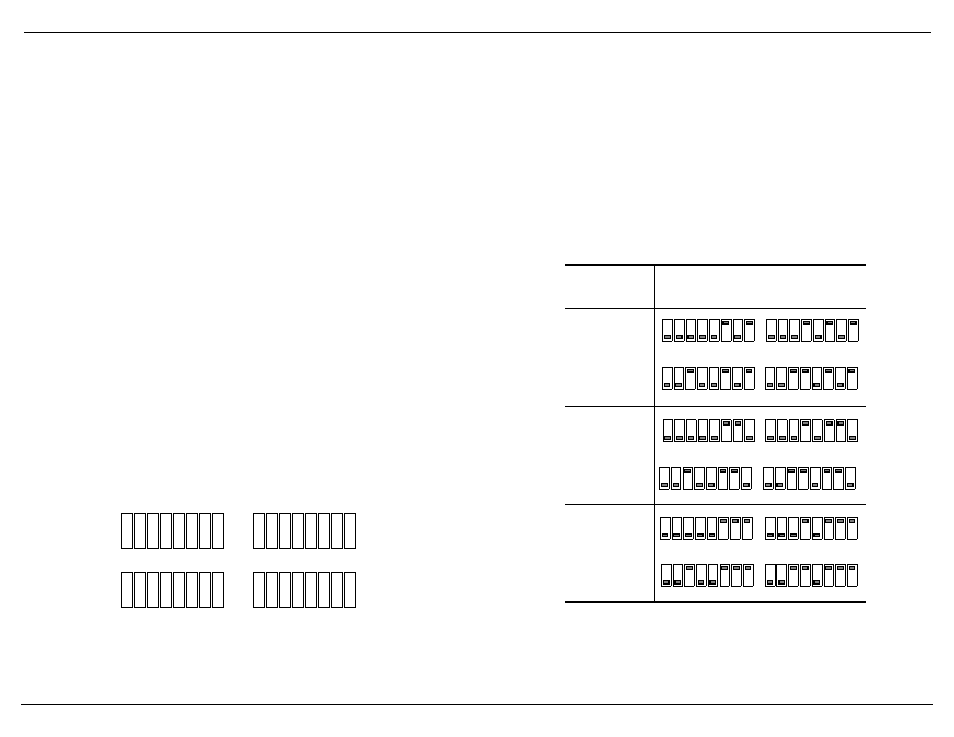
switches on the controller as directed in the summary screen.
You may want to fill in the blank switches provided for you or place a check
mark in Table 1-1, which illustrates common
I/O
ranges.
Press <
ENTER
> to view the
DIP
switch settings for additional controllers.
Notes: You may want to set the
DIP
switches for the controllers while
looking at the summary screen.
You can also use the
\ROCKET\INSTALL.LOG
file to set the switches,
if you do not set them at this time.
9.
Make sure that you note the line that you must add to the
AUTOEXEC.BAT
file. For example:
SET ROCKETCFG=C:\ROCKET\CONFIG.DAT
This path is the same path where the
API
is installed.
Note: After you create your own applications, you may need to change the
configuration file (see Subsection 2.3).
10. When your cursor returns to the
DOS
prompt, remove the diskette from the
drive.
11. Edit the
AUTOEXEC.BAT
file as directed in Step 9.
Go to the next subsection to install the controller.
ON
1
2
3
4
5
6
7
8
ON
1
2
3
4
5
6
7
8
ON
1
2
3
4
5
6
7
8
ON
1
2
3
4
5
6
7
8
Controller #1
Controller #2
Controller #3
Controller #4
Table 1-1. Common Switch Settings
Controller
#1
I/O
Address
Range
DIP
Switch Settings
Controller #1 determines other
controller settings
100 - 143 hex
140 - 183 hex
180 - 1C3 hex
(Default)
1st ISA
2nd ISA
ON
1
2
3
4
5
6
7
8
ON
1
2
3
4
5
6
7
8
ON
1
2
3
4
5
6
7
8
ON
1
2
3
4
5
6
7
8
3rd ISA
4th ISA
1st ISA
2nd ISA
ON
1
2
3
4
5
6
7
8
ON
1
2
3
4
5
6
7
8
ON
1
2
3
4
5
6
7
8
ON
1
2
3
4
5
6
7
8
3rd ISA
4th ISA
1st ISA
2nd ISA
ON
1
2
3
4
5
6
7
8
ON
1
2
3
4
5
6
7
8
1
2
3
4
5
6
7
8
1
2
3
4
5
6
7
8
3rd ISA
4th ISA