23. calibration, 25. equipment preparation, 27. reference adjust – Fluke 2180A User Manual
Page 34: 29. reference adjust (+v), 31. zero adjust, Calibration -4, Equipment preparation -4, Reference adjust -4, Reference adjust (+v) -4, Zero adjust -4
Attention! The text in this document has been recognized automatically. To view the original document, you can use the "Original mode".
2180A
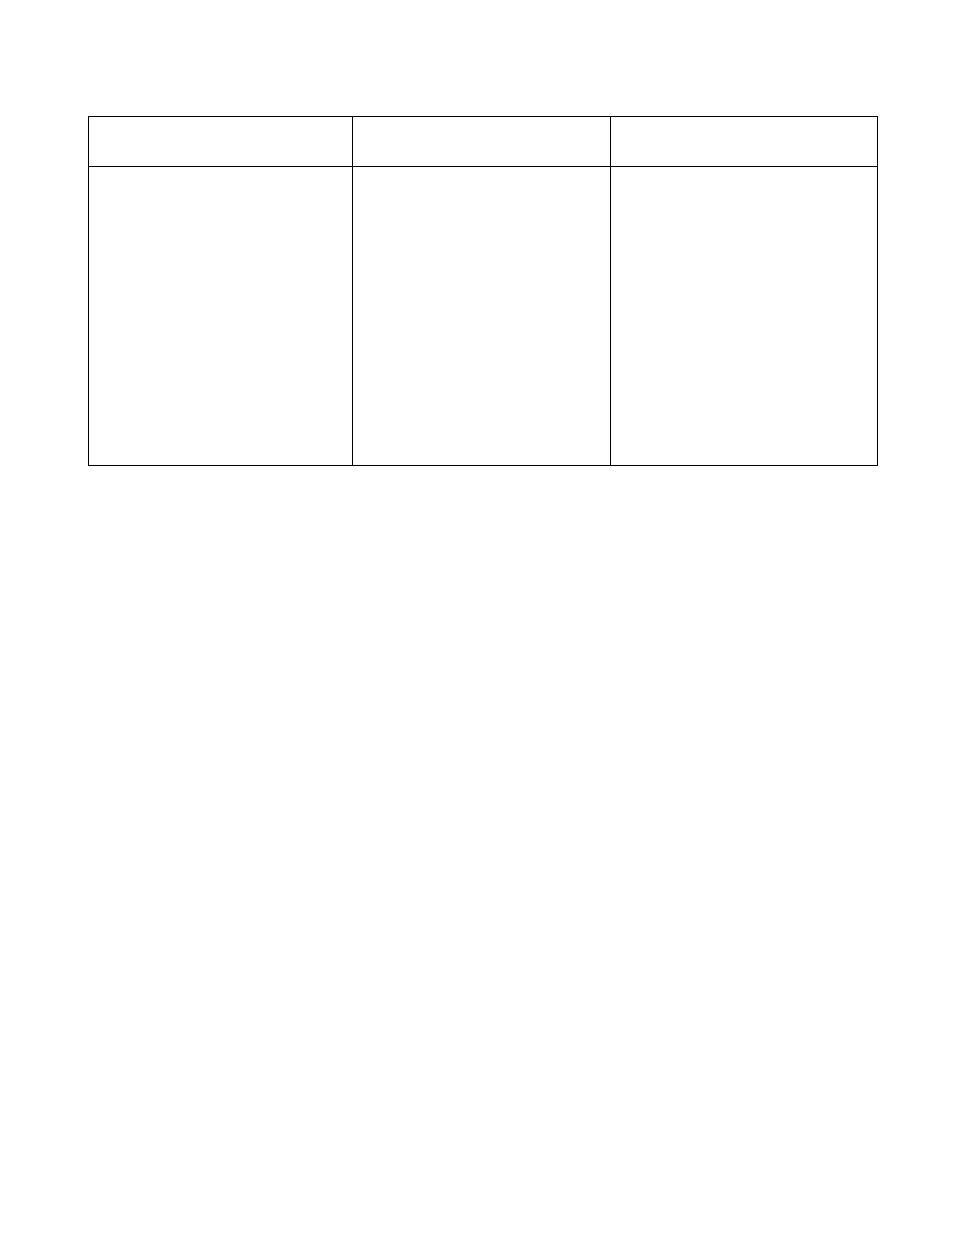
Table 4-2. Recommended Test Equipment
TEST EQUIPMENT
MINIMUM USE
SPECIFICATIONS
RECOMMENDED
MODEL
Variable Line-Voltage
Transformer
100,120, 220, 240V ac, as required,
±10%
General Radio VARIAC W5HM
Decade Resistance Box
.01Ì2 resolution
General Radio 1433T,
ESI Model RS925A, or
equivalent
Voltage Divider
100:1
Fluke Y2022 or equivalent
Calibrator (DC Source)
10
m
V resolution
Fluke 343A or equivalent
Digital Voltmeter (±100
m
V)
100
m
V resolution, on 10V range
Fluke 8800A or equivalent
Lag Bath
Temperature Stable, .01° resolution
Customer Constructed. (See Lag
Bath Construction, this section)
4-23. CALIBRATION
4-24. The thermometer should be calibrated at either
90-day or annual periods, depending upon the accuracy
desired, and any time that repairs are made to the
instrument. Conversion between Fahrenheit and Celsius
scales is realized through a mathematical computation by
the microcomputer. Calibration in °F is recommended.
Calibration in either scale (° F or °C) insures the accuracy
of the other. Either scale can be verified by executing the
Performance Test.
4-25. Equipment Preparation
4-26. Prepare the equipment for calibration using the
following procedure:
1. Remove the top cover from the instrument.
2. Apply power to 2180A and all test equipment to
be used. Insure the 2180A warm-up period has been
sufficient to reach rated accuracy (at least 20 minutes).
3.
Select the desired temperature scale (°C or °F).
If the Limits Option is installed select the LIMITS
or >) function.
NOTE
Before removing the RTD Input Module,
power switch to OFF.
set
CAUTION
Do not connect analog common (OV) to digital
common (-15V with respect to analog
common). Instrument damage may result.
4-27. Reference Adjust
4-28. Perform Reference Adjust using the following
procedure:
1.
Connect the DVM between TP 16 and TPl
(Analog Common).
2. Adjust R7 for a reading of 6.2V ±100
pN.
4-29. Reference Adjust (+V)
4-30. Perform the Reference Adjust for the ±V using
the following procedure:
1. Connect the DVM to TP 17 (HI) and TPl (LO -
Analog Common).
2.
Adjust R44 to obtain a reading of 6.2V ±100
m
V.
4-31. Zero Adjust
4-32. Perform the Zero Adjust using the following
procedure:
1.
Connect the 2180A Digital Thermometer, DC
Voltage Calibrator, and Voltage Divider as
illustrated in Figure 4-3.
2.
On the RTD Input Module, place a jumper
between -V and -S on TBl. Select AUTO (S2 on
the Input PCB).
4-4