I “i »1 i – Kenmore 106.511800 User Manual
Page 16
Attention! The text in this document has been recognized automatically. To view the original document, you can use the "Original mode".
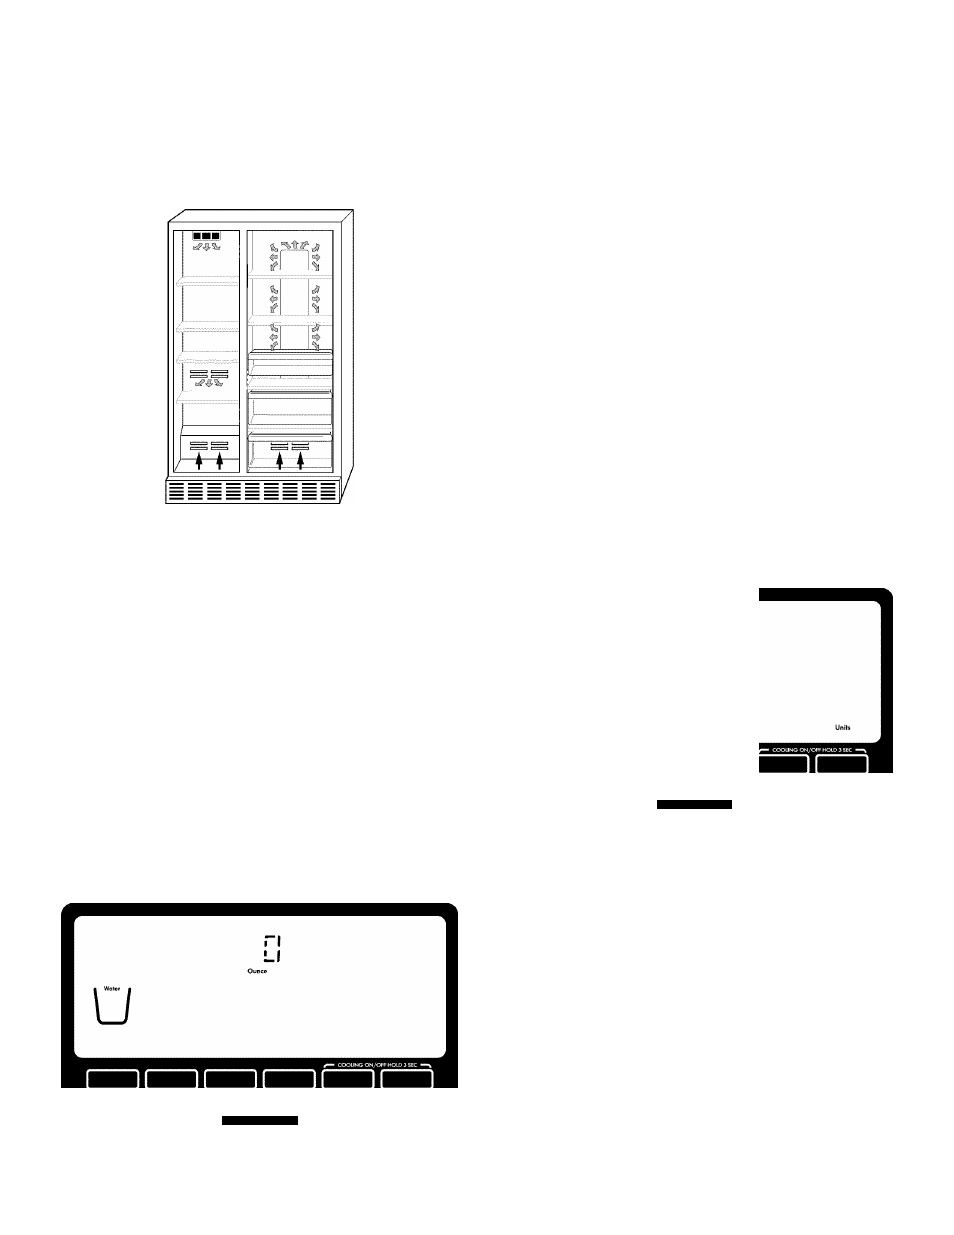
Dual evaporation results in higher humidity, which helps keep
foods in the refrigerator from spoiling os quickly and improves
food quality and freshness in the freezer due to decreased
freezer burn. In addition, the dual evaporation system helps
keep food smells in the refrigerator from transferring to ice in
the freezer.
Air circulates through vents within each compartment, and does
not transfer between the compartments.
Adjusting the Controls
Do not block any of these vents with food such os soda, cereal,
bread, etc. If the vents ore blocked, airflow will be obstructed
and temperature and moisture problems may occur.
NOTE: The dual evaporation system is always activated when
your refrigerator is operating. You do not need to press any
buttons to turn it on.
The refrigerator and freezer controls ore located on the
dispenser panel.
IMPORTANT: The display screen on the dispenser control panel
will turn off automatically and enter “sleep” mode when the
control buttons and dispenser pod hove not been used for
2 minutes or more. While in “sleep” mode, the first press of o
control button will only reactivate the display screen, without
changing any settings. After reactivation, changes to any
settings con then be mode. If no changes ore mode within
2 minutes, the display will re-enter “sleep” mode.
■ Touch any control button on the dispenser panel to activate
the display screen. The home screen will appear os shown.
For your convenience, your refrigerator and freezer controls ore
preset at the factory. When you first install your refrigerator,
moke sure that the controls ore still set to the “mid-settings.” The
factory recommended set points ore 37°F (3°C) for the
refrigerator and 0°F (-18°C) for the freezer.
IMPORTANT:
■
Wait 24 hours before you put food into the refrigerator. If
you odd food before the refrigerator has cooled completely,
your food may spoil.
NOTE: Adjusting the set points to o colder than
recommended setting will not cool the compartments any
faster.
■
If the temperature is too worm or too cold in the refrigerator
or freezer, first check the air vents to be sure they ore not
blocked before adjusting the controls.
■
The preset settings should be correct for normal household
usage. The controls ore set correctly when milk or juice is os
cold os you like and when ice cream is firm.
■
Wait at least 24 hours between adjustments. Recheck the
temperatures before other adjustments ore mode.
To view and adjust the set points, press and hold the
TEMPERATURE button for 3 seconds. When adjust mode is
activated, adjusting information will appear on the display
Recommended Temp
"I “I
»1 I
Dispense Water
Dispense Water
NOTE: To view Celsius temperatures, press the MEASURED FILL
button when adjust mode is activated. To return the display
setting to Fahrenheit, press MEASURED FILL again.
■
When adjust mode is activated, the display screen shows
the refrigerator set point and “REFRIGERATOR” appears.
■
Press SETTINGS to raise the set point, or press
TEMPERATURE to lower the set point.
■
When you hove finished viewing (and adjusting if desired)
the refrigerator set point, press LIGHT to change the display
to show the freezer set point. When the zone has been
changed, “FREEZER” appears on the display screen.
■
Press SETTINGS to raise the set point, or press
TEMPERATURE to lower the set point.
■
When you hove finished viewing (and adjusting if desired)
both the refrigerator and freezer set points, press LOCK to
save the settings.
16