Select picture to print, Select ‘multi print, Ct‘print start – Panasonic DMC-TZ2 User Manual
Page 39: Select item, To cancel print press ‘menu/ set
Attention! The text in this document has been recognized automatically. To view the original document, you can use the "Original mode".
Gónnéciing
with/òther
dèvices':/;
1
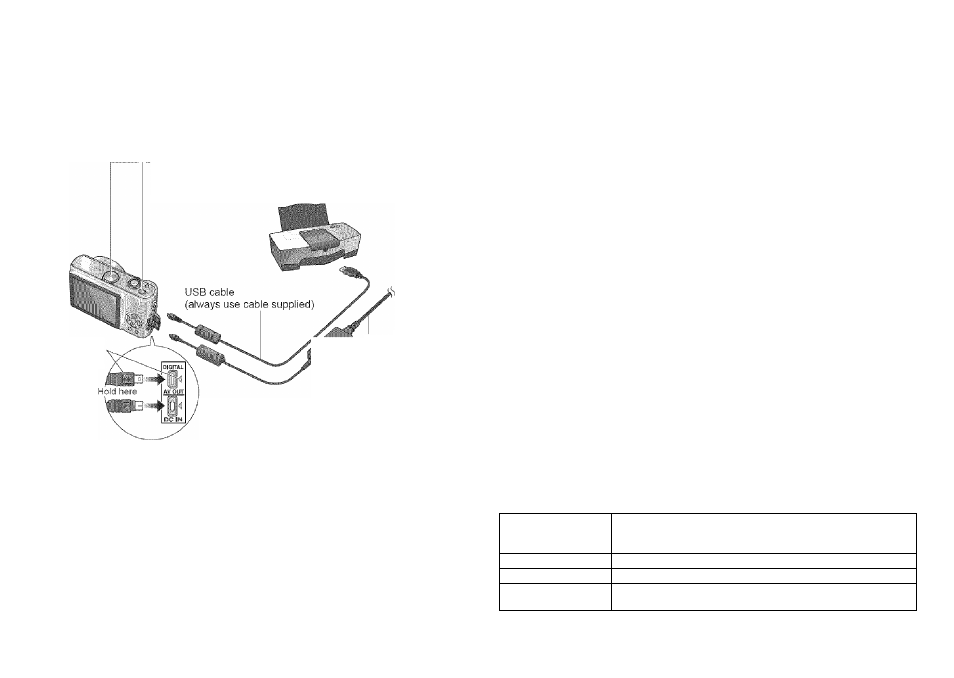
You can connect directly to a PictBridge-compatible printer for printing.
Preparations:« Ensure that you have a sufficiently-charged battery, or an AC adaptor
(DMW-AC5PP, sold separately).
• Remove memory card to use pictures in built-in memory.
• Adjust settings on your printer (print quality, etc) as required.
—®Turn on power of both
camera
and printer
- i2)Set to
©Connect camera to printer
(4)Operate camera to
print pictures (see right)
IPrinting single
pictures
Select picture to print
,----------------- ,
I,
!""Y-
¡Printing multiple pictures
Select ‘MULTI PRINT’
m
1
I
ct‘PRINT START’
PRINT WITH DATE
!i CfF
NUM OF PRINTS
i 1.... '
PAPER SIZE
^
PAGE LAYOUT
ii ■
Select item
Align marks
and insert
using AC adaptor,
jrn off camera
power before
plugging in or
removing.
•Check socket direction and insert straight in.
(Damage to socket shape can lead to faulty
operation.)
■#Do not use any other USB connection cables except the supplied one.
• Do not disconnect the USB cable when the cable disconnection icon ^ is displayed
(may not be displayed with some printers).
• Turn off power and disconnect USB cable before inserting or removing memory cards.
• If you have connected the camera without setting it to remove the USB cable,
and set the camera to ^ before reconnecting. (Power may need to be reset on some
printers.)
• if you change to a different mode after connecting, an error message will be displayed.
Set the mode dial back to
£k,
cancel any printing, and disconnect the USB cable.
#To print clipboard pictures, first copy (P.60) to the memory card.
• If the battery display flashes red, cancel printing and disconnect the USB cable
(reconnect again after charging battery).
•An orange # displayed during printing indicates an error message. Check the printer.
• Print may be divided into different stints if printing several pictures.
(Remaining sheets display may differ from set number.)
■To cancel print Press ‘MENU/
SET’
• Print settings ^ (P.78)
• Disconnect USB cable after printing.
o
See below for details
Select ‘PRINT START’
PRINT WITH DATE
flUM. OF PRINTS
P/\PERSI2E
PAGE LAYOUT
________ i
Alb :
OFF
"
I
____ %
Select ‘YES’ if print confirmation
screen is displayed.
■Multiple picture printing items
MULTI SELECT
Scroll between pictures with -4 ►, select pictures with
T /A
displayed) to print. Press
T
again to release selection.
Press ‘MENU/SET’ when selection is complete.
SELECTALL
Print all pictures.
DPOF PICTURE
Print pictures selected in ‘DPOF PRINT’. (P.68)
FAVORITE
Print pictures selected as ‘FAVORITE’.
(Displayed if ‘FAVORITE’ (P.65) set)
76
VQT1B61
VQT1B61
77